Linux-CentOS-7—— 安装MySQL 8
文章目录
- Linux-CentOS-7—— 安装MySQL 8
- 安装之前先卸载之前软件和残留文件
- 1. 使用 wget 下载 mysql 8 的 Yum 仓库包
- 2. 安装 mysql 仓库包
- 3. 绕过 RPM 包的 GPG 签名验证
- 4. 安装 mysql 8 服务器
- 5. 启动 mysql 服务
- 6. 获取 mysql 临时密码
- 7. 登录 mysql
- 8. 修改 mysql 登录密码
- 8.1 设置弱口令密码登录数据库(可选)
- 9. 授权远程用户登录
- 10. 配置 mysql 配置文件
- 11. 查看 MySQL 监听的端口
- 12. 防火墙配置(CentOS-7 防火墙)
- 12. 远程登录 mysql
- 12.1 其他补充
Linux-CentOS-7—— 安装MySQL 8
备注:在安装MySQL之前,先确保系统环境能够联网,使用的是root用户权限。
安装之前先卸载之前软件和残留文件
清理旧版本和残留文件能确保 MySQL 全新安装,减少兼容性问题,提高稳定性。
在 CentOS 7 安装 MySQL 前卸载旧版本并清理残留文件的主要原因:
- 避免冲突:防止旧版 MySQL/MariaDB 与新版本冲突,导致无法启动或运行异常。
- 配置文件干净:旧版
my.cnf可能不兼容新版,清理后确保配置正确。- 数据安全:防止旧数据干扰新安装,避免数据损坏或混乱。
- 依赖关系正确:确保 YUM/RPM 能正确安装新版本,不被旧包影响。
- 系统稳定:避免残留服务或文件占用资源,导致性能问题。
rpm -qa | grep mysql
rpm -qa | grep mariadb
yum remove mysql mysql-server mariadb*
rm -rf /var/lib/mysql && rm -rf /etc/my.cnf
1. 使用 wget 下载 mysql 8 的 Yum 仓库包
要添加 MySQL 官方提供的 Yum 仓库,可以通过下载并安装一个特殊的 RPM 包来实现
CentOS 7默认Yum仓库不包含MySQL 8
- CentOS 7的默认Yum仓库提供的是MariaDB(MySQL的分支版本),而非Oracle官方的MySQL。
- 若直接运行
yum install mysql-server来安装MySQL是不行的。
wget https://dev.mysql.com/get/mysql80-community-release-el7-7.noarch.rpm
[root@localhost ~]# wget https://dev.mysql.com/get/mysql80-community-release-el7-7.noarch.rpm
--2025-04-06 09:37:06--  https://dev.mysql.com/get/mysql80-community-release-el7-7.noarch.rpm
Resolving dev.mysql.com (dev.mysql.com)... 92.122.104.233, 2600:1415:12:583::2e31, 2600:1415:12:59a::2e31
Connecting to dev.mysql.com (dev.mysql.com)|92.122.104.233|:443... connected.
HTTP request sent, awaiting response... 302 Moved Temporarily
Location: https://repo.mysql.com//mysql80-community-release-el7-7.noarch.rpm [following]
--2025-04-06 09:37:08--  https://repo.mysql.com//mysql80-community-release-el7-7.noarch.rpm
Resolving repo.mysql.com (repo.mysql.com)... 104.83.120.179, 2a02:26f0:fd00:2b4::1d68, 2a02:26f0:fd00:2b3::1d68, ...
Connecting to repo.mysql.com (repo.mysql.com)|104.83.120.179|:443... connected.
HTTP request sent, awaiting response... 200 OK
Length: 11196 (11K) [application/x-redhat-package-manager]
Saving to: ‘mysql80-community-release-el7-7.noarch.rpm’100%[==========================================================================>] 11,196      --.-K/s   in 0s      2025-04-06 09:37:08 (261 MB/s) - ‘mysql80-community-release-el7-7.noarch.rpm’ saved [11196/11196][root@localhost ~]# ls
anaconda-ks.cfg  mysql80-community-release-el7-7.noarch.rpm
[root@localhost ~]#
mysql80-community-release-el7-8.noarch.rpm是一个用于在CentOS/RHEL 7系统上配置MySQL8.0官方软件源的安装包。通过安装这个RPM包,可以轻松地使用yum命令来管理MySQL 8.0的安装、更新和卸载。文件名各部分的含义:
mysql80表示这是MySQL 8.0版本的配置包community-release说明这是MySQL社区版(免费开源版本)的发布包el7表示适用于RHEL/CentOS 7系列操作系统8是这个仓库配置包的版本号noarch.rpm表示这是与系统架构无关的RPM包,可以在任何CPU架构的CentOS 7系统上安装
2. 安装 mysql 仓库包
将 MySQL 8.0 的软件源配置集成到系统的 yum 包管理中,安装后会在/etc/yum.repos.d/目录生成mysql-community.repo等配置文件,后续就能通过 yum 命令方便地安装 MySQL 相关软件包。
rpm -ivh mysql80-community-release-el7-7.noarch.rpm
[root@localhost ~]# rpm -ivh mysql80-community-release-el7-7.noarch.rpm
warning: mysql80-community-release-el7-7.noarch.rpm: Header V4 RSA/SHA256 Signature, key ID 3a79bd29: NOKEY
Preparing...                          ################################# [100%]
Updating / installing...1:mysql80-community-release-el7-7  ################################# [100%]
[root@localhost ~]#
[root@localhost ~]# ll /etc/yum.repos.d/
total 56
-rw-r--r--. 1 root root 2523 Apr  6 07:11 CentOS-Base.repo
-rw-r--r--. 1 root root 1664 Oct 23  2020 CentOS-Base.repo.backup
-rw-r--r--. 1 root root 1309 Oct 23  2020 CentOS-CR.repo
-rw-r--r--. 1 root root  649 Oct 23  2020 CentOS-Debuginfo.repo
-rw-r--r--. 1 root root  314 Oct 23  2020 CentOS-fasttrack.repo
-rw-r--r--. 1 root root  630 Oct 23  2020 CentOS-Media.repo
-rw-r--r--. 1 root root 1331 Oct 23  2020 CentOS-Sources.repo
-rw-r--r--. 1 root root 8515 Oct 23  2020 CentOS-Vault.repo
-rw-r--r--. 1 root root  616 Oct 23  2020 CentOS-x86_64-kernel.repo
-rw-r--r--. 1 root root 1147 Aug 26  2022 mysql-community-debuginfo.repo
-rw-r--r--. 1 root root 2062 Aug 26  2022 mysql-community.repo
-rw-r--r--. 1 root root 2132 Aug 26  2022 mysql-community-source.repo
[root@localhost ~]#
3. 绕过 RPM 包的 GPG 签名验证
尝试强制安装MySQL服务端软件包(跳过安全验证),防止因为 GPG 密钥检查失败导致的安装问题
yum install -y mysql-server --nogpgcheck
[root@localhost ~]# yum install -y mysql-server --nogpgcheck
Loaded plugins: fastestmirror
Loading mirror speeds from cached hostfile* base: mirrors.aliyun.com* extras: mirrors.aliyun.com* updates: mirrors.aliyun.com
Package mysql-community-server-8.0.41-1.el7.x86_64 already installed and latest version
Nothing to do
[root@localhost ~]#
--nogpgcheck 的作用:
- 该参数本应跳过 GPG 签名验证强制安装,但因软件已存在,未实际触发。
因为之前已经安装过了,所以最后结果出现
Nothing to do
4. 安装 mysql 8 服务器
yum install -y mysql-community-server
[root@localhost ~]# yum install -y mysql-community-server
Loaded plugins: fastestmirror
Loading mirror speeds from cached hostfile* base: mirrors.aliyun.com* extras: mirrors.aliyun.com* updates: mirrors.aliyun.com
Package mysql-community-server-8.0.41-1.el7.x86_64 already installed and latest version
Nothing to do
[root@localhost ~]#
因为之前已经安装过了,所以最后结果出现
Nothing to do
5. 启动 mysql 服务
启动MySQL服务,再设置开机自启动MySQL服务(确保MySQL服务是 running 运行状态,否则后面不能获取到有效的临时密码)
systemctl start mysqld
systemctl enable mysqld
systemctl status mysqld
[root@localhost ~]# systemctl start mysqld				# 启动MySQL服务
[root@localhost ~]# systemctl enable mysqld				# 设置MySQL服务开机自启动
[root@localhost ~]# systemctl status mysqld				# 查看MySQL服务状态
● mysqld.service - MySQL ServerLoaded: loaded (/usr/lib/systemd/system/mysqld.service; enabled; vendor preset: disabled)Active: active (running) since Sun 2025-04-06 09:45:53 EDT; 10s agoDocs: man:mysqld(8)http://dev.mysql.com/doc/refman/en/using-systemd.htmlMain PID: 1463 (mysqld)Status: "Server is operational"CGroup: /system.slice/mysqld.service└─1463 /usr/sbin/mysqldApr 06 09:45:48 localhost.localdomain systemd[1]: Starting MySQL Server...
Apr 06 09:45:53 localhost.localdomain systemd[1]: Started MySQL Server.
[root@localhost ~]#
6. 获取 mysql 临时密码
grep 'temporary password' /var/log/mysqld.log
一般都会返回一串无规律的字符串(密码),如果没有返回则为空密码
[root@localhost ~]# grep 'temporary password' /var/log/mysqld.log
2025-04-06T13:45:50.071883Z 6 [Note] [MY-010454] [Server] A temporary password is generated for root@localhost: 75DmSkunGn()
[root@localhost ~]#
root@localhost:
75DmSkunGn()就是登录密码,,复制一下,下面登录需要 (密码是随机生成的,不要复制到前面的空格,它是没有空格密码的)
7. 登录 mysql
这里登录需要用到上面的临时密码(就是不规则的字符串),也就是初始密码。如果临时密码生成有带有 特殊符号 需要单引号包裹(密码含特殊字符时需用单引号包裹)。
mysql -uroot -p'75DmSkunGn()'
[root@localhost ~]# mysql -uroot -p'75DmSkunGn()'
Enter password:
Welcome to the MySQL monitor.  Commands end with ; or \g.
Your MySQL connection id is 9
Server version: 8.0.41Copyright (c) 2000, 2025, Oracle and/or its affiliates.Oracle is a registered trademark of Oracle Corporation and/or its
affiliates. Other names may be trademarks of their respective
owners.Type 'help;' or '\h' for help. Type '\c' to clear the current input statement.mysql>
mysql -uroot -p'75DmSkunGn()'说明:
mysql
- MySQL 客户端程序,用于连接并操作 MySQL 服务器。
-uroot
-u参数指定用户名,root是 MySQL 的超级管理员账户。- 注意:参数与值之间无空格(
-uroot正确,-u root也允许,但前者更规范)。-p'75DmSkunGn()'
-p参数指定密码,密码需紧跟在-p后(无空格)。- 密码包含特殊字符(如
>、(、_等)时,必须用单引号包裹,否则会被 Shell 解析导致错误。- 安全风险:密码会暴露在命令历史中(可通过
history查看)。
8. 修改 mysql 登录密码
能连接登录进去数据库之后,修改登录密码。
备注:设置方便自己记忆的密码多数都是弱口令 (只适合练习环境)
alter user 'root'@'localhost' identified by 'Asd123..' ;
mysql> alter user 'root'@'localhost' identified by 'Asd123..' ;		-- 设置登录密码
Query OK, 0 rows affected (0.01 sec)mysql> quit				-- 退出当前连接数据库
Bye
[root@localhost ~]#
注意:默认密码策略要求包含数字、大小写字母、特殊字符、长度8位等。()
登出数据库之后使用刚刚修改的密码登录
mysql -uroot -pAsd123..
[root@localhost ~]# mysql -uroot -pAsd123..
mysql: [Warning] Using a password on the command line interface can be insecure.
Welcome to the MySQL monitor.  Commands end with ; or \g.
Your MySQL connection id is 11
Server version: 8.0.41 MySQL Community Server - GPLCopyright (c) 2000, 2025, Oracle and/or its affiliates.Oracle is a registered trademark of Oracle Corporation and/or its
affiliates. Other names may be trademarks of their respective
owners.Type 'help;' or '\h' for help. Type '\c' to clear the current input statement.mysql>
8.1 设置弱口令密码登录数据库(可选)
如果想改成弱口令,先把密码策略改一下再设置密码 (重启MySQL服务则,密码策略失效)
mysql> set global validate_password.policy=low;						-- 设置登录密码只验证长度(降低MySQL密码级别程度)
Query OK, 0 rows affected (0.00 sec)mysql> set global validate_password.length=6;						-- 设置登录密码位数长度
Query OK, 0 rows affected (0.00 sec)mysql> alter user 'root'@'localhost' identified by '123456' ;		-- 设置mysql的root用户的密码为123456
Query OK, 0 rows affected (0.00 sec)mysql> flush privileges;											-- 刷新权限
Query OK, 0 rows affected (0.01 sec)mysql> quit				-- 登出当前所连接的数据库
Bye
[root@localhost ~]#
登录数据库
[root@localhost ~]# mysql -uroot -p123456
mysql: [Warning] Using a password on the command line interface can be insecure.
Welcome to the MySQL monitor.  Commands end with ; or \g.
Your MySQL connection id is 11
Server version: 8.0.41 MySQL Community Server - GPLCopyright (c) 2000, 2025, Oracle and/or its affiliates.Oracle is a registered trademark of Oracle Corporation and/or its
affiliates. Other names may be trademarks of their respective
owners.Type 'help;' or '\h' for help. Type '\c' to clear the current input statement.mysql>
9. 授权远程用户登录
MySQL 5.7+ 版本开始不允许在 GRANT 语句中直接创建用户并设置密码 (8.0 更严格)
必须分两步:先创建用户 → 再授权
-- 示例:MySQL 8 不支持以下这种在给予权限同时创建用用户
grant all privileges on *.* to root@'%' identified by '123456';
% 表示任意地址,也可以指定 IP,可以远程登录;如果是 localhost,则不能远程登录,仅限于本地主机登录,不能远程登录。
建议新建一个用户,允许所有数据库和所有数据表的操作权限(练习环境)
mysql> create user 'admin'@'%' identified by '123456';		-- 创建一个用户(自定义,没有设置低级别密码策略就用强密码)
Query OK, 0 rows affected (0.00 sec)mysql> grant all privileges on *.* to 'admin'@'%' with grant option;	-- 授予admin用户所有权限
Query OK, 0 rows affected (0.01 sec)mysql> flush privileges;						-- 刷新权限
Query OK, 0 rows affected (0.01 sec)mysql> select user, host from mysql.user;		-- 查看用户表(host为 “%” 的都是可以远程的用户)
+------------------+-----------+
| user             | host      |
+------------------+-----------+
| admin            | %         |
| mysql.infoschema | localhost |
| mysql.session    | localhost |
| mysql.sys        | localhost |
| root             | localhost |
+------------------+-----------+
5 rows in set (0.00 sec)mysql>
10. 配置 mysql 配置文件
配置文件路径
/etc/my.cnf(Linux-CentOS-7系统)
[mysqld] # MySQL 服务器配置[client] # MySQL 客户端通用配置[mysql] # mysql 命令行工具配置
[root@localhost ~]# vim /etc/my.cnf					# 编辑mysql的配置文件
[root@localhost ~]# cat /etc/my.cnf					# 查看文件内容(手动添加的内容)
[mysqld]
#
# Remove leading # and set to the amount of RAM for the most important data
# cache in MySQL. Start at 70% of total RAM for dedicated server, else 10%.
# innodb_buffer_pool_size = 128M
#
# Remove the leading "# " to disable binary logging
# Binary logging captures changes between backups and is enabled by
# default. It's default setting is log_bin=binlog
# disable_log_bin
#
# Remove leading # to set options mainly useful for reporting servers.
# The server defaults are faster for transactions and fast SELECTs.
# Adjust sizes as needed, experiment to find the optimal values.
# join_buffer_size = 128M
# sort_buffer_size = 2M
# read_rnd_buffer_size = 2M
#
# Remove leading # to revert to previous value for default_authentication_plugin,
# this will increase compatibility with older clients. For background, see:
# https://dev.mysql.com/doc/refman/8.0/en/server-system-variables.html#sysvar_default_authentication_plugin
# default-authentication-plugin=mysql_native_passworddatadir=/var/lib/mysql					# 数据存储目录(默认位置,存储数据库文件)
socket=/var/lib/mysql/mysql.sock		# MySQL 本地通信的 socket 文件路径(用于本地客户端连接)log-error=/var/log/mysqld.log			# 错误日志路径(排查问题时优先查看此文件)
pid-file=/var/run/mysqld/mysqld.pid		# MySQL 进程ID文件路径(服务管理用)
#
# ---------------------------------------------------------------------------------------------------------- #
/* 下面都是手动添加上去的 */
character-set-server = utf8mb4			# 使用UTF-8MB4字符集,支持完整的Unicode包括emoji表情
collation-server = utf8mb4_unicode_ci	# 使用基于Unicode的排序规则,不区分大小写port=3306								# MySQL默认端口号
bind-address = 0.0.0.0					# 允许所有IP主机远程连接[client]
default-character-set = utf8mb4			# 客户端默认使用UTF-8MB4字符集[mysql]
default-character-set = utf8mb4			# MySQL命令行客户端默认使用UTF-8MB4字符集
[root@localhost ~]#
[root@localhost ~]# systemctl restart mysqld		# 重启mysql服务立即生效
配置完
/etc/my.cnf文件之后不要忘记重启mysqld服务。
11. 查看 MySQL 监听的端口
MySQL默认端口号是3306(可以改端口号),确保端口是开启状态
show variables like 'port';
mysql> show variables like 'port';
+---------------+-------+
| Variable_name | Value |
+---------------+-------+
| port          | 3306  |
+---------------+-------+
netstat -tulnp | grep mysql
[root@localhost ~]# netstat -tulnp | grep mysql
tcp        0      0 0.0.0.0:3306            0.0.0.0:*               LISTEN      1326/mysqld
tcp6       0      0 :::33060                :::*                    LISTEN      1326/mysqld
[root@localhost ~]#
12. 防火墙配置(CentOS-7 防火墙)
备注:如果已经关掉防火墙的,可直接忽略这一步 (
systemctl stop firewalld:关闭防火墙)
不做防火墙放行端口配置,外面的数据库连接工具是连不上MySQL服务端。
错误信息:
2002 - Can't connect to server on 'localhost' (10061)
表示客户端无法连接到 MySQL 服务器
firewall-cmd --zone=public --add-port=3306/tcp --permanent
firewall-cmd --reload
[root@localhost ~]# firewall-cmd --zone=public --add-port=3306/tcp --permanent		-- 放行3306端口
success
[root@localhost ~]# firewall-cmd --reload			-- 重新加载防火墙
success
[root@localhost ~]# firewall-cmd --list-all
public (active)target: defaulticmp-block-inversion: nointerfaces: ens33sources: services: dhcpv6-client sshports: 3306/tcpprotocols: masquerade: noforward-ports: source-ports: icmp-blocks: rich rules: [root@localhost ~]#
12. 远程登录 mysql
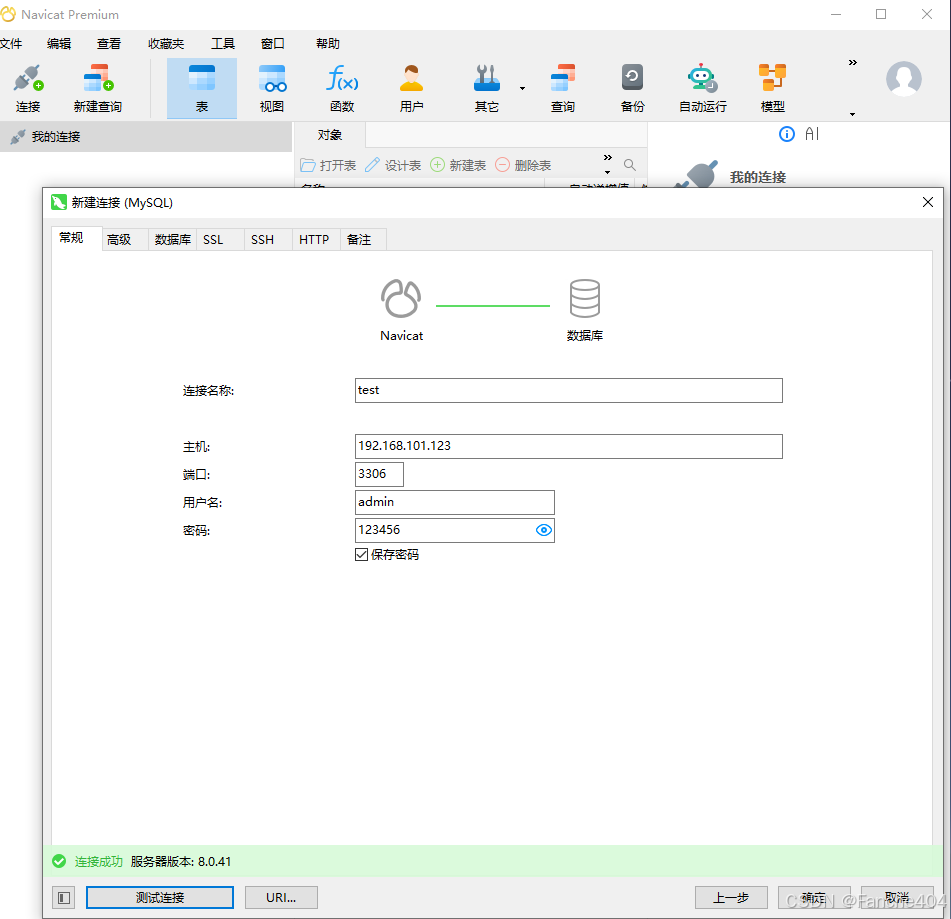
这里用 navicat 工具远程数据库,可以去navicat下一个试用的。
连接名称随便写,主机这里的话,如果是在Windows本地搭建的MySQL服务,就默认使用 localhost 即可,但是这里用的是VMware CentOS-7 搭建的MySQL服务器,所以这里的主机就是虚拟主机的IP地址。如果不指定有MySQL服务器的主机,会一直出现 2002 错误 ,换个角度来看就是找不到主机的MySQL服务。这里的用户名和密码就是上面自定义创建的用户,host必须是 % 才可以远程!最后点左下角的测试连接即可。如果一秒没有响应,那是不可能通的。
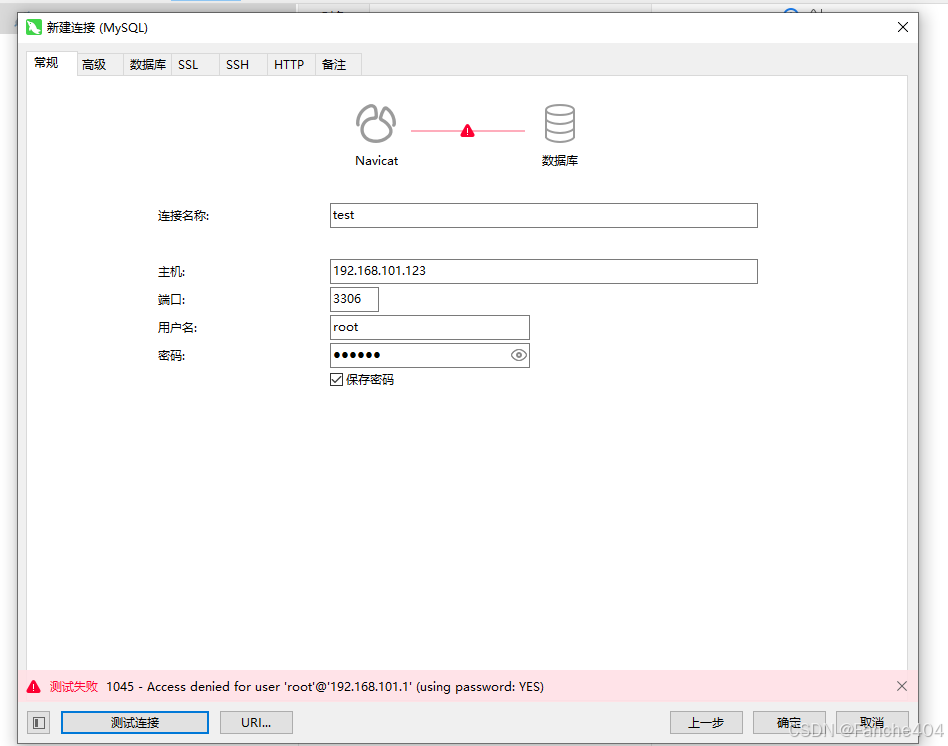
如果使用 root 用户登录会出现 1045 错误。这里可以看到 root 用户只有localhost 并没有 %,因此使用root用户登录会出现被拒绝登录的报错信息。(一般不建议使用root用户远程登录)
mysql> SELECT user, host FROM mysql.user;
+------------------+-----------+
| user             | host      |
+------------------+-----------+
| admin            | %         |
| mysql.infoschema | localhost |
| mysql.session    | localhost |
| mysql.sys        | localhost |
| root             | localhost |
+------------------+-----------+
错误信息:
1045 - Access denied for user 'root'@'192.168.101.1' (using password: YES)
表示 MySQL 服务器拒绝了来自 IP 地址 192.168.101.1 的用户 root 的访问请求。
12.1 其他补充
连接 MySQL 出现 2002 错误 或者 2003 错误都是无法连接到 MySQL 服务器
错误代码
2002:通常指无法通过本地套接字连接到MySQL服务器。
错误代码2003:通常指无法连接到MySQL服务器。
可能原因:
- MySQL 服务未运行(
2003 错误)- 启动MySQL服务
- socket 文件路径不正确或丢失(
2002 错误)- 确保 socket 文件路径一致
- 权限问题导致无法访问 socket 文件
- 尝试连接错误的服务器或端口(
2003 错误)- 确保端口对应正确且是启动状态
- 防火墙阻止连接(
2003 错误)- 防火墙放行3306端口或者关闭防火墙
mysql 登录出现 2002 的例子 (socket 文件路径不正确或丢失)
[root@aliyunhost ~]# mysql -uroot -p
Enter password:
ERROR 2002 (HY000): Can't connect to local MySQL server through socket '/storage/db/mysql/mysql.sock' (2)
[root@aliyunhost ~]#
socket文件路径在配置文件中设置不完整
这一般是由于修改了mysql配置 /etc/my.cnf 引起的。比如我们修改了配置文件中 [mysql] 选项下的 socket 参数,而未指定[client]、[mysql] 选项的socket参数,导致mysql使用默认的socket文件位置去寻找socket文件,从而导致未找到socket文件而引发此错误。
1. 确定 socket 文件正确位置
[root@aliyunhost ~]# ls /var/lib/mysql/mysql.sock
/var/lib/mysql/mysql.sock
[root@aliyunhost ~]#
[root@aliyunhost ~]# find / -name '*.sock'
/var/lib/gssproxy/default.sock
/var/lib/mysql/mysql.sock			# /var/lib/mysql/mysql.sock
/tmp/aliyun_assist_service.sock
/run/gssproxy.sock
/run/chrony/chronyd.sock
/run/rpcbind.sock
[root@aliyunhost ~]#
2. 修改 /etc/my.cnf 配置文件
在配置文件中添加 [client] 选项和 [mysql] 选项,
并使用这两个选项下的 socket 参数值,与 [mysqld] 选项下的“socket”参数值,指向的socket文件路径完全一致
[root@aliyunhost ~]# cat /etc/my.cnf
[mysqld]								# MySQL 服务器配置
port=3306
datadir=/var/lib/mysql
socket=/var/lib/mysql/mysql.sock		# 指向文件路径一致
symbolic-links=0
log-error=/var/log/mysqld.log
pid-file=/var/run/mysqld/mysqld.pid
#
[client]
default-character-set=utf8
socket=/var/lib/mysql/mysql.sock		# 客户端连接服务器使用的 Unix 套接字文件路径,与服务器保持一致
#
[mysql]									# MySQL 客户端通用配置
default-character-set=utf8
socket=/var/lib/mysql/mysql.sock		# mysql 命令行工具连接服务器使用的 Unix 套接字文件路径,与服务器保持一致[root@aliyunhost ~]#