Vue3 路由权限管理:基于角色的路由生成与访问控制
Vue3 路由权限管理:基于角色的路由生成与访问控制
一、核心概念
1.1 大致流程思路:
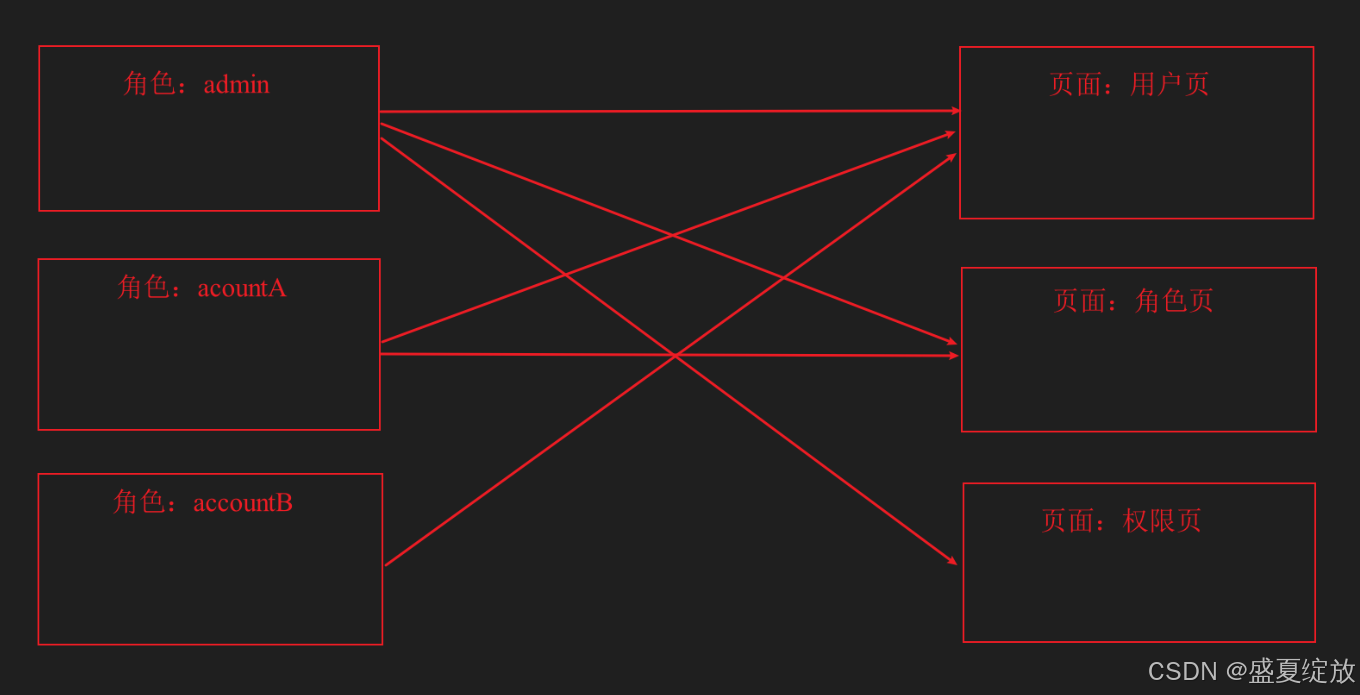
用户在登录完成的时候,后端给出一个此登录用户对应的角色名字,此时可以将这个用户的角色存起来(vuex/pinia)中,在设置路由时的meta字段中设置的roles属性如:roles: ['admin', 'accountA', 'accountB']----这就是每个页面能访问的角色名。至此为止,用户的角色名字我们拿到了,每个页面能访问的角色名字我们也知道了,接下来只需要去判断当前用户的角色名是否包含这些权限即可—这就需要交给导航守卫了:router.beforeEach((to, from, next) => {})。
1.2 核心组件对比表
| 组件 | 作用 | 示例 | 特点 |
|---|---|---|---|
| 静态路由 | 基础公共路由 | 登录页/404页 | 无需权限,初始加载 |
| 动态路由 | 权限控制路由 | 管理后台各页面 | 按需加载,角色过滤 |
| 路由守卫 | 访问控制 | beforeEach钩子 | 实时验证,安全屏障 |
| 状态管理 | 角色存储 | Vuex/Pinia | 全局共享,持久化 |
基于角色的路由权限管理系统主要包含以下几个核心部分:
-
静态路由:无需权限即可访问的路由(如登录页、404页)
-
动态路由:需要根据角色的权限进行控制是否显示的路由(如后台管理页面)。
-
角色权限配置:定义哪些角色可以访问哪些路由,如:
- 路由守卫:在路由跳转时进行权限验证
二、代码实现解析
1. 路由配置
// 静态路由 - 无需权限
const staticRoutes = [{path: '/login',name: 'Login',component: LoginView},{path: '/404',name: 'NotFound',component: NotFoundView}
];// 动态路由 - 要根据角色的权限进行显示
export const dynamicRoutes = [{path: '/admin',name: 'admin',component: HomeView,meta: {title: "首页",title_path: '/admin',sub_title: "后台管理",roles: ['admin', 'accountA', 'accountB'] // 修正为数组格式},children: [{path: 'user',name: 'user',component: UserView,meta: {title: "用户管理",title_path: '/admin/user',sub_title: "用户信息编辑",roles: ['admin', 'accountA', 'accountB'] // 修正为数组格式}},{path: 'role',name: 'role',component: RoleView,meta: {title: "角色管理",title_path: '/admin/role',sub_title: "角色信息编辑",roles: ['admin', 'accountA'] // 修正为数组格式}},{path: 'permis',name: 'permis',component: PermissView,meta: {title: "权限管理",title_path: '/admin/permis',sub_title: "权限信息编辑",roles: ['admin'] // 修正为数组格式}}]}
]
2. 路由初始化
const router = createRouter({history: createWebHistory(process.env.BASE_URL),routes: staticRoutes // 初始只加载静态路由
})
3. 动态路由添加
在用户登录后,根据角色动态添加路由:
// 过滤出用户有权限访问的路由
function filterRoutes(routes: RouteRecordRaw[], userRoles: string[]) {return routes.filter(route => {// 如果没有设置roles,则默认允许访问if (!route.meta?.roles) return true// 检查用户是否有任一所需角色return route.meta.roles.some(role => userRoles.includes(role))})
}// 添加动态路由
function addDynamicRoutes(userRoles: string[]) {const accessibleRoutes = filterRoutes(dynamicRoutes, userRoles)// 先移除可能已存在的动态路由router.getRoutes().forEach(route => {if (dynamicRoutes.some(dr => dr.name === route.name)) {router.removeRoute(route.name!)}})// 添加新路由accessibleRoutes.forEach(route => {router.addRoute(route)})
}
4. 路由守卫实现
router.beforeEach((to, from, next) => {const store = useStore()const userRoles = store.state.roles || []// 1. 检查是否需要权限if (to.meta.roles) {const requiredRoles = to.meta.rolesconst hasPermission = requiredRoles.some(role => userRoles.includes(role))if (!hasPermission) {return next('/404') // 无权限跳转404}}// 2. 检查是否已登录但访问登录页if (to.name === 'Login' && store.state.token) {return next('/admin') // 已登录用户跳转首页}next()
})
三、完整工作流程
-
应用初始化:
• 只加载静态路由(登录页、404页)
• 用户访问时首先进入登录页 -
用户登录:
vuex:store/index.ts :
import { createStore } from 'vuex'export default createStore({state: {roles: [],},getters: {getRoles: state => state.roles // 添加一个getter来获取roles},mutations: {SET_ROLES(state, roles) { // 添加mutation来修改rolesstate.roles = roles}},actions: {setRoles({ commit }, roles) { // 正确的action写法commit('SET_ROLES', roles) // 通过commit调用mutation}},modules: {}
})
view/LoginView.vue :
import { dynamicRoutes } from '@/router'; // 导入动态路由
// 检查当前用户角色的操作---可以放在一个js文件中导入。这里直接写入这个文件
function filterRoutesByRole(routes: any[], userRoles: string[]) {return routes.filter((route) => {// 如果没有设置roles,或者用户角色包含任一所需角色return (!route.meta?.roles ||route.meta.roles.some((role: string) => userRoles.includes(role)));});
}
function generateDynamicRoutes() {const userRoles = store.state.roles || [];console.log(userRoles)const accessibleRoutes = filterRoutesByRole(dynamicRoutes, userRoles);// 先移除可能已存在的动态路由router.getRoutes().forEach((r) => {if (dynamicRoutes.some((dr) => dr.name === r.name)) {router.removeRoute(r.name!);}});// 添加新路由accessibleRoutes.forEach((route) => {router.addRoute(route);});
}
// 完结...// 登录按钮
const submitForm = async () => {try {// 尝试对表单进行验证,如果验证不通过,则不会执行后续代码await formRef.value?.validate();// 使用 axios 发送 POST 请求到服务器的登录接口// 将用户名和密码作为请求体发送const response = await axios.post("/api/users/login", {username: ruleForm.value.usermobile, // 用户名字段在请求体中password: ruleForm.value.userpwd, // 密码字段在请求体中});// 打印响应对象到控制台console.log(response);// 弹出响应消息提示用户message.info(response.data.msg);// alert(response.data.msg);// 从响应数据中提取 token、用户 ID 和用户名const role_code: string = response.data.data.userInfo.role_code; // 角色的唯一标识// 注意:这里存在vuex中的数据应该是一个数组,方便后续处理   let role_code_arr = ref<string[]>([]);role_code_arr.value.push(role_code);// 将角色的编码存到vuex中store.commit("SET_ROLES", role_code_arr);// 生成动态路由generateDynamicRoutes();} catch (error: any) {// 如果请求失败或验证失败,则捕获错误并打印到控制台console.error("请求失败:", error);message.error(error.response.data.msg);}
};
导航守卫:router/index.ts :
import { createRouter, createWebHistory, type RouteRecordRaw } from 'vue-router'
// import { useUserStore } from '@/store/user'
import { useStore } from "vuex";
// 路由组件导入
const HomeView = () => import('../views/HomeView.vue')
const UserView = () => import('../views/UserView.vue')
const RoleView = () => import('@/views/RoleView.vue')
const PermissView = () => import('@/views/PermissView.vue')
const LoginView = () => import('../views/LoginView.vue')
const NotFoundView = () => import('../views/NotFound.vue')// 静态路由
const staticRoutes = [{path: '/login',name: 'Login',component: LoginView},{path: '/404',name: 'NotFound',component: NotFoundView}
];// 动态路由
export const dynamicRoutes = [{path: '/admin',name: 'admin',component: HomeView,meta: {title: "首页",title_path: '/admin',sub_title: "后台管理",roles: ['admin', 'accountA', 'accountB'] // 修正为数组格式},children: [{path: 'user',name: 'user',component: UserView,meta: {title: "用户管理",title_path: '/admin/user',sub_title: "用户信息编辑",roles: ['admin', 'accountA', 'accountB'] // 修正为数组格式}},{path: 'role',name: 'role',component: RoleView,meta: {title: "角色管理",title_path: '/admin/role',sub_title: "角色信息编辑",roles: ['admin', 'accountA'] // 修正为数组格式}},{path: 'permis',name: 'permis',component: PermissView,meta: {title: "权限管理",title_path: '/admin/permis',sub_title: "权限信息编辑",roles: ['admin'] // 修正为数组格式}}]}
]const router = createRouter({// history: createWebHistory(import.meta.env.BASE_URL),history: createWebHistory(process.env.BASE_URL),routes:staticRoutes
})// 导航守卫
router.beforeEach((to, from, next) => {const store = useStore();const userRoles = to.meta.roles || [];console.log(store.state.roles)// 如果路由需要权限验证if (to.meta.roles) {// const hasPermission = to.meta.roles.some(role => userStore.roles.includes(role));const hasPermission = userRoles.some((role:any) => store.state.roles.includes(role));// const hasPermission = to.meta.roles.includes(store.roles);if (!hasPermission) {return next({ name: 'NotFound' }); // 无权限时跳转到 404 页面}}next(); // 允许访问
});export default router
生成动态菜单:HomeView.vue:
import { useStore } from "vuex";
const store = useStore();import { useRouter, useRoute } from "vue-router";
const router = useRouter();
const route = useRoute();// 现生成一个动态菜单--需要从meta中拿到
const all_router = router.getRoutes();
// 把全部的路由meta拿到
const all_meta_data = all_router.map((item) => {return item.meta;
});
// 过滤出isMenu === true的meta
const meta_data = all_meta_data.filter((item) => {return item.isMenu === true;
});
// 从vuex中拿到此用户的角色组
const userRoles = store.state.roles || [];
// 过滤出此角色可以访问的路由meta
const finish_meta = meta_data.filter((item) => {return item.roles.some((role: string) => userRoles.includes(role));// return item.roles.includes(store.state.st)
});
// 最后拿到可以给菜单使用的数组菜单
const iconComponents = {  // 图标的命名,由于meta中的icon是字符串,这里也是一种解决方法AppstoreOutlined: AppstoreOutlined,InboxOutlined: InboxOutlined,DesktopOutlined: DesktopOutlined
};
const use_meta = finish_meta.map((item) => {return {key:item.title_path,// icon:item.icon.replace(/^["']|["']$/g, ''),// icon: iconMap[item.icon] || null,icon: iconComponents[item.icon],label:item.title}
});
-
路由导航:
• 每次路由跳转时,路由守卫会检查:
◦ 目标路由是否需要特定权限
◦ 当前用户是否拥有所需权限
• 根据检查结果允许或拒绝访问 -
用户注销:
function logout() {// 清除用户信息store.commit('CLEAR_USER')// 重置路由router.getRoutes().forEach(route => {if (dynamicRoutes.some(dr => dr.name === route.name)) {router.removeRoute(route.name!)}})// 跳转到登录页router.push('/login')
}
检查用户角色操作的作用分析
您提供的代码中关于用户角色检查的部分实际上是非常必要的,它在整个权限控制流程中扮演着关键角色。让我详细解释其作用和必要性:
一、角色检查的核心作用
1. 权限过滤的核心机制
function filterRoutesByRole(routes: any[], userRoles: string[]) {return routes.filter((route) => {return (!route.meta?.roles || // 无权限限制的路由直接放行route.meta.roles.some((role: string) => userRoles.includes(role)) // 检查角色匹配);});
}
这段代码实现了:
• 路由筛选:根据用户角色过滤出可访问的路由
• 权限验证:确保用户只能看到自己有权限访问的路由
• 安全控制:防止越权访问敏感路由
2. 动态路由生成流程
二、为什么不能省略?
1. 必要性分析
| 检查环节 | 作用 | 省略后果 |
|---|---|---|
| 角色存储 | 保留用户权限标识 | 无法识别用户权限级别 |
| 路由过滤 | 生成个性化路由表 | 所有用户看到相同菜单 |
| 权限验证 | 防止越权访问 | 安全漏洞风险 |
2. 实际应用场景
假设:
• 用户角色:['editor']
• 路由配置:
[{ path: '/admin', meta: { roles: ['admin'] }},{ path: '/editor', meta: { roles: ['editor'] }}
]
无过滤时:用户可以看到/admin路由但无法正常使用,导致错误
有过滤时:用户只能看到/editor路由,体验更合理
三、代码优化建议
1. 类型安全改进
// 在类型声明文件中
declare module 'vue-router' {interface RouteMeta {roles?: string[];// 其他元字段...}
}// 过滤函数改进
function filterAccessibleRoutes(routes: RouteRecordRaw[], userRoles: string[]): RouteRecordRaw[] {return routes.filter(route => {const requiredRoles = route.meta?.roles || []return requiredRoles.length === 0 || requiredRoles.some(role => userRoles.includes(role))})
}
2. 性能优化
// 避免重复计算
const userRoles = computed(() => store.state.roles)// 路由添加前检查
function needsRefresh(newRoutes: RouteRecordRaw[]) {const currentRoutes = router.getRoutes()return (newRoutes.length !== currentRoutes.length ||newRoutes.some(route => !currentRoutes.some(r => r.path === route.path)))
}
3. 错误处理增强
function generateDynamicRoutes() {try {const userRoles = store.state.roles || []if (!Array.isArray(userRoles)) {throw new Error('角色数据格式错误')}const accessibleRoutes = filterRoutesByRole(dynamicRoutes, userRoles)// 清除旧路由逻辑...// 添加新路由逻辑...} catch (err) {console.error('路由生成失败:', err)router.push('/error?code=route_init_failed')}
}
四、完整工作流程
-
用户登录
• 获取角色信息 → 存储到Vuex -
路由生成
-
访问控制
• 路由守卫二次验证
• 菜单动态生成
五、总结
您代码中的角色检查操作:
• ✅ 不是多余的:是权限系统的核心逻辑
• ✅ 必不可少:确保路由与权限的精确匹配
• ✅ 可以优化:类型、性能、错误处理等方面
建议保留这部分逻辑,同时参考上述优化建议进行改进,可以使您的权限控制系统更加健壮和安全。
四、最佳实践方案
4.1 路由配置规范
| 字段 | 类型 | 必填 | 说明 |
|---|---|---|---|
| path | string | 是 | 路由路径 |
| component | Component | 是 | 组件引用 |
| meta.roles | string[] | 否 | 允许的角色 |
| meta.title | string | 推荐 | 页面标题 |
| meta.icon | string | 可选 | 菜单图标 |
| meta.cache | boolean | 否 | 是否缓存 |
4.2 权限检查方案对比
| 方案 | 优点 | 缺点 | 适用场景 |
|---|---|---|---|
| 前端控制 | 响应快,体验好 | 安全性较低 | 内部管理系统 |
| 前后端结合 | 安全性高 | 实现复杂 | 高安全要求系统 |
| 动态接口 | 灵活度高 | 性能开销大 | 权限频繁变更系统 |
4.3 性能优化建议
-
路由懒加载
component: () => import('@/views/HeavyPage.vue') -
路由分组打包
// vite.config.js rollupOptions: {output: {manualChunks: {admin: ['@/views/Admin*.vue']}} } -
持久化缓存
// 使用pinia-plugin-persistedstate
persist: {paths: ['user.roles']
}
五、常见问题解决方案
5.1 问题排查表
| 现象 | 可能原因 | 解决方案 |
|---|---|---|
| 路由跳转循环 | 守卫逻辑错误 | 检查重定向条件 |
| 菜单不更新 | 路由未正确重置 | 确保先remove后add |
| 404错误 | 路由未加载 | 检查addRoute调用 |
| 权限失效 | 角色信息丢失 | 检查状态持久化 |
5.2 典型错误处理
// 安全的路由添加方式
function safeAddRoute(route) {try {if (router.hasRoute(route.name)) {router.removeRoute(route.name)}router.addRoute(route)return true} catch (err) {console.error('路由添加失败:', err)return false}
}
六、完整示例项目结构
/src
├── router
│   ├── index.ts        # 路由入口
│   ├── static.ts       # 静态路由
│   └── dynamic.ts      # 动态路由配置
├── stores
│   └── auth.ts         # 权限状态管理
├── utils
│   └── permission.ts   # 权限验证工具
└── views├── public          # 公共页面└── admin           # 权限页面
通过这套系统化方案,开发者可以快速实现:
- 基于角色的精细化权限控制
- 动态菜单的自动生成
- 安全的访问验证机制
- 良好的用户体验和性能表现