【linux】如何扩展磁盘容量(VMware虚拟机)-转载
如何扩展磁盘容量(VMware虚拟机)
一、前置准备工作
扩展虚拟机磁盘前,需要先把虚拟机关机才能进行扩展磁盘操作
- 1.选择虚拟机设置,如下图所示

- 2.输入你想扩展的磁盘容量,以本次实操为例,我这里输入的30G(具体按照实际容量输入)
- 3.点击确定
- 4.启动虚拟机
二、扩展磁盘容量
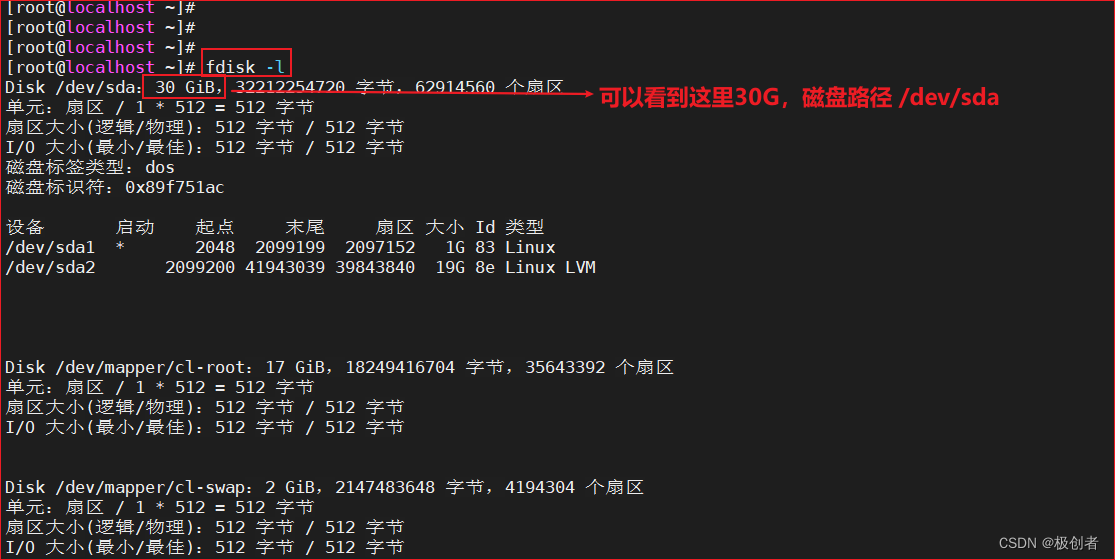
1.使用root用户登录系统,使用fdisk -l命令查看磁盘分区情况
| 1 |
|

2. 使用fdisk命令重新对/dev/sda磁盘进行分区
使用 fdisk /dev/sda后会进入具体实际分区操作页面,以下为参数说明:
常规
- d 删除分区
- F 列出未分区的空闲区
- l 列出已知分区类型
- n 添加新分区
- p 打印分区表
- t 更改分区类型
- v 检查分区表
- i 打印某个分区的相关信息
输入m,仅是提示获取帮助,在这里可以看到各个命令具体含义
输入p,打印当前有多少分区表,本例中有两个分区表,分别为/dev/sda1和/dev/sda2
输入n,添加新分区,这里输入n以后会让你选择是对主分区扩展还是对扩展分区扩展,请根据实际情况填写,本例中输入p,选择主分区进行扩展。完成后,会让你输入数字,具体的数字根据你实际的情况来,本例中
输入3,完成后此时出现扇区大小确认,直接用默认值,直接敲2次回车
最后输入w,保存退出
| 1 2 3 4 5 6 7 8 9 10 11 12 13 14 15 16 17 18 19 20 21 22 23 24 25 26 27 28 29 30 31 32 33 34 35 36 37 38 39 40 41 42 43 44 45 46 47 48 49 50 51 52 53 54 55 56 57 58 59 60 61 62 63 64 65 66 67 68 69 70 71 72 73 74 |
|
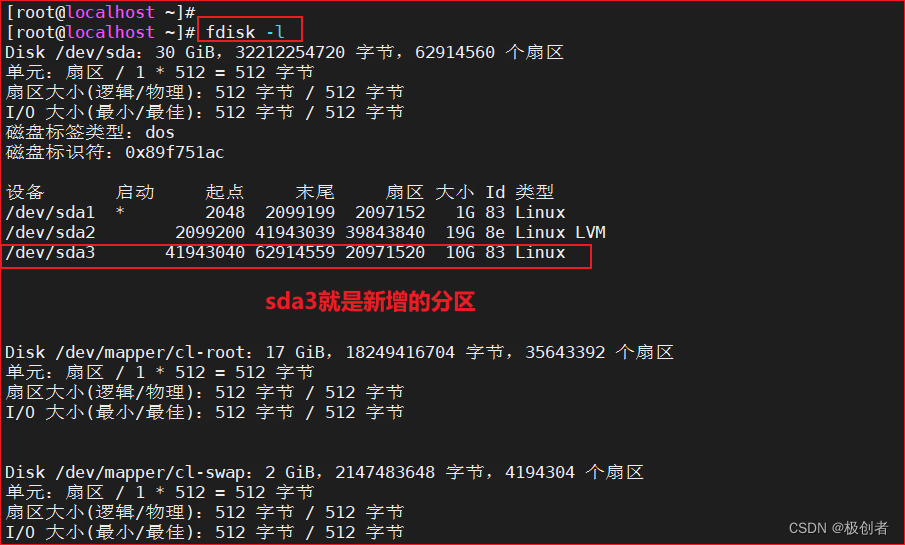
3.再次使用fdisk -l查看扩展分区情况
| 1 |
|

4.reboot重启虚拟机
| 1 |
|
5.使用pvcreate命令对新建的分区创建物理分区
| 1 2 |
|
6.使用vgs查看虚拟卷组
| 1 2 3 |
|
7.使用vgextend命令对卷组进行扩容,将新建的/dev/sda3分区加入到上述第6步骤查询出来的卷组中(本例中查询出来的卷组名为cl,实际的卷组名以你们查询出来的为准)
| 1 2 |
|
8.使用df -h查看要扩展的文件系统,本例中文件系统为:/dev/mapper/cl-root
| 1 2 3 4 5 6 7 8 9 10 |
|
9.使用lvextend命令扩展文件系统,本例中为:/dev/mapper/cl-root,注意,本例中是额外扩展了10G磁盘(没扩展磁盘前是20G),在使用lvextend扩展时,不能完全给10G,要比10G小一点作为预留,本次给9G
| 1 2 3 |
|
10.使用pvdisplay查看创建后的物理分区
| 1 2 3 4 5 6 7 8 9 10 11 12 13 14 15 16 17 18 19 20 21 22 |
|
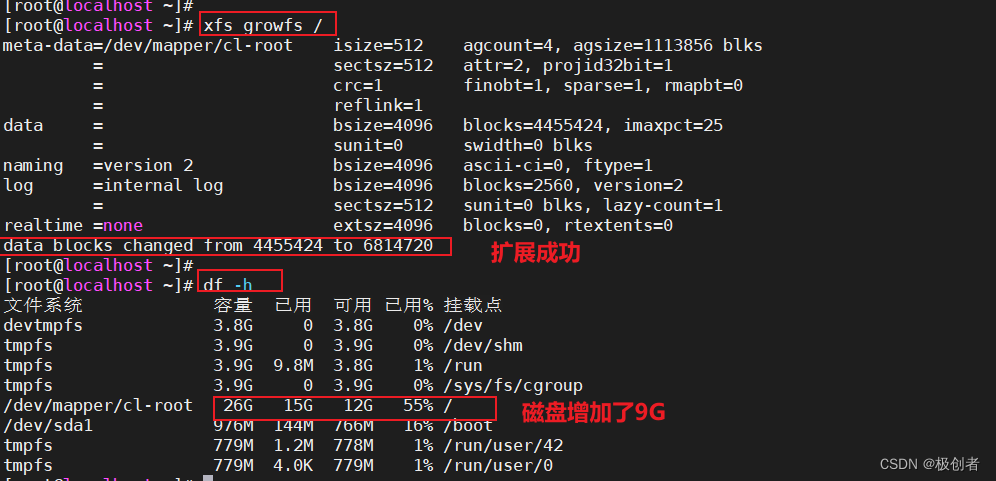
11.再次使用df -h查看磁盘空间,发现磁盘仍然只有20G,并未增加到30G,那是因为还缺少最后一步,需要对文件系统进行扩容
| 1 2 3 4 5 6 7 8 9 10 |
|
12.查看文件系统/dev/mapper/cl-root格式,此处查询出来是xfs,有的查询出来可能是ext4,具体已实际情况为准
| 1 |
|

13. 使用xfs_growfs(红帽、CentOS使用该xfs_growfs命令,其他系统如Ubuntu等自行查阅一下)命令对文件系统进行扩容,如果是ext4格式的,使用resize2fs
| 1 |
|

注意:xfs_growfs用两种用法
- 老版xfs_growfs用法:xfs_growfs [文件系统名]
- 新版xfs_growfs用法:xfs_growfs [挂载点]
如果命令用的不对,会出现如下错误:
| 1 2 |
|
VMware Linux(Centos)虚拟机扩容根目录磁盘空间
1、编辑虚拟机设置,点击[硬盘],选择[扩展] 填写大小
2、启动虚拟机操作系统Centos,查看磁盘情况
$ fdisk -l
显示如下:
Disk /dev/sda: 32.2 GB, 32212254720 bytes255 heads, 63 sectors/track, 3916 cylindersUnits = cylinders of 16065 * 512 = 8225280 bytesSector size (logical/physical): 512 bytes / 512 bytesI/O size (minimum/optimal): 512 bytes / 512 bytesDisk identifier: 0x00094582Device Boot Start End Blocks Id System/dev/sda1 * 1 64 512000 83 LinuxPartition 1 does not end on cylinder boundary./dev/sda2 64 2611 20458496 8e Linux LVMDisk /dev/mapper/vg_rxf-lv_root: 18.9 GB, 18865979392 bytes255 heads, 63 sectors/track, 2293 cylindersUnits = cylinders of 16065 * 512 = 8225280 bytesSector size (logical/physical): 512 bytes / 512 bytesI/O size (minimum/optimal): 512 bytes / 512 bytesDisk identifier: 0x00000000Disk /dev/mapper/vg_rxf-lv_swap: 2080 MB, 2080374784 bytes255 heads, 63 sectors/track, 252 cylindersUnits = cylinders of 16065 * 512 = 8225280 bytesSector size (logical/physical): 512 bytes / 512 bytesI/O size (minimum/optimal): 512 bytes / 512 bytesDisk identifier: 0x00000000
可以看见分区情况如下:
Device Boot Start End Blocks Id System/dev/sda1 * 1 64 512000 83 LinuxPartition 1 does not end on cylinder boundary./dev/sda2 64 2611 20458496 8e Linux LVM
3、创建分区sda3
$ fdisk /dev/sda
根据命令提示创建分区
WARNING: DOS-compatible mode is deprecated. It's strongly recommended toswitch off the mode (command 'c') and change display units tosectors (command 'u').Command (m for help): n #输入n表示创建新分区Command actione extendedp primary partition (1-4)p #输入pPartition number (1-4): 3 #输入3,表示sda3,前面已经有2个了First cylinder (2611-3916, default 2611): #回车,默认值Using default value 2611Last cylinder, +cylinders or +size{K,M,G} (2611-3916, default 3916): #回车,默认值Using default value 3916Command (m for help): w #输入w保存,退出The partition table has been altered!Calling ioctl() to re-read partition table.WARNING: Re-reading the partition table failed with error 16: 设备或资源忙.The kernel still uses the old table. The new table will be used atthe next reboot or after you run partprobe(8) or kpartx(8)Syncing disks.
再查看分区情况
$ fdisk -l
情况如下:
Device Boot Start End Blocks Id System/dev/sda1 * 1 64 512000 83 LinuxPartition 1 does not end on cylinder boundary./dev/sda2 64 2611 20458496 8e Linux LVM/dev/sda3 2611 3916 10483750 83 Linux
这时分区已经变成3个了,但是还没有挂载,还不能用。
4、重启操作系统
$ reboot
5、格式化新分区ext3
$ mkfs -t ext3 /dev/sda3
mke2fs 1.41.12 (17-May-2010)文件系统标签=操作系统:Linux块大小=4096 (log=2)分块大小=4096 (log=2)Stride=0 blocks, Stripe width=0 blocks655360 inodes, 2620937 blocks131046 blocks (5.00%) reserved for the super user第一个数据块=0Maximum filesystem blocks=268435456080 block groups32768 blocks per group, 32768 fragments per group8192 inodes per groupSuperblock backups stored on blocks: 32768, 98304, 163840, 229376, 294912, 819200, 884736, 1605632正在写入inode表: 完成 Creating journal (32768 blocks): 完成Writing superblocks and filesystem accounting information: 完成This filesystem will be automatically checked every 29 mounts or180 days, whichever comes first. Use tune2fs -c or -i to override.
6、将物理硬盘分区初始化为物理卷,以便LVM使用,输入指令
$ lvs
LV VG Attr LSize Pool Origin Data% Move Log Cpy%Sync Convertlv_root vg_rxf -wi-ao---- 17.57g lv_swap vg_rxf -wi-ao---- 1.94g
输入指令:
$ pvcreate /dev/sda3
Physical volume "/dev/sda3" successfully created
7、向卷组中添加物理卷来增加容量
输入df -h 查看lvm组名
$ df -h
Filesystem Size Used Avail Use% Mounted on/dev/mapper/vg_rxf-lv_root 18G 18G 112M 100% /tmpfs 931M 4.0K 931M 1% /dev/shm/dev/sda1 485M 35M 425M 8% /boot
其中vg_rxf为根所在组名.
输入指令,增加卷组的容量
$ vgextend vg_rxf /dev/sda3
Volume group "vg_rxf" successfully extended
8、查看可以扩展的空间大小
$ vgdisplay
--- Volume group ---VG Name vg_rxfSystem ID Format lvm2Metadata Areas 2Metadata Sequence No 4VG Access read/writeVG Status resizableMAX LV 0Cur LV 2Open LV 2Max PV 0Cur PV 2Act PV 2VG Size 29.50 GiBPE Size 4.00 MiBTotal PE 7553Alloc PE / Size 4994 / 19.51 GiBFree PE / Size 2559 / 10.00 GiBVG UUID KFyuD1-cj5n-cukx-z1Zf-Gg2T-IQLT-v6BD4N
Free PE / Size 就是可以提供分配的自由空间,最多10.00 GiB,在扩展时输入小于该值
9、扩充磁盘空间
$ lvextend -L+9G /dev/mapper/vg_rxf-lv_root /dev/sda3
Extending logical volume lv_root to 26.57 GiBLogical volume lv_root successfully resized
10、使用e2fsck指令查看检测文件系统错误
$ e2fsck -a /dev/mapper/vg_rxf-lv_root
/dev/mapper/vg_rxf-lv_root is mounted.e2fsck: 无法继续, 中止.
11、查看分区文件系统
$ df -T
文件系统 类型 1K-块 已用 可用 已用% 挂载点devtmpfs devtmpfs 751236 0 751236 0% /devtmpfs tmpfs 763080 4 763076 1% /dev/shmtmpfs tmpfs 763080 9756 753324 2% /runtmpfs tmpfs 763080 0 763080 0% /sys/fs/cgroup/dev/mapper/centos-root xfs 37734400 16848316 20886084 45% //dev/sda1 xfs 1038336 166076 872260 16% /boottmpfs tmpfs 152620 0 152620 0% /run/user/0
若为xfs系统
$ xfs_growfs /dev/mapper/centos-root
meta-data=/dev/mapper/centos-root isize=512 agcount=4, agsize=1113856 blks= sectsz=512 attr=2, projid32bit=1= crc=1 finobt=0 spinodes=0data = bsize=4096 blocks=4455424, imaxpct=25= sunit=0 swidth=0 blksnaming =version 2 bsize=4096 ascii-ci=0 ftype=1log =internal bsize=4096 blocks=2560, version=2= sectsz=512 sunit=0 blks, lazy-count=1realtime =none extsz=4096 blocks=0, rtextents=0data blocks changed from 4455424 to 9436160
否则
$ resize2fs /dev/mapper/vg_rxf-lv_root
Filesystem at /dev/mapper/vg_rxf-lv_root is mounted on /; on-line resizing requiredold desc_blocks = 2, new_desc_blocks = 2Performing an on-line resize of /dev/mapper/vg_rxf-lv_root to 6965248 (4k) blocks.The filesystem on /dev/mapper/vg_rxf-lv_root is now 6965248 blocks long.
12、查看扩展空间后的结果
$ df -h
devtmpfs 734M 0 734M 0% /devtmpfs 746M 4.0K 746M 1% /dev/shmtmpfs 746M 9.6M 736M 2% /runtmpfs 746M 0 746M 0% /sys/fs/cgroup/dev/mapper/centos-root 36G 17G 20G 45% //dev/sda1 1014M 163M 852M 16% /boottmpfs 150M 0 150M 0% /run/user/0
可以看到,磁盘已扩展成功!
