前言
前提要求
- 安装 virtualbox 和vagrant<vagrant-disksize> (Linux 方式 Windows 方式)
创建一键部署centos 虚拟机
- /opt/vagrant 安装目录
- /opt/VirtualBox 安装目录
- /opt/centos8/Vagrantfile (可配置网络IP,内存,cpu,磁盘及分区,启动项,虚拟化开启,usb3.0,安装软件) 参考
- 用户名密码 root:1234@com,vagrant:1234@com 远程连接端口 2220
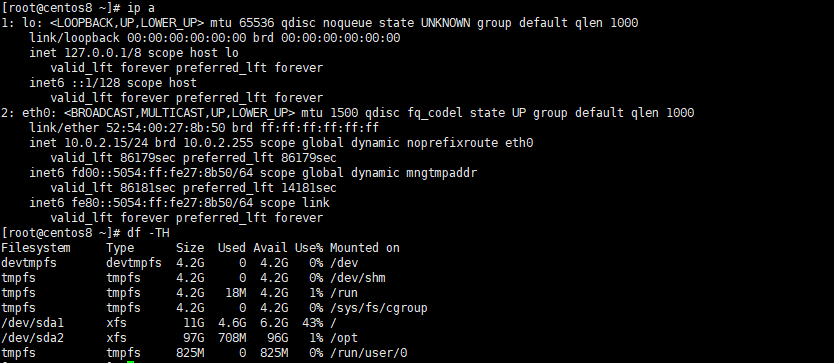
- 虚拟机内部挂载了分区/opt/ 90G ,根据主机需要更改即可 63行 66 行是增加新分区
- /usr/lib/systemd/system/vagrant-autostart.service 开机启动脚本
- /usr/bin/vagrant_start.sh 启动脚本,可以执行批量启动关闭
- vagrant_stop.sh 关闭脚本,可以执行批量启动关闭
- /var/log/vagrant_startup.log 启动日志记录
- /var/log/vagrant_shutdown.log 关闭日志记录
- box 导入参数参考
- 导出参考
vim /vagrant_import_centos.sh
#!/bin/bash
# -*- coding: utf-8 -*-
# Author: make.han
# Date: 2025/04/10
# vagrant centos<<!
# vagrant vm
https://portal.cloud.hashicorp.com/vagrant/discover# vagrant docs
https://developer.hashicorp.com/vagrant/docs# vagrant download
https://releases.hashicorp.com/vagrant# vagrant gitlab
https://github.com/hashicorp/vagrant/releases# vagrantfile config
https://developer.hashicorp.com/vagrant/docs/vagrantfile/machine_settings# vagrant 常用命令参考
vagrant init      # 初始化
vagrant up        # 启动虚拟机
vagrant halt      # 关闭虚拟机
vagrant reload    # 重启虚拟机
vagrant ssh       # SSH 至虚拟机
vagrant suspend   # 挂起虚拟机
vagrant resume    # 唤醒虚拟机
vagrant status    # 查看虚拟机运行状态
vagrant destroy   # 销毁当前虚拟机#box管理命令
vagrant box list    # 查看本地box列表
vagrant box add     # 添加box到列表
vagrant box remove  # 从box列表移除
!echo "create centos directory"
mkdir -p /opt/centos8
cd /opt/centos8 echo "add init config"
cat <<'EOF'>>/opt/centos8/Vagrantfile
# -*- mode: ruby -*-
# vi: set ft=ruby :Vagrant.configure("2") do |config|# The most common configuration options are documented and commented below.# For a complete reference, please see the online documentation at# https://docs.vagrantup.com.# Every Vagrant development environment requires a box. You can search for# boxes at https://vagrantcloud.com/search.config.vm.box = "centos8.3"# hosts nameconfig.vm.hostname = "centos8"# 默认启动磁盘大小config.vm.disk :disk, size: "100GB", primary: true# Add new disks (需要安装插件vagrant plugin install vagrant-disksize)#config.disksize.size = "80GB"# Set the guest operating system type (:linux :windows)config.vm.guest = :linux# Disable automatic box update checking. If you disable this, then# boxes will only be checked for updates when the user runs# `vagrant box outdated`. This is not recommended.# config.vm.box_check_update = false# Create a forwarded port mapping which allows access to a specific port# within the machine from a port on the host machine. In the example below,# accessing "localhost:8080" will access port 80 on the guest machine.# NOTE: This will enable public access to the opened port# config.vm.network "forwarded_port", guest: 80, host: 8080# Create a forwarded port mapping which allows access to a specific port# within the machine from a port on the host machine and only allow access# via 127.0.0.1 to disable public access# config.vm.network "forwarded_port", guest: 80, host: 8080, host_ip: "127.0.0.1"config.vm.network :forwarded_port, guest: 22, host: 2220, host_ip: "0.0.0.0"# Create a private network, which allows host-only access to the machine# using a specific IP.# config.vm.network "private_network", ip: "192.168.33.10"# Create a public network, which generally matched to bridged network.# Bridged networks make the machine appear as another physical device on# your network.# 配置为公有网络,虚拟机将通过 DHCP 获取一个与宿主机同网段的 IP 地址# config.vm.network "public_network"#config.vm.network "public_network", ip: "192.168.11.82"# Share an additional folder to the guest VM. The first argument is# the path on the host to the actual folder. The second argument is# the path on the guest to mount the folder. And the optional third# argument is a set of non-required options.# config.vm.synced_folder "../data", "/vagrant_data"# Disable the default share of the current code directory. Doing this# provides improved isolation between the vagrant box and your host# by making sure your Vagrantfile isn't accessible to the vagrant box.# If you use this you may want to enable additional shared subfolders as# shown above.# config.vm.synced_folder ".", "/vagrant", disabled: trueconfig.vm.provider "virtualbox" do |vb|#   # Display the VirtualBox GUI when booting the machinevb.gui = false## Customize the amount of memory on the VM:vb.memory = "8096" # 42 CPU coresvb.cpus = 2 # Enable nested virtualization (optional)vb.customize ["modifyvm", :id, "--nested-hw-virt", "on"]# vm namevb.name = "centos8.3"# Startup Item Settingsvb.customize ["modifyvm", :id, "--boot1", "disk"]vb.customize ["modifyvm", :id, "--boot2", "dvd"]vb.customize ["modifyvm", :id, "--boot3", "floppy"]vb.customize ["modifyvm", :id, "--boot4", "net"]# Enable USB controller (USB 2.0)#vb.customize ["modifyvm", :id, "--usb", "on"]#vb.customize ["modifyvm", :id, "--usbehci", "on"]# Enable USB controller (USB 3.0)vb.customize ["modifyvm", :id, "--usb", "on"]vb.customize ["modifyvm", :id, "--usbxhci", "on"]# 启用双向共享粘贴板和拖放功能vb.customize ["modifyvm", :id, "--clipboard", "bidirectional"]vb.customize ["modifyvm", :id, "--draganddrop", "bidirectional"]end# View the documentation for the provider you are using for more# information on available options.# Define a Vagrant Push strategy for pushing to Atlas. Other push strategies# such as FTP and Heroku are also available. See the documentation at# https://docs.vagrantup.com/v2/push/atlas.html for more information.# config.push.define "atlas" do |push|#   push.app = "YOUR_ATLAS_USERNAME/YOUR_APPLICATION_NAME"# end# Enable provisioning with a shell script. Additional provisioners such as# Puppet, Chef, Ansible, Salt, and Docker are also available. Please see the# documentation for more information about their specific syntax and use.# config.vm.provision "shell", inline: <<-SHELL#   apt-get update#   apt-get install -y apache2# SHELLconfig.vm.provision "shell", inline: <<-SHELLecho "root:1234@com" | chpasswdecho "vagrant:1234@com" | chpasswd# 配置 DNSecho "nameserver 8.8.8.8" > /etc/resolv.confecho "nameserver 8.8.4.4" >> /etc/resolv.confrm -rf /etc/yum.repos.d/*curl -o /etc/yum.repos.d/CentOS-Base.repo https://mirrors.aliyun.com/repo/Centos-vault-8.5.2111.repoyum clean allyum makecachesed -i 's/PasswordAuthentication no/PasswordAuthentication yes/g' /etc/ssh/sshd_configsed -i 's/#PermitRootLogin yes/PermitRootLogin yes/g' /etc/ssh/sshd_configsystemctl restart sshd# 分区插件安装配置yum install -y xfsprogs xfsdump parted vim net-tools# 使用 fdisk 创建单一分区(echo n      # 添加新分区echo p      # 主分区echo 2      # 分区号(1)echo        # 起始扇区(默认)echo        # 结束扇区(默认,使用所有可用空间)echo w      # 写入更改并退出) | fdisk /dev/sdamkfs.xfs -f /dev/sda2mount -t xfs /dev/sda2 /optsed -i '$a/dev/sda2  /opt xfs  defaults  0  0' /etc/fstab SHELL
end
EOFecho "download centos vagrant"
wget -N -P /opt/centos8 https://cloud.centos.org/centos/8/vagrant/x86_64/images/CentOS-8-Vagrant-8.3.2011-20201204.2.x86_64.vagrant-virtualbox.boxecho "add vagrant list"
vagrant box add --name centos8.3 /opt/centos8/CentOS-8-Vagrant-8.3.2011-20201204.2.x86_64.vagrant-virtualbox.box# 在线下载
#vagrant init centos8.3 --box-version 2004.01#echo "init vagrant-disksize"
#vagrant plugin install vagrant-disksizeecho "start centos vm"
vagrant up#echo "进入"
#vagrant sshecho "查看"
vagrant box listecho "port firewall"
firewall-cmd --zone=public --add-port=2220/tcp --permanent && firewall-cmd --reloadecho "vagrant service"
cat <<'EOF'>>/usr/lib/systemd/system/vagrant-autostart.service
[Unit]
Description=Auto-start Vagrant VM on boot
After=network.target vboxdrv.service[Service]
Type=oneshot
ExecStart=/usr/bin/vagrant_start.sh
ExecStop=/usr/bin/vagrant_stop.sh
RemainAfterExit=true
User=root[Install]
WantedBy=multi-user.target
EOFecho "Vagrant startup script"
cat <<'EOF'>>/usr/bin/vagrant_start.sh
#!/bin/bash# 定义 Vagrant 项目目录列表
VAGRANT_PROJECTS=("/opt/centos8""/opt/ubuntu20""/opt/debian11"
)# 遍历每个 Vagrant 项目并启动虚拟机
for project in "${VAGRANT_PROJECTS[@]}"; doecho "切换到 Vagrant 项目目录: $project 并启动虚拟机..."if [ -d "$project" ]; thencd "$project" || { echo "无法进入目录: $project"; continue; }vagrant up >> /var/log/vagrant_startup.log 2>&1if [ $? -eq 0 ]; thenecho "虚拟机启动成功: $project"elseecho "虚拟机启动失败: $project"fielseecho "项目目录不存在: $project"fi
done
EOFecho "Vagrant close script"
cat <<'EOF'>>/usr/bin/vagrant_stop.sh
#!/bin/bash# 定义 Vagrant 项目目录列表
VAGRANT_PROJECTS=("/opt/centos8""/opt/ubuntu20""/opt/debian11"
)# 遍历每个 Vagrant 项目并关闭虚拟机
for project in "${VAGRANT_PROJECTS[@]}"; doecho "切换到 Vagrant 项目目录: $project 并关闭虚拟机..."if [ -d "$project" ]; thencd "$project" || { echo "无法进入目录: $project"; continue; }vagrant halt >> /var/log/vagrant_shutdown.log 2>&1if [ $? -eq 0 ]; thenecho "虚拟机关闭成功: $project"elseecho "虚拟机关闭失败: $project"fielseecho "项目目录不存在: $project"fi
done
EOFecho "赋予脚本权限"
chmod +x /usr/bin/{vagrant_start.sh,vagrant_stop.sh}echo "启动服务,开机自启动"
systemctl enable vagrant-autostart.service
systemctl status vagrant-autostart.service
执行安装
bash /vagrant_centos_install.sh
进入centos 系统
cd /opt/centos8
vagrant ssh
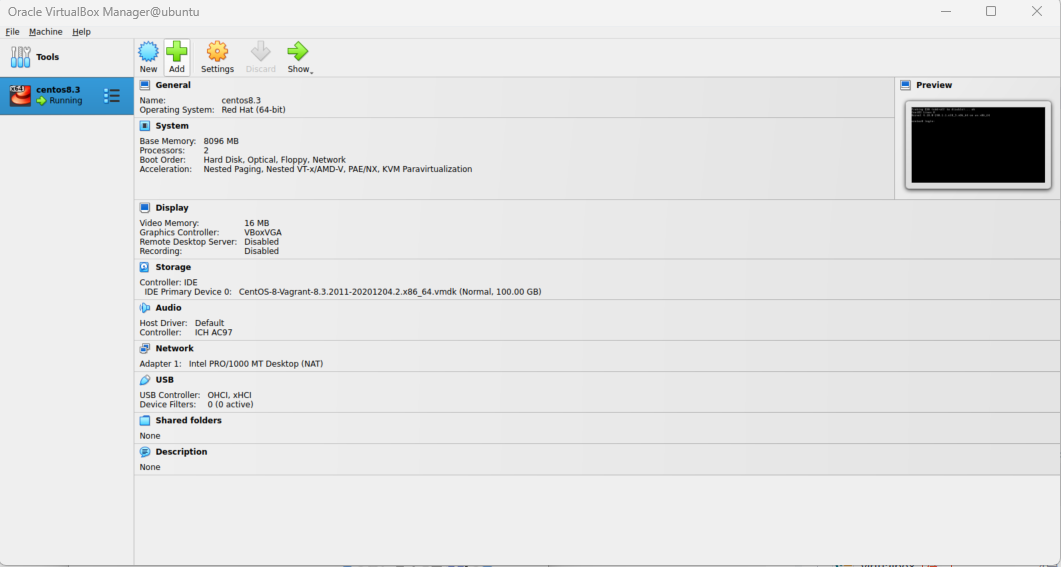
进入virtualbox 管理界面
virtualbox
远程连接 MobaXterm或者Xmanager
- 端口 2220
- root:1234@com,vagrant:1234@com