Springboot切换到3.3.4后,使用spring security一些小问题记录
这几天想试试Spring AI这个组件,看看ollama通过Spring AI怎么用。官方的介绍地址:https://spring.io/projects/spring-ai。
经过一番研究发现,发现这个组件需要Springboot 3.2+,之前一直在用Spring Boot2.6.13,同时为了自用,也自己组了一个基于Spring Security的脚手架。
最终经过一番选择,最终选了SpringBoot 3.3.4,JDK选择的是17,FastJson更新为2.0.53,JJWT更新为0.12.6,该版本调整为3个依赖:
<dependency><groupId>io.jsonwebtoken</groupId><artifactId>jjwt</artifactId><version>0.12.6</version></dependency><dependency><groupId>io.jsonwebtoken</groupId><artifactId>jjwt-api</artifactId><version>0.12.6</version></dependency><dependency><groupId>io.jsonwebtoken</groupId><artifactId>jjwt-impl</artifactId><version>0.12.6</version></dependency>
一番下来,发现如果仅仅是用chat接口来实现,还是挺简单的,不过要是用Stream模式的话,一般来讲还用Vue之类的框架,效果可能会更好些,所以干脆向着再弄一个新版的基于Spring Security的脚手架出来。
经过一番折腾,大部分问题都解决了,本文章主要是为了描述SpringBoot的一些基本使用问题,因为目前的经验及水平限制,这两天也弄不清楚到底是什么引起的,先把问题先记录下来,同时也找了算是一些解决方案的内容,供后面遇到类似问题的同学做一些启发。
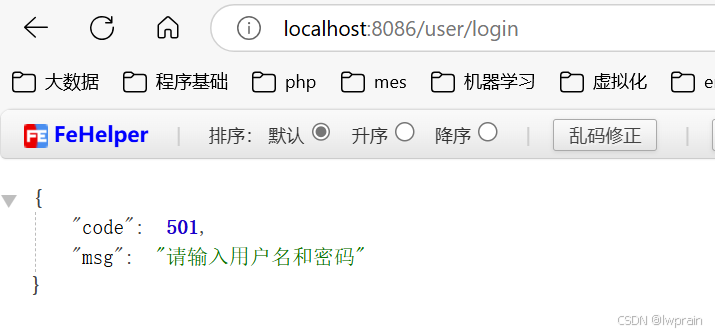
1、问题一,这是遇到的第一个拦路虎,访问时提示:
拒绝访问 localhost,你没有查看此页面的用户权限,错误代码是HTTP ERROR 403。

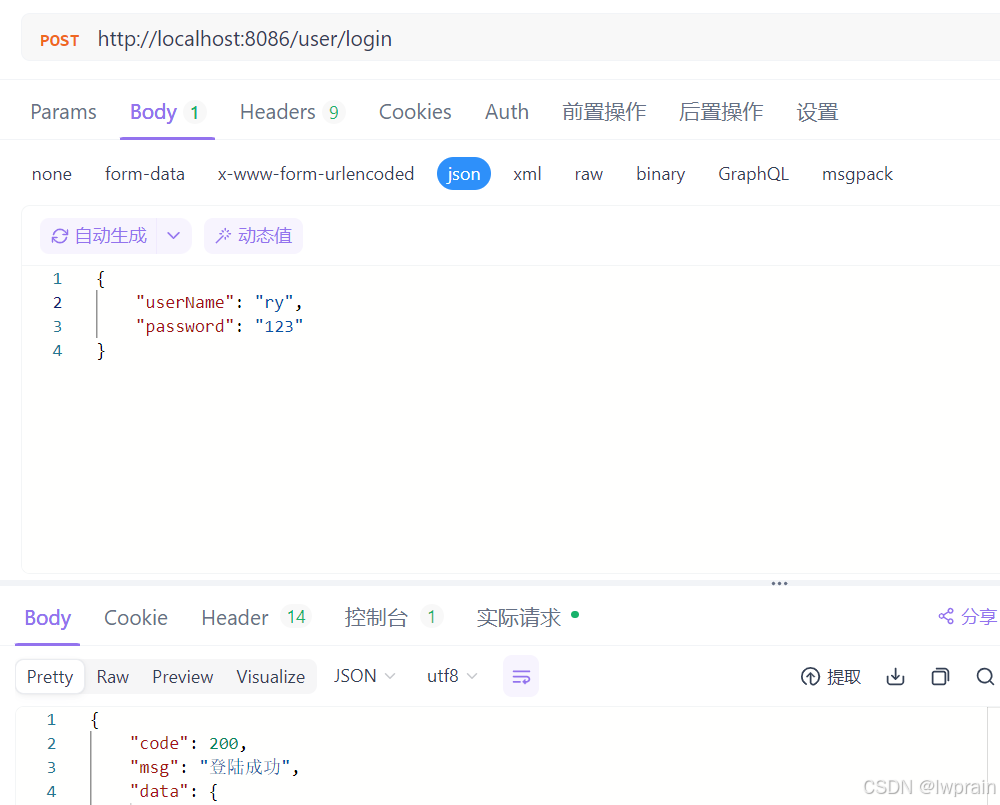
后来费了一番手脚,才意识到是因为此接口不支持GET方式访问,通过apifox来访问,是没问题的:
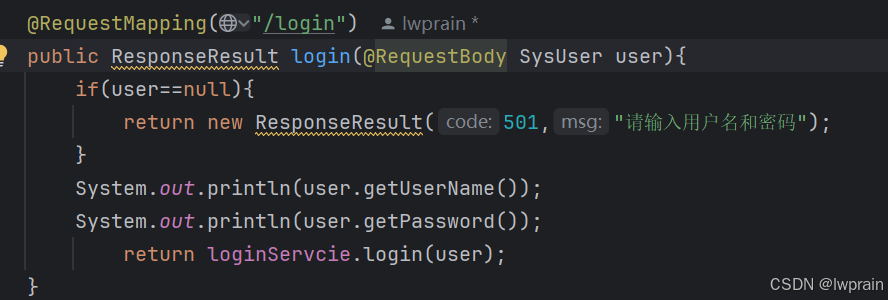
估计是security拦截了错误提示,控制器里这样的:
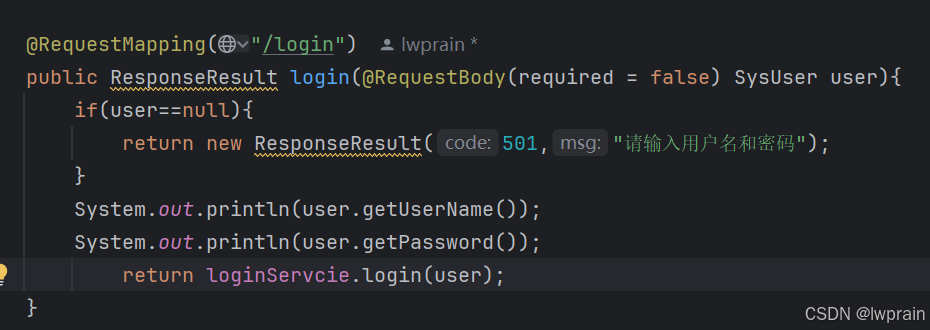
再后来到一些内容,发现可能是因为@RequestBody要求强制验证了,这里改下:
重启服务,可以了。
浪费了好几个小时的时间o(╥﹏╥)o。
2、JWT的过滤器中,跟踪发现错误都是redis转换数据时的提示各种错误:
比如:
提示:java.lang.ClassCastException: class com.rainpet.springsecurity.entity.SysUser cannot be cast to class com.rainpet.springsecurity.entity.SysUser (com.rainpet.springsecurity.entity.SysUser is in unnamed module of loader org.springframework.boot.devtools.restart.classloader.RestartClassLoader @6171d624; com.rainpet.springsecurity.entity.SysUser is in unnamed module of loader org.springframework.boot.devtools.restart.classloader.RestartClassLoader @2b81ec2a)
后来禁用了spring-boot-devtool也不行。
提示:Name for argument of type [java.lang.String] not specified, and parameter name information not available via reflection. Ensure that the compiler uses the '-parameters' flag
后来发现把build段中的部分改为:
<plugin><groupId>org.apache.maven.plugins</groupId><artifactId>maven-compiler-plugin</artifactId><version>3.8.1</version><configuration><source>17</source><target>17</target><compilerArgs><compilerArg>-parameters</compilerArg></compilerArgs><encoding>UTF-8</encoding></configuration></plugin>
之前source及target配的是1.8,后来配置为17,同时增加了:
<compilerArgs><compilerArg>-parameters</compilerArg></compilerArgs>
貌似问题解决了。
3、SecurityConfig.java文件内容变动为,之前的版本和现在的版本差异较大:
import com.rainpet.springsecurity.filter.CustomAuthenticationProvider;
import com.rainpet.springsecurity.filter.JwtAuthenticationTokenFilter;
import com.rainpet.springsecurity.service.impl.UserDetailsServiceImpl;
import jakarta.servlet.http.HttpServletRequest;
import jakarta.servlet.http.HttpServletResponse;
import org.springframework.beans.factory.annotation.Autowired;
import org.springframework.context.annotation.Bean;
import org.springframework.context.annotation.Configuration;
import org.springframework.context.annotation.Primary;
import org.springframework.security.authentication.AuthenticationManager;
import org.springframework.security.config.annotation.authentication.configuration.AuthenticationConfiguration;
import org.springframework.security.config.annotation.web.builders.HttpSecurity;
import org.springframework.security.config.annotation.web.configurers.AbstractHttpConfigurer;
import org.springframework.security.config.http.SessionCreationPolicy;
import org.springframework.security.core.AuthenticationException;
import org.springframework.security.core.userdetails.UserDetailsService;
import org.springframework.security.crypto.bcrypt.BCryptPasswordEncoder;
import org.springframework.security.crypto.password.PasswordEncoder;
import org.springframework.security.web.AuthenticationEntryPoint;
import org.springframework.security.web.SecurityFilterChain;
import org.springframework.security.web.access.AccessDeniedHandler;
import org.springframework.security.web.authentication.UsernamePasswordAuthenticationFilter;import java.io.IOException;@Configuration
public class SecurityConfig {@Bean@Primarypublic UserDetailsService userDetailsService() {return new UserDetailsServiceImpl(); // Implement this service to load user details}@Beanpublic PasswordEncoder passwordEncoder(){return new BCryptPasswordEncoder();}@Beanpublic CustomAuthenticationProvider customAuthenticationProvider(UserDetailsService userDetailsService) {return new CustomAuthenticationProvider((UserDetailsServiceImpl) userDetailsService);}@AutowiredJwtAuthenticationTokenFilter jwtAuthenticationTokenFilter;@Autowiredprivate AuthenticationEntryPoint authenticationEntryPoint;@Autowiredprivate AccessDeniedHandler accessDeniedHandler;@Beanpublic SecurityFilterChain securityFilterChain(HttpSecurity http) throws Exception {
//        若要让requestMatchers匹配所有地址,可使用"/**"http// 使用新的csrf配置方式.csrf(AbstractHttpConfigurer::disable).sessionManagement(session -> session.sessionCreationPolicy(SessionCreationPolicy.STATELESS)).authorizeHttpRequests(auth -> auth.requestMatchers("/user/login","/user/register","/user/emailLogin","/user/telLogin","/error","/static/**").permitAll().anyRequest().authenticated()).exceptionHandling(exceptions -> exceptions.authenticationEntryPoint(this::handleAuthenticationException).accessDeniedHandler(new CustomAccessDeniedHandler()));http.addFilterBefore(jwtAuthenticationTokenFilter, UsernamePasswordAuthenticationFilter.class);// ... 其他配置保持不变 ...return http.build();}private void handleAuthenticationException(HttpServletRequest request, HttpServletResponse response, AuthenticationException exception) throws IOException {//            response.sendError(HttpServletResponse.SC_UNAUTHORIZED, "Unauthorized");response.getWriter().print(exception.getMessage());throw  exception;}static class CustomAccessDeniedHandler implements org.springframework.security.web.access.AccessDeniedHandler {@Overridepublic void handle(HttpServletRequest request, HttpServletResponse response, org.springframework.security.access.AccessDeniedException accessDeniedException) throws IOException {
//            response.setStatus(HttpServletResponse.SC_FORBIDDEN);
//            response.setContentType("application/json;charset=UTF-8");
//            response.getWriter().write("{\"status\":\"error\",\"message\":\"Forbidden\"}");throw accessDeniedException;}}@Beanpublic AuthenticationManager authenticationManager(AuthenticationConfiguration authenticationConfiguration) throws Exception {return authenticationConfiguration.getAuthenticationManager();}
}
4、RedisConfig.java更改为:
import com.alibaba.fastjson2.JSON;
import com.alibaba.fastjson2.JSONReader;
import com.alibaba.fastjson2.JSONWriter;
import com.rainpet.springsecurity.utils.FastJsonRedisSerializer;
import org.springframework.context.annotation.Bean;
import org.springframework.context.annotation.Configuration;
import org.springframework.data.redis.connection.RedisConnectionFactory;
import org.springframework.data.redis.core.RedisTemplate;
import org.springframework.data.redis.serializer.RedisSerializer;
import org.springframework.data.redis.serializer.SerializationException;
import org.springframework.data.redis.serializer.StringRedisSerializer;import java.nio.charset.StandardCharsets;@Configuration
public class RedisConfig {@Bean@SuppressWarnings(value = { "unchecked", "rawtypes" })public RedisTemplate<Object, Object> redisTemplate(RedisConnectionFactory connectionFactory) {RedisTemplate<Object, Object> template = new RedisTemplate<>();template.setConnectionFactory(connectionFactory);// 使用 FastJSON2 作为值的序列化器RedisSerializer<Object> fastJson2RedisSerializer = new RedisSerializer<Object>() {@Overridepublic byte[] serialize(Object o) throws SerializationException {if (o == null) {return new byte[0];}return JSON.toJSONString(o, JSONWriter.Feature.WriteClassName).getBytes(StandardCharsets.UTF_8);}@Overridepublic Object deserialize(byte[] bytes) throws SerializationException {if (bytes == null || bytes.length == 0) {return null;}return JSON.parseObject(new String(bytes, StandardCharsets.UTF_8), Object.class, JSONReader.Feature.SupportAutoType);}};// 使用 StringRedisSerializer 来序列化和反序列化 redis 的 key 值StringRedisSerializer stringRedisSerializer = new StringRedisSerializer();template.setKeySerializer(stringRedisSerializer);template.setValueSerializer(fastJson2RedisSerializer);// Hash 的 key 也采用 StringRedisSerializer 的序列化方式template.setHashKeySerializer(stringRedisSerializer);template.setHashValueSerializer(fastJson2RedisSerializer);template.afterPropertiesSet();return template;}
}
5、mybatisplus版本更新为3.5.10.1,同时相关的配置文件也更新了,主要是牵涉分页组件的调整:
依赖:
<dependency><groupId>com.baomidou</groupId><artifactId>mybatis-plus-spring-boot3-starter</artifactId><version>3.5.10.1</version></dependency><!-- jdk 11+ 引入可选模块 --><dependency><groupId>com.baomidou</groupId><artifactId>mybatis-plus-jsqlparser</artifactId><version>3.5.10.1</version></dependency>
配置文件:MyBatisPlusConfig.java
import com.baomidou.mybatisplus.annotation.DbType;
import com.baomidou.mybatisplus.extension.plugins.MybatisPlusInterceptor;
import com.baomidou.mybatisplus.extension.plugins.inner.PaginationInnerInterceptor;
import com.baomidou.mybatisplus.extension.plugins.pagination.Page;
import org.springframework.context.annotation.Bean;
import org.springframework.context.annotation.Configuration;@Configuration
public class MyBatisPlusConfig {@Beanpublic MybatisPlusInterceptor mybatisPlusInterceptor() {MybatisPlusInterceptor interceptor = new MybatisPlusInterceptor();// 添加分页插件,并指定数据库类型PaginationInnerInterceptor paginationInnerInterceptor = new PaginationInnerInterceptor(DbType.MYSQL);// 设置最大单页限制数量,默认500条,-1不受限制paginationInnerInterceptor.setMaxLimit(1000L);// 设置请求的页面大于最大页后操作,true调回到首页,false继续请求,默认falsepaginationInnerInterceptor.setOverflow(true);interceptor.addInnerInterceptor(paginationInnerInterceptor);return interceptor;}
}
6、JwtAuthenticationTokenFilter.java更新为:
import com.rainpet.springsecurity.entity.LoginUser;
import com.rainpet.springsecurity.utils.JwtUtil;
import com.rainpet.springsecurity.utils.RedisCache;
import io.jsonwebtoken.Claims;
import org.springframework.beans.factory.annotation.Autowired;
import org.springframework.security.authentication.UsernamePasswordAuthenticationToken;
import org.springframework.security.core.context.SecurityContextHolder;
import org.springframework.stereotype.Component;
import org.springframework.util.StringUtils;
import org.springframework.web.filter.OncePerRequestFilter;import jakarta.servlet.FilterChain;
import jakarta.servlet.ServletException;
import jakarta.servlet.http.HttpServletRequest;
import jakarta.servlet.http.HttpServletResponse;
import java.io.IOException;
import java.util.Objects;@Component
public class JwtAuthenticationTokenFilter extends OncePerRequestFilter {@Autowiredprivate RedisCache redisCache;@Overrideprotected void doFilterInternal(HttpServletRequest request, HttpServletResponse response, FilterChain filterChain) throws ServletException, IOException {//获取tokenString token = request.getHeader("token");if (!StringUtils.hasText(token)) {//如果没有token 则进行下次的filter 放行filterChain.doFilter(request, response);return;}//解析tokenString userid;try {Claims claims = JwtUtil.parseJWT(token);userid = claims.getSubject();} catch (Exception e) {// 设置响应状态码为 401,表示未授权response.setStatus(HttpServletResponse.SC_UNAUTHORIZED);// 设置响应内容类型为 JSONresponse.setContentType("application/json;charset=UTF-8");// 构造异常信息的 JSON 字符串String errorJson = "{" +"\"code\":401," +"\"message\": \""+e.getMessage()+"\"}";// 获取响应输出流response.getWriter().write(errorJson);return;}//从redis中获取用户信息String redisKey = "login:" + userid;LoginUser loginUser = redisCache.getCacheObject(redisKey);if(Objects.isNull(loginUser)){throw new RuntimeException("用户未登录");}//存入SecurityContextHolder//TODO 获取权限信息封装到Authentication中  ****重点 第三个参数是获取权限数据,实际应用中这里必须设置,是从登陆时设置的权限列表中获取UsernamePasswordAuthenticationToken authenticationToken =new UsernamePasswordAuthenticationToken(loginUser,null,loginUser.getAuthorities());SecurityContextHolder.getContext().setAuthentication(authenticationToken);//放行filterChain.doFilter(request, response);}
}
7、JwtUtils.java更新为:
import io.jsonwebtoken.Claims;
import io.jsonwebtoken.JwtBuilder;
import io.jsonwebtoken.Jwts;
import io.jsonwebtoken.security.Keys;import javax.crypto.SecretKey;
import java.nio.charset.StandardCharsets;
import java.util.Base64;
import java.util.Date;
import java.util.UUID;/*** JWT工具类*/
public class JwtUtil {//有效期为public static final Long JWT_TTL = 60 * 60 *5000L;// 60 * 60 *1000  一个小时static String secret="123";//此处长度要调整为适当长度public static String getUUID() {String token = UUID.randomUUID().toString().replaceAll("-", "");return token;}/*** 生成jtw* @param subject token中要存放的数据(json格式)* @return*/public static String createJWT(String subject) {JwtBuilder builder = getJwtBuilder(subject, JWT_TTL, getUUID()); // 设置过期时间return builder.compact();}/*** 生成jtw* @param subject token中要存放的数据(json格式)* @param ttlMillis token超时时间* @return*/public static String createJWT(String subject, Long ttlMillis) {JwtBuilder builder = getJwtBuilder(subject, ttlMillis, getUUID()); // 设置过期时间return builder.compact();}private static JwtBuilder getJwtBuilder(String subject, Long ttlMillis, String uuid) {SecretKey secretKey = generalKey();long nowMillis = System.currentTimeMillis();Date now = new Date(nowMillis);if (ttlMillis == null) {ttlMillis = JwtUtil.JWT_TTL;}long expMillis = nowMillis + ttlMillis;Date expDate = new Date(expMillis);return Jwts.builder().id(uuid)              // 唯一的ID.subject(subject)   // 主题  可以是JSON数据.issuer("sg")     // 签发者.issuedAt(now)      // 签发时间.signWith(secretKey, Jwts.SIG.HS512) // 使用HS256对称加密算法签名.expiration(expDate);}/*** 创建token* @param id* @param subject* @param ttlMillis* @return*/public static String createJWT(String id, String subject, Long ttlMillis) {JwtBuilder builder = getJwtBuilder(subject, ttlMillis, id); // 设置过期时间return builder.compact();}public static void main(String[] args) throws Exception {String token = "eyJhbGciOiJIUzUxMiJ9.eyJqdGkiOiI5ZGI3MzE5Y2RjNWU0ODhlYTA2ZTAyOTQ1MGNmYzYxMCIsInN1YiI6IjEiLCJpc3MiOiJzZyIsImlhdCI6MTc0Mzc1NzE2OCwiZXhwIjoxNzQzNzc1MTY4fQ.ezfygdS3rMuSSD0Q6DDyGS2MLNOObna9QwaPfPwCd008jJ9mGPx3hDjb3jXZDBnTRO1nsgoOr662fImECRlu7g";Claims claims = parseJWT(token);System.out.println(claims);}/*** 生成加密后的秘钥 secretKey* @return*/public static SecretKey generalKey() {// 使用 Jwts.SIG.HS256.key() 生成符合安全要求
//        return Jwts.SIG.HS512.key().build();return Keys.hmacShaKeyFor(secret.getBytes(StandardCharsets.UTF_8));}/*** 解析** @param jwt* @return* @throws Exception*/public static Claims parseJWT(String jwt) throws Exception {SecretKey secretKey = generalKey();return Jwts.parser().verifyWith(secretKey)  // 使用 verifyWith 替代 setSigningKey.build()               // 需要调用 build() 方法.parseSignedClaims(jwt) // 使用 parseSignedClaims 替代 parseClaimsJws.getPayload();         // 使用 getPayload 替代 getBody}
}
8、application.yaml文件也更新了:
主要是springboot3中牵涉redis的部分有更新。
server:port: 8086tomcat:use-native: falsespring:application:name: spring-boot-applicationdatasource:driver-class-name: com.mysql.cj.jdbc.Driverurl: jdbc:mysql://127.0.0.1:3306/mall?allowMultiQueries=true&serverTimezone=GMT%2B8&useUnicode=true&characterEncoding=UTF-8username: rootpassword: rootdata:redis:# Redis服务器地址host: 127.0.0.1# Redis服务器连接端口port: 6379# Redis服务器连接密码password: # Redis数据库索引database: 3# 连接超时时间(毫秒)timeout: 30000lettuce:pool:max-active: 50max-wait: -1max-idle: 50min-idle: 1
9、统一异常处理问题:
首先要先配置好:
import org.springframework.context.annotation.Configuration;
import org.springframework.web.servlet.HandlerExceptionResolver;
import org.springframework.web.servlet.config.annotation.CorsRegistry;
import org.springframework.web.servlet.config.annotation.ResourceHandlerRegistry;
import org.springframework.web.servlet.config.annotation.WebMvcConfigurer;
import org.springframework.web.servlet.handler.SimpleMappingExceptionResolver;import java.util.List;
import java.util.Properties;@Configuration
public class CorsConfig implements WebMvcConfigurer {@Overridepublic void addCorsMappings(CorsRegistry registry) {// 设置允许跨域的路径registry.addMapping("/**")// 设置允许跨域请求的域名.allowedOriginPatterns("*")// 是否允许cookie.allowCredentials(true)// 设置允许的请求方式.allowedMethods("GET", "POST", "DELETE", "PUT")// 设置允许的header属性.allowedHeaders("*")// 跨域允许时间.maxAge(3600);}@Overridepublic void addResourceHandlers(ResourceHandlerRegistry registry) {registry.addResourceHandler("/static/**").addResourceLocations("classpath:/static/");}
}
其次,增加统一异常处理:
import org.apache.logging.log4j.LogManager;
import org.apache.logging.log4j.Logger;
import org.springframework.http.HttpStatus;
import org.springframework.http.ResponseEntity;
import org.springframework.web.bind.annotation.ControllerAdvice;
import org.springframework.web.bind.annotation.ExceptionHandler;
import org.springframework.web.servlet.resource.NoResourceFoundException;import java.util.HashMap;
import java.util.Map;@ControllerAdvice
public class GlobalExceptionHandler {private static final Logger logger = LogManager.getLogger(GlobalExceptionHandler.class);@ExceptionHandler(NoResourceFoundException.class)public ResponseEntity<Map<String, Object>> handleResourceNotFoundException(Exception ex) {Map<String, Object> errorResponse = new HashMap<>();errorResponse.put("message", ex.getMessage());errorResponse.put("status", HttpStatus.NOT_FOUND.value());return new ResponseEntity<>(errorResponse, HttpStatus.OK);}@ExceptionHandler(Exception.class)public ResponseEntity<Map<String, Object>> handleGeneralException(Exception ex) {logger.error("An exception occurred: ", ex);Map<String, Object> errorResponse = new HashMap<>();errorResponse.put("message", "An unexpected error occurred: " + ex.getMessage());errorResponse.put("status", HttpStatus.INTERNAL_SERVER_ERROR.value());return new ResponseEntity<>(errorResponse, HttpStatus.INTERNAL_SERVER_ERROR);}}