鸿蒙主流路由详解
鸿蒙主流路由详解
Navigation

Navigation更适合于一次开发,多端部署,也是官方主流推荐的一种路由控制方式,但是,使用起来入侵耦合度高,所以,一般会使用HMRouter,这也是官方主流推荐的路由Navigation官网地址
个人源码地址
路由跳转
第一步-定义路由栈
@Provide('PageInfo') pageInfo: NavPathStack = new NavPathStack()
第二步-定义页面跳转构造函数
统一写在主页面
@BuilderPageMap(name: string) {if (name === "NavDestinationTitle1") {pageOneTmp() // 自定义组件} else if (name === "NavDestinationTitle2") {pageTwoTmp() // 自定义组件} else if (name === "NavDestinationTitle3") {pageThreeTmp() // 自定义组件}}
分开写在子页面
这种方法,需要自定义路由表,这也是跨包路由所必须的
路由表配置:
-
在跳转目标模块的配置文件module.json5添加路由表配置:
{"module" : {"routerMap": "$profile:route_map"}} -
添加完路由配置文件地址后,需要在工程resources/base/profile中创建route_map.json文件。添加如下配置信息:
{"routerMap": [{"name": "PageOne", // 子组件名称"pageSourceFile": "src/main/ets/pages/PageOne.ets", // 子组件地址"buildFunction": "PageOneBuilder", // 字组件构造函数"data": {"description" : "this is PageOne" // 描述}}]} -
填写构造函数
@Builder
export function pageOneTmpBuilder(){pageOneTmp()
}
第三步-进行页面跳转
这里只介绍常用简单的跳转方式
不带参数跳转
// 路由表在主页面
this.pageInfo.pushPathByName(`NavDestinationTitle${index}`, null) // 第一个参数是地址,第二个参数是数据
// 路由表是 router_map.json
this.pageInfo.pushPathByName('pageOneTmp', null) // 第一个参数是地址,第二个参数是数据
带参数跳转
// 路由表在主页面
let loginParam:LoginParam = new LoginParam("张三","男", 18) // LoginParam自定义类型
this.pageInfo.pushPathByName(`NavDestinationTitle${index}`,loginParam) // 第一个参数是地址,第二个参数是数据
// 路由表是 router_map.json
let loginParam:LoginParam = new LoginParam("张三","男", 18) // LoginParam自定义类型
this.pageInfo.pushPathByName(`pageOneTmp`,loginParam) // 第一个参数是地址,第二个参数是数据
参数解析
// 子页面
// 获得所有NavDestination的名称
let params:string[] = this.pageInfos.getAllPathName()
console.log(TAG,'所有页面名称',JSON.stringify(params))// 通过Index获取参数
let obj = this.pageInfos.getParamByIndex(0) as LoginParam
console.log(TAG,'来源页面参数',JSON.stringify(obj))// 通过名称获取参数(一般路由栈顶端的就是当前页面,params[params.length-1]可以路由栈栈顶名称)
let params2 = this.pageInfos.getParamByName(params[params.length-1])[0] as LoginParam
console.log(TAG,'来源页面参数',JSON.stringify(params2))
带参返回
// 子页面,可以放在onRead()方法里面接收,也可以放在aboutToAppear()方法里面接收
// 获得所有NavDestination的名称
let params:string[] = this.pageInfos.getAllPathName()
console.log(TAG,'所有页面名称',JSON.stringify(params))// 通过Index获取参数
let obj = this.pageInfos.getParamByIndex(0) as LoginParam
console.log(TAG,'来源页面参数',JSON.stringify(obj))// 通过名称获取参数(一般路由栈顶端的就是当前页面,params[params.length-1]可以路由栈栈顶名称)
let params2 = this.pageInfos.getParamByName(params[params.length-1])[0] as LoginParam
console.log(TAG,'来源页面参数',JSON.stringify(params2))
// 带参返回
this.pageInfos.pop(obj,true)
主页面解析子页面参数
// 解析参数
let loginParam:LoginParam = new LoginParam("张三","男", 18) // LoginParam自定义类型
this.pageInfo.pushPathByName(`NavDestinationTitle${index}`,loginParam,(popInfo)=>{console.log(TAG,`NavDestinationTitle${index}返回信息`,JSON.stringify(popInfo.result))
}) // 第一个参数是地址,第二个参数是数据,第三个处理子页面返回的参数
路由拦截
第一步-定义路由栈
@Provide('PageInfo') pageInfo: NavPathStack = new NavPathStack()
第二步-定义页面跳转构造函数
@BuilderPageMap(name: string) {if (name === "NavDestinationTitle1") {pageOneTmp() // 自定义组件} else if (name === "NavDestinationTitle2") {pageTwoTmp() // 自定义组件} else if (name === "NavDestinationTitle3") {pageThreeTmp() // 自定义组件}}
第三步-进行页面跳转并进行拦截
// 解析参数
let loginParam: LoginParam = new LoginParam("张三", "男", 18) // LoginParam自定义类型
this.pageInfo.pushPathByName(`NavDestinationTitle${index}`, loginParam, (popInfo) => {console.log(TAG, `NavDestinationTitle${index}返回信息`, JSON.stringify(popInfo.result))
}) // 第一个参数是地址,第二个参数是数据,第三个处理子页面返回的参数// 路由拦截
this.pageInfo.setInterception({willShow: (from: NavDestinationContext | "navBar", to:NavDestinationContext | "navBar",operation: NavigationOperation, animated: boolean) => {if (typeof to === "string") {console.log("target page is navigation home page.");return;}// 将跳转到PageTwo的路由重定向到PageOnelet target: NavDestinationContext = to asNavDestinationContext;console.log(TAG, '当前要跳转界面', target.pathInfo.name)if (target.pathInfo.name === 'NavDestinationTitle1') {target.pathStack.pop();target.pathStack.pushPathByName('NavDestinationTitle2', null);}}
})
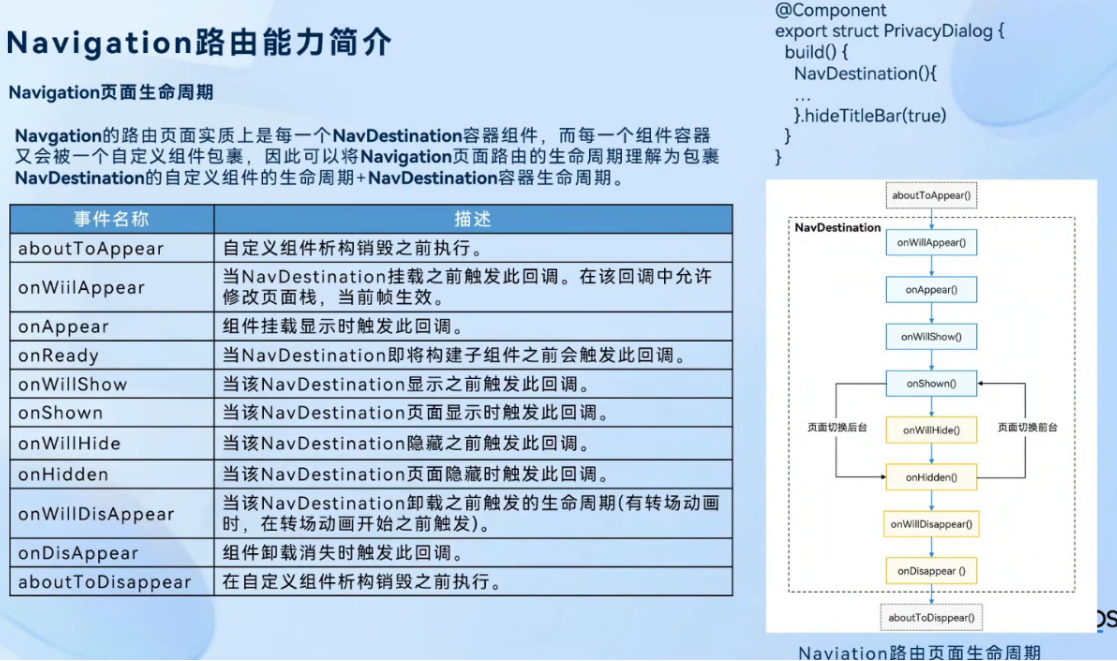
生命周期

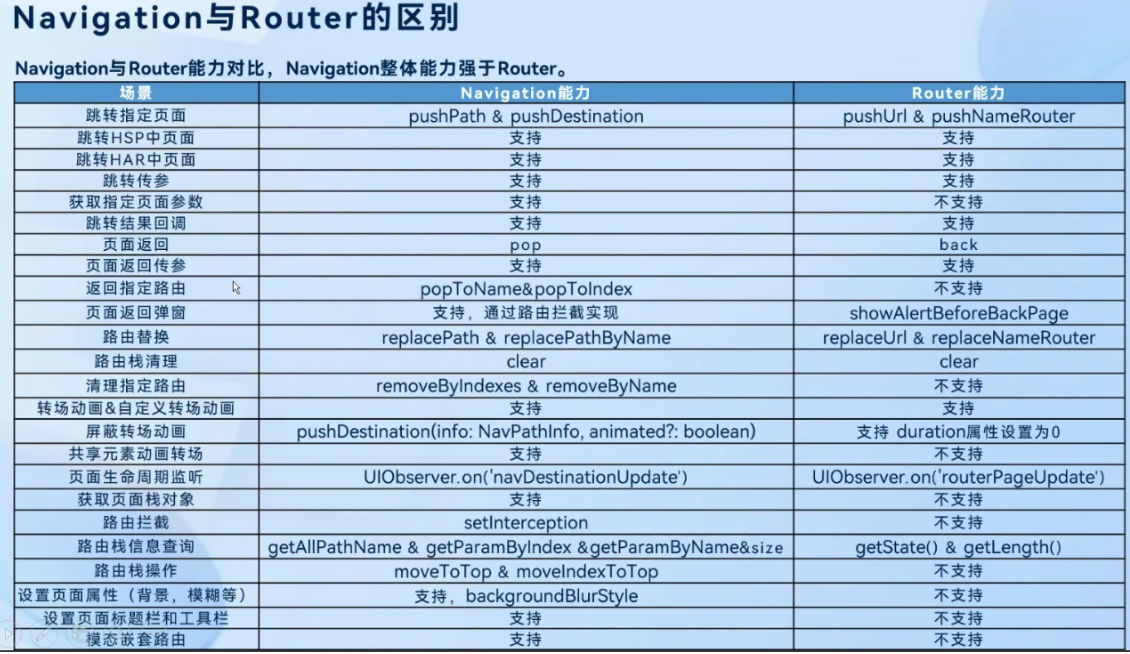
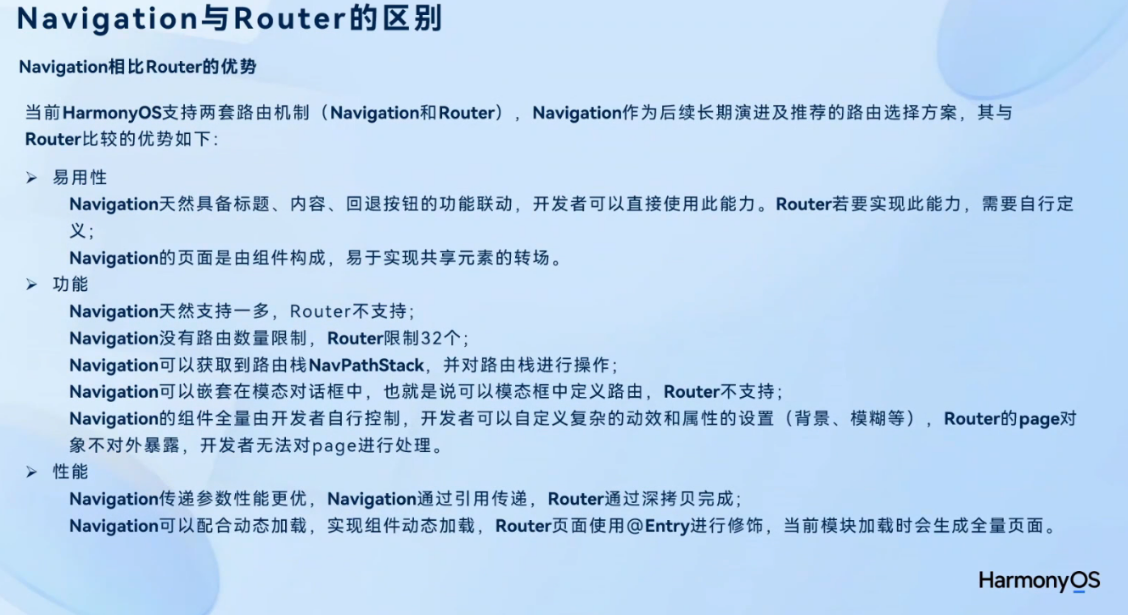
对比


HmRouter
这种路由方式进行了解耦,不用再去写Build函数,它是基于自定义注解的方式,进行路由跳转,这也是官方推荐的方式
官网地址
个人源码地址
基础配置
第一步-使用ohpm安装依赖
ohpm install @hadss/hmrouter   // 路由框架
ohpm install @hadss/hmrouter-transitions   // 高阶转场动画库,依赖路由框架(可选)
第二步-拷贝artifacts到工程目录libs文件(需要自己创建)
第三步-修改oh-package.json5(entry目录切记)
报错的话重新输入路径
{"dependencies": {"@hadss/hmrouter": "file: ../libs/HMRouterLibrary-${version}.har","@hadss/hmrouter-transitions": "file: ../libs/HMRouterTransitions-${version}.har"}
}
第四步-修改工程的hvigor/hvigor-config.json文件
{"dependencies": {"@hadss/hmrouter-plugin": "file: ../libs/hadss-hmrouter-plugin-${version}.tgz"// 使用npm仓版本号}
}
第五步-在模块中引入路由编译插件,修改 hvigorfile.ts
import { hapTasks } from '@ohos/hvigor-ohos-plugin';
import { hapPlugin } from '@hadss/hmrouter-plugin';
//管理HMRouter这个对象的,根据报的类型修改hapPlugin
export default {system: hapTasks, /* Built-in plugin of Hvigor. It cannot be modified. */plugins:[hapPlugin()] /* Custom plugin to extend the functionality of Hvigor. */
}
第六步-可选配置hmrouter_config.json(自己在工程目录下创建)
插件扫描指定目录下的文件,动态的生成被包装好的页面对象
{"scanDir": ["src/main/ets/components","src/main/ets/interceptors"],"saveGeneratedFile": true
}
第七步-工程配置在工程目录下的build-profile.json5
"buildOption": {"strictMode": {"caseSensitiveCheck": true,"useNormalizedOHMUrl": true}
}
使用
第一步-初始化 onCreate()
在UIAbility或者启动框架AppStartup中初始化路由框架
export default class EntryAbility extends UIAbility {onCreate(want: Want, launchParam: AbilityConstant.LaunchParam): void {HMRouterMgr.init({context: this.context})}
}
第二步-主界面
自定义主界面样式
/*** 自定义主界面样式*/
class NavModifier extends AttributeUpdater<NavigationAttribute> {initializeModifier(instance: NavigationAttribute): void {instance.mode(NavigationMode.Stack);instance.navBarWidth('100%');instance.hideTitleBar(true);instance.hideToolBar(true);}
}
主界面使用
import { HMDefaultGlobalAnimator, HMNavigation } from '@hadss/hmrouter';
import { AttributeUpdater } from '@kit.ArkUI';@Entry
@Component
struct Index {modifier: NavModifier = new NavModifier()build() {Column() {HMNavigation({navigationId:'mainNavigation',homePageUrl:'PageA', // 设置主页options:{standardAnimator:HMDefaultGlobalAnimator.STANDARD_ANIMATOR,dialogAnimator:HMDefaultGlobalAnimator.DIALOG_ANIMATOR,modifier:this.modifier // 设置页面风格}}){Button('点我')}}.height('100%').width('100%')}
}/*** 自定义主界面样式*/
class NavModifier extends AttributeUpdater<NavigationAttribute> {initializeModifier(instance: NavigationAttribute): void {instance.mode(NavigationMode.Stack);instance.navBarWidth('100%');instance.hideTitleBar(true);instance.hideToolBar(true);}
}
第三步-可选配置拦截器
import { HMInterceptor, HMInterceptorAction, HMInterceptorInfo, IHMInterceptor } from "@hadss/hmrouter";const TAG = '[JumpInfoInterceptor]'@HMInterceptor({ interceptorName: 'JumpInfoInterceptor', global: true })
export class JumpInfoInterceptor implements IHMInterceptor {handle(info: HMInterceptorInfo): HMInterceptorAction {/*** export interface HMInterceptorInfo {* srcName: string;*  targetName?: string;*  isSrc?: boolean;*  type: HMActionType;*  routerPathInfo: HMRouterPathInfo;*  routerPathCallback?: HMRouterPathCallback;*  context: UIContext;* }* 可以根据自己的需求,配置拦截信息*/let connectionInfo: string = info.type === 'push' ? 'jump to' : 'back to';console.info(TAG,'输出信息为',`${info.srcName} ${connectionInfo} ${info.targetName}`)return HMInterceptorAction.DO_NEXT;}
}
第四步-路由跳转
不带拦截器的跳转
import { HMRouter, HMRouterMgr } from '@hadss/hmrouter';const TAG = '[PageC]'@HMRouter({pageUrl:'PageC'})
@Component
export struct PageC {aboutToAppear(): void {let param = HMRouterMgr.getCurrentParam()console.log(TAG,'PageC的接收参数为',JSON.stringify(param))}build() {Column({space:20}){Button('PageC').onClick(()=>{HMRouterMgr.pop({pageUrl:'PageC',param:'这是来自于C的数据'})})}}
}
带拦截器的跳转
import { HMRouter, HMRouterMgr } from "@hadss/hmrouter";const TAG = '[PageB]'@HMRouter({pageUrl:'PageB',interceptors:['JumpInfoInterceptor']})
@Component
export struct PageB {aboutToAppear(): void {let param = HMRouterMgr.getCurrentParam()console.log(TAG,'PageB的接收参数为',JSON.stringify(param))}build() {Column(){Button('PageB==>pop').onClick(()=>{HMRouterMgr.pop({pageUrl:'PageA',param:'这是来自于B的数据'})})Button('PageB==>push').onClick(()=>{HMRouterMgr.push({pageUrl:'PageC',param:'这是来自于B的数据'})})}}
}
