鸿蒙文本组件高级特性——富文本属性字符串
1、概 述
属性字符串StyledString/MutableStyledString(MutableStyledString继承于StyledString,以下统一简称StyledString)是功能强大的标记对象,可用于字符或段落级别设置文本样式。通过将StyledString附加到文本组件, 可以通过多种方式更改文本,包括修改字号、添加字体颜色、使文本可点击以及自定义方式绘制文本等。
属性字符串提供多种类型样式对象,涵盖各种常见的文本样式格式。也可以自行创建CustomSpan, 以应用自定义样式。
2、富文本属性字符串的使用
👉🏻 基本的创建与使用
可以通过TextController提供的setStyledString(StyledString)方法将属性字符串附加到文本组件【推荐在onPageShow中触发绑定,在aboutToAppear中调用setStyledString无法实现页面初始即可见属性字符串文本内容,因为aboutToAppear运行时组件还没有完成创建并成功挂载节点树】
基本的使用示例如下:
@Entry@Componentstruct styled_string_demo1 {styledString1: StyledString = new StyledString("运动45分钟");mutableStyledString1: MutableStyledString = new MutableStyledString("运动35分钟");controller1: TextController = new TextController();controller2: TextController = new TextController();async onPageShow() {this.controller1.setStyledString(this.styledString1)this.controller2.setStyledString(this.mutableStyledString1)}build() {Column() {// 显示属性字符串Text(undefined, { controller: this.controller1 })Text(undefined, { controller: this.controller2 })}.width('100%')}}
示例效果如下(没有设置自定义样式):

👉🏻 设置行内文本样式
属性字符串目前提供了TextStyle、TextShadowStyle、DecorationStyle、BaselineOffsetStyle、LineHeightStyle、LetterSpacingStyle各种Style对象来实现设置文本的各类样式。分别介绍如下:
-
使用TextStyle设置样式
示例代码如下:
import { LengthMetrics } from '@kit.ArkUI'@Entry@Componentstruct styled_string_demo2 {textStyleAttrs: TextStyle = new TextStyle({ fontWeight: FontWeight.Bolder, fontSize: LengthMetrics.vp(24), fontStyle: FontStyle.Italic })mutableStyledString: MutableStyledString = new MutableStyledString("运动35分钟 目标达成", [{start: 2,length: 2,styledKey: StyledStringKey.FONT,styledValue: this.textStyleAttrs},{start: 7,length: 4,styledKey: StyledStringKey.FONT,styledValue: new TextStyle({ fontColor: Color.Orange, fontSize: LengthMetrics.vp(12)})}]);controller: TextController = new TextController();async onPageShow() {this.controller.setStyledString(this.mutableStyledString)}build() {Column() {// 显示属性字符串Text(undefined, { controller: this.controller }).margin({ top: 10 })}.width('100%')}}
效果如下:
![]()
-
使用TextShadowStyle设置样式
示例代码如下:
// xxx.ets@Entry@Componentstruct styled_string_demo3 {mutableStyledString: MutableStyledString = new MutableStyledString("运动35分钟", [{start: 0,length: 3,styledKey: StyledStringKey.TEXT_SHADOW,styledValue: new TextShadowStyle({radius: 5,type: ShadowType.COLOR,color: Color.Red,offsetX: 10,offsetY: 10})}]);controller: TextController = new TextController();async onPageShow() {this.controller.setStyledString(this.mutableStyledString)}build() {Column() {// 显示属性字符串Text(undefined, { controller: this.controller })}.width('100%')}}
示例效果如下:
![]()
-
使用DecorationStyle设置样式
示例代码如下:
// xxx.ets@Entry@Componentstruct styled_string_demo4 {mutableStyledString: MutableStyledString = new MutableStyledString("运动35分钟", [{start: 0,length: 3,styledKey: StyledStringKey.DECORATION,styledValue: new DecorationStyle({type: TextDecorationType.LineThrough, color: Color.Red})}]);controller: TextController = new TextController();async onPageShow() {this.controller.setStyledString(this.mutableStyledString)}build() {Column() {// 显示属性字符串Text(undefined, { controller: this.controller })}.width('100%')}}
示例效果如下:
![]()
-
使用BaselineOffsetStyle设置样式
示例代码如下:
import { LengthMetrics, LengthUnit } from '@kit.ArkUI'// xxx.ets@Entry@Componentstruct styled_string_demo5 {mutableStyledString: MutableStyledString = new MutableStyledString("运动35分钟", [{start: 0,length: 3,styledKey: StyledStringKey.BASELINE_OFFSET,styledValue: new BaselineOffsetStyle(LengthMetrics.px(20))}]);controller: TextController = new TextController();async onPageShow() {this.controller.setStyledString(this.mutableStyledString)}build() {Column() {// 显示属性字符串Text(undefined, { controller: this.controller })}.width('100%')}}
示例效果如下:

-
使用LineHeightStyle设置样式
示例代码如下:
import { LengthMetrics, LengthUnit } from '@kit.ArkUI'// xxx.ets@Entry@Componentstruct styled_string_demo6 {mutableStyledString: MutableStyledString = new MutableStyledString("运动35分钟\n顶顶顶\n得到", [{start: 8,length: 3,styledKey: StyledStringKey.LINE_HEIGHT,styledValue: new LineHeightStyle(LengthMetrics.vp(50))}]);controller: TextController = new TextController();async onPageShow() {this.controller.setStyledString(this.mutableStyledString)}build() {Column() {// 显示属性字符串Text(undefined, { controller: this.controller })}.width('100%').margin({ top: 10 })}}
示例效果如下:

-
使用LetterSpacingStyle设置样式
示例代码如下:
import { LengthMetrics, LengthUnit } from '@kit.ArkUI'// xxx.ets@Entry@Componentstruct styled_string_demo7 {mutableStyledString: MutableStyledString = new MutableStyledString("运动35分钟", [{start: 0,length: 2,styledKey: StyledStringKey.LETTER_SPACING,styledValue: new LetterSpacingStyle(new LengthMetrics(20, LengthUnit.VP))}]);controller: TextController = new TextController();async onPageShow() {this.controller.setStyledString(this.mutableStyledString)}build() {Column() {// 显示属性字符串Text(undefined, { controller: this.controller })}.width('100%')}}
示例效果如下:
![]()
👉🏻 设置段落样式
可通过ParagraphStyle设置段落样式布局。下图显示了如何分割文本中的段落,段落以换行符 \n 结尾。
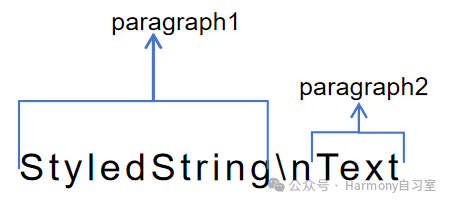
下面的代码示例展示了如何创建 ParagraphStyle 并应用。如果将 ParagraphStyle 附加到段落开头末尾或之间的任何位置均会应用样式,非段落区间内则不会应用样式。示例代码如下:
import { LengthMetrics } from '@kit.ArkUI'titleParagraphStyleAttr: ParagraphStyle = new ParagraphStyle({ textAlign: TextAlign.Center });//段落首行缩进15vpparagraphStyleAttr1: ParagraphStyle = new ParagraphStyle({ textIndent: LengthMetrics.vp(15) });//创建含段落样式的对象paragraphStyledString1paragraphStyledString1: MutableStyledString = new MutableStyledString("段落标题\n正文第一段落开始0123456789正文第一段落结束。", [{start: 0,length: 4,styledKey: StyledStringKey.PARAGRAPH_STYLE,styledValue: this.titleParagraphStyleAttr},{start: 0,length: 4,styledKey: StyledStringKey.LINE_HEIGHT,styledValue: new LineHeightStyle(new LengthMetrics(50))},{start: 0,length: 4,styledKey: StyledStringKey.FONT,styledValue: new TextStyle({ fontSize: LengthMetrics.vp(24), fontWeight: FontWeight.Bolder })},{start: 5,length: 3,styledKey: StyledStringKey.PARAGRAPH_STYLE,styledValue: this.paragraphStyleAttr1},{start: 5,length: 20,styledKey: StyledStringKey.LINE_HEIGHT,styledValue: this.lineHeightStyle1}]);
除了可以在创建属性字符串时就预设样式,也可以后续通过replaceStyle清空原样式替换新样式, 同时需要在附加的文本组件controller上主动触发更新绑定的属性字符串。示例代码如下:
import { LengthMetrics } from '@kit.ArkUI'//段落不设置缩进配置最大行数及超长显示方式paragraphStyleAttr3: ParagraphStyle = new ParagraphStyle({ textAlign: TextAlign.End, maxLines: 1, wordBreak: WordBreak.BREAK_ALL, overflow: TextOverflow.Ellipsis});// 后续某个节点触发更新段落样式controller: TextController = new TextController();this.paragraphStyledString1.replaceStyle({start: 5,length: 3,styledKey: StyledStringKey.PARAGRAPH_STYLE,styledValue: this.paragraphStyleAttr3})this.controller.setStyledString(this.mutableStyledString3)
👉🏻 使用图片
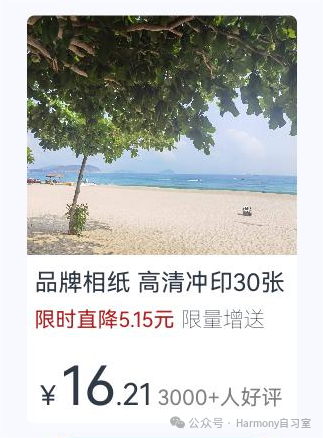
可通过ImageAttachment来添加图片。下面的示例展示了如何将图片和文本附加到同一个MutableStyledString对象上,并实现图文混排。
// xxx.etsimport { image } from '@kit.ImageKit'import { LengthMetrics } from '@kit.ArkUI'@Entry@Componentstruct styled_string_demo4 {@State message: string = 'Hello World'imagePixelMap: image.PixelMap | undefined = undefined@State imagePixelMap3: image.PixelMap | undefined = undefinedmutableStr: MutableStyledString = new MutableStyledString('123');controller: TextController = new TextController();mutableStr2: MutableStyledString = new MutableStyledString('This is set decoration line style to the mutableStr2', [{start: 0,length: 15,styledKey: StyledStringKey.DECORATION,styledValue: new DecorationStyle({type: TextDecorationType.Overline,color: Color.Orange,style: TextDecorationStyle.DOUBLE})}])async aboutToAppear() {console.info("aboutToAppear initial imagePixelMap")this.imagePixelMap = await this.getPixmapFromMedia($r('app.media.sea'))}private async getPixmapFromMedia(resource: Resource) {let unit8Array = await this.getUIContext().getHostContext()?.resourceManager?.getMediaContent({bundleName: resource.bundleName,moduleName: resource.moduleName,id: resource.id})let imageSource = image.createImageSource(unit8Array?.buffer?.slice(0, unit8Array?.buffer?.byteLength))let createPixelMap: image.PixelMap = await imageSource.createPixelMap({desiredPixelFormat: image.PixelMapFormat.RGBA_8888})await imageSource.release()return createPixelMap}leadingMarginValue: ParagraphStyle = new ParagraphStyle({ leadingMargin: LengthMetrics.vp(5)})//行高样式对象lineHeightStyle1: LineHeightStyle= new LineHeightStyle(new LengthMetrics(24));//Bold样式boldTextStyle: TextStyle = new TextStyle({ fontWeight: FontWeight.Bold });//创建含段落样式的对象paragraphStyledString1paragraphStyledString1: MutableStyledString = new MutableStyledString("\n品牌相纸 高清冲印30张\n限时直降5.15元 限量增送", [{start: 0,length: 28,styledKey: StyledStringKey.PARAGRAPH_STYLE,styledValue: this.leadingMarginValue},{start: 14,length: 9,styledKey: StyledStringKey.FONT,styledValue: new TextStyle({ fontSize: LengthMetrics.vp(14), fontColor: '#B22222' })},{start: 24,length: 4,styledKey: StyledStringKey.FONT,styledValue: new TextStyle({ fontSize: LengthMetrics.vp(14), fontWeight: FontWeight.Lighter })},{start: 11,length: 4,styledKey: StyledStringKey.LINE_HEIGHT,styledValue: this.lineHeightStyle1}]);paragraphStyledString2: MutableStyledString = new MutableStyledString("\n¥16.21 3000+人好评", [{start: 0,length: 5,styledKey: StyledStringKey.PARAGRAPH_STYLE,styledValue: this.leadingMarginValue},{start: 0,length: 4,styledKey: StyledStringKey.LINE_HEIGHT,styledValue: new LineHeightStyle(new LengthMetrics(60))},{start: 0,length: 7,styledKey: StyledStringKey.FONT,styledValue: this.boldTextStyle},{start: 1,length: 1,styledKey: StyledStringKey.FONT,styledValue: new TextStyle({ fontSize: LengthMetrics.vp(18) })},{start: 2,length: 2,styledKey: StyledStringKey.FONT,styledValue: new TextStyle({ fontSize: LengthMetrics.vp(36) })},{start: 4,length: 3,styledKey: StyledStringKey.FONT,styledValue: new TextStyle({ fontSize: LengthMetrics.vp(20) })},{start: 7,length: 9,styledKey: StyledStringKey.FONT,styledValue: new TextStyle({ fontColor: Color.Grey, fontSize: LengthMetrics.vp(14)})}])build() {Row() {Column({ space: 10 }) {Text(undefined, { controller: this.controller }).copyOption(CopyOptions.InApp).draggable(true).backgroundColor('#FFFFFF').borderRadius(5)Button('点击查看商品卡片').onClick(() => {if (this.imagePixelMap !== undefined) {this.mutableStr = new MutableStyledString(new ImageAttachment({value: this.imagePixelMap,size: { width: 180, height: 160 },verticalAlign: ImageSpanAlignment.BASELINE,objectFit: ImageFit.Fill}))this.paragraphStyledString1.appendStyledString(this.paragraphStyledString2)this.mutableStr.appendStyledString(this.paragraphStyledString1)this.controller.setStyledString(this.mutableStr)}})}.width('100%')}.height('100%').backgroundColor('#F8F8FF')}}
示例效果如下:
👉🏻 设置事件
可通过GestureStyle设置onClick、onLongPress事件来使文本响应点击长按事件。除了初始化属性字符串对象即初始样式对象,还可以可通过setStyle接口再叠加新样式或更新已有样式,同时需要在附加的文本组件controller上主动触发更新绑定的属性字符串。示例代码如下:
import { drawing } from '@kit.ArkGraphics2D';class MyCustomSpan extends CustomSpan {constructor(word: string, width: number, height: number, fontSize: number) {super();this.word = word;this.width = width;this.height = height;this.fontSize = fontSize;}onMeasure(measureInfo: CustomSpanMeasureInfo): CustomSpanMetrics {return { width: this.width, height: this.height }}onDraw(context: DrawContext, options: CustomSpanDrawInfo) {let canvas = context.canvas;const brush = new drawing.Brush();brush.setColor({ alpha: 255, red: 0, green: 0, blue: 0 })const font = new drawing.Font()font.setSize(vp2px(this.fontSize))const textBlob = drawing.TextBlob.makeFromString(this.word.substring(0, 5), font, drawing.TextEncoding.TEXT_ENCODING_UTF8)canvas.attachBrush(brush)this.onDrawRectByRadius(context, options.x, options.x + vp2px(this.width), options.lineTop, options.lineBottom, 20)brush.setColor({ alpha: 255, red: 255, green: 255, blue: 255 })canvas.attachBrush(brush)canvas.drawTextBlob(textBlob, options.x, options.lineBottom - 30)brush.setColor({ alpha: 255, red: 255, green: 228 , blue: 196 })canvas.attachBrush(brush)const textBlob1 = drawing.TextBlob.makeFromString(this.word.substring(5), font, drawing.TextEncoding.TEXT_ENCODING_UTF8)canvas.drawTextBlob(textBlob1, options.x + vp2px(100), options.lineBottom - 30)canvas.detachBrush()}onDrawRectByRadius(context: DrawContext, left: number, right: number, top: number, bottom: number, radius: number) {let canvas = context.canvaslet path = new drawing.Path()// 画带radius的rectpath.moveTo(left + radius, top)path.lineTo(right - radius, top)path.arcTo(right - 2 * radius, top, right, top + 2 * radius, 270, 90)path.lineTo(right, bottom - radius)path.arcTo(right - 2 * radius, bottom - 2 * radius, right, bottom, 0, 90)path.lineTo(left + 2 * radius, bottom)path.arcTo(left, bottom - 2 * radius, left + 2 * radius, bottom, 90, 90)path.lineTo(left, top + 2 * radius)path.arcTo(left, top, left + 2 * radius, top + 2 * radius, 180, 90)canvas.drawPath(path)}setWord(word: string) {this.word = word;}width: number = 160word: string = "drawing"height: number = 10fontSize: number = 16}@Entry@Componentstruct styled_string_demo6 {customSpan3: MyCustomSpan = new MyCustomSpan("99VIP88%off", 200, 40, 30)textStyle: MutableStyledString = new MutableStyledString("123");textController: TextController = new TextController()isPageShow: boolean = trueasync onPageShow() {if (!this.isPageShow) {return}this.isPageShow = falsethis.textController.setStyledString(new StyledString(this.customSpan3))}build() {Row() {Column() {Text(undefined, { controller: this.textController }).copyOption(CopyOptions.InApp).fontSize(30)}.width('100%')}.height('100%')}}
示例效果如下:

3、一个综合实例
实现一个富文本效果,效果如下:

实现代码如下:
import { LengthMetrics } from '@kit.ArkUI';@Entry@Componentstruct Index {alignCenterParagraphStyleAttr: ParagraphStyle = new ParagraphStyle({ textAlign: TextAlign.Center });//行高样式对象lineHeightStyle1: LineHeightStyle= new LineHeightStyle(LengthMetrics.vp(24));//Bold样式boldTextStyle: TextStyle = new TextStyle({ fontWeight: FontWeight.Bold });//创建含段落样式的对象paragraphStyledString1paragraphStyledString1: MutableStyledString = new MutableStyledString("您的豪华钻石已过期1天\n续费可继续享受会员专属权益", [{start: 0,length: 4,styledKey: StyledStringKey.PARAGRAPH_STYLE,styledValue: this.alignCenterParagraphStyleAttr},{start: 0,length: 4,styledKey: StyledStringKey.LINE_HEIGHT,styledValue: new LineHeightStyle(LengthMetrics.vp(40))},{start: 11,length: 14,styledKey: StyledStringKey.FONT,styledValue: new TextStyle({ fontSize: LengthMetrics.vp(14), fontColor: Color.Grey })},{start: 11,length: 4,styledKey: StyledStringKey.PARAGRAPH_STYLE,styledValue: this.alignCenterParagraphStyleAttr},{start: 11,length: 4,styledKey: StyledStringKey.LINE_HEIGHT,styledValue: this.lineHeightStyle1}]);paragraphStyledString2: MutableStyledString = new MutableStyledString("\n¥4.88¥15", [{start: 0,length: 4,styledKey: StyledStringKey.PARAGRAPH_STYLE,styledValue: this.alignCenterParagraphStyleAttr},{start: 0,length: 4,styledKey: StyledStringKey.LINE_HEIGHT,styledValue: new LineHeightStyle(LengthMetrics.vp(60))},{start: 0,length: 6,styledKey: StyledStringKey.FONT,styledValue: this.boldTextStyle},{start: 1,length: 1,styledKey: StyledStringKey.FONT,styledValue: new TextStyle({ fontSize: LengthMetrics.vp(18)})},{start: 2,length: 4,styledKey: StyledStringKey.FONT,styledValue: new TextStyle({ fontSize: LengthMetrics.vp(40)})},{start: 6,length: 3,styledKey: StyledStringKey.FONT,styledValue: new TextStyle({ fontColor: Color.Grey, fontSize: LengthMetrics.vp(14)})},{start: 6,length: 3,styledKey: StyledStringKey.DECORATION,styledValue: new DecorationStyle({ type: TextDecorationType.LineThrough, color: Color.Grey })}])paragraphStyledString3: MutableStyledString = new MutableStyledString("\n02时06分后将失去该优惠", [{start: 0,length: 4,styledKey: StyledStringKey.PARAGRAPH_STYLE,styledValue: this.alignCenterParagraphStyleAttr},{start: 0,length: 4,styledKey: StyledStringKey.LINE_HEIGHT,styledValue: new LineHeightStyle(LengthMetrics.vp(30))},{start: 1,length: 2,styledKey: StyledStringKey.FONT,styledValue: new TextStyle({ fontColor: '#FFD700', fontWeight: FontWeight.Bold })},{start: 4,length: 2,styledKey: StyledStringKey.FONT,styledValue: new TextStyle({ fontColor: '#FFD700', fontWeight: FontWeight.Bold })}])controller: TextController = new TextController();build() {Row() {Column( { space : 5 }) {Text(undefined, { controller: this.controller }).width(240).copyOption(CopyOptions.InApp).draggable(true).onAppear(()=>{this.paragraphStyledString2.appendStyledString(this.paragraphStyledString3)this.paragraphStyledString1.appendStyledString(this.paragraphStyledString2)this.controller.setStyledString(this.paragraphStyledString1)})Button("限时4.88元 立即续费").width(200).fontColor(Color.White).fontSize(18).backgroundColor('#3CB371').margin({ bottom: 10 })}.borderWidth(1).borderColor('#FFDEAD').margin({ left: 10 })}.height('60%')}}