大模型微调实战:基于 LLaMAFactory 通过 LoRA 微调修改模型自我认知
1. 训练相关概念
上一篇文章GPT 是如何炼成的: 大模型微调基本概念指北中分享了模型训练的相关概念,这里简单复习一下。
ChatGPT 是如何炼成的?
ChatGPT 是如何炼成的,或者说如何训练出一个大模型?
读者福利:如果大家对大模型感兴趣,这套大模型学习资料一定对你有用
对于0基础小白入门:

训练一个大模型一般可以分为三步:
-
1)预训练(Pre Training,PT):提供海量数据,通过无监督预训练,花费大量算力得到一个基座模型
-
比如 Llama 3 在 24K GPU 集群上训练,使用了 15T 的数据
-
此时模型有预测下一个 token 的能力,但是离对话 / 问答 模型还差一点,可能不会回复你的问题,反而给你生成一个类似的问题
-
2)指令微调(Supervised Fine-Tuning, SFT):在基座模型上微调,让模型能够适用特定任务,最终得到一个 SFT 模型
-
比如为了让模型成为问答助手,需要让模型学习更多的问答对话,从而学习到我们输入问题的时候,模型应该输出答案,而不是输出一个类似的问题。
-
这些问答对话由人类准备的,包括问题和正确的回答。
-
3)强化学习(Reinforcement Learning from Human Feedback, RLHF):通过人类反馈进一步优化模型的生成质量,使其生成的回答更符合用户的期望和人类的价值观。
-
Helpful:判断模型遵循用户指令以及推断指令的能力。
-
Honest:判断模型产生幻觉( 编造事实)的倾向。
-
Harmless:判断模型的输出是否适当、是否诋毁或包含贬义内容。
-
一般根据 3H 原则进行打分:
-
为了简化这一过程,一般是先训练一个用于打分的模型,即:奖励模型(Reward Model,RW),让奖励模型来代替人实现强化学习
预训练由于对算力和数据需求都比较大,因此要求比较高,一般用户不会涉及到预训练。
更多的是基于开源的基础模型(LLama、Baichuan、Qwen、ChatGLM…)等做微调、强化学习以满足自身需求。
微调
什么是大模型微调?
大模型微调,也称为 Fine-tuning,是指在已经预训练好的大型语言模型基础上(一般称为“基座模型”),使用特定的数据集进行进一步的训练,让模型适应特定任务或领域。
微调方法
上一篇中介绍了比较主流的训练方法,这里简单提一下:
微调根据更新参数量不同可以分为以下两种:
-
全量参数更新 Full Fine-tuning(FFT):即对预训练模型的所有参数进行更新,训练速度较慢,消耗机器资源较多。
-
参数高效微调 Parameter-Efficient Fine-Tuning(PEFT):只对部分参数做调整,训练速度快,消耗机器资源少。
理论上,预训练和微调都可以做全量参数更新和部分参数更新,但是一般实际训练时都是 预训练 + 全量,微调 + 部分参数更新 这样组合的。
其中 PEFT 是一系列方法的统称,Scaling Down to Scale Up: A Guide to Parameter-Efficient Fine-Tuning[1] 论文里系统地概述和比较了参数高效微调方法,涵盖了 2019 年 2 月至 2023 年 2 月之间发表的 40 多篇论文。
文中作者将高效微调方法分为三类:
-
添加额外参数 A(Addition-based)
-
类似适配器的方法(Adapter-like methods)
-
软提示(Soft prompts)
-
选取部分参数更新 S(Selection-based)
-
引入重参数化 R(Reparametrization-based)
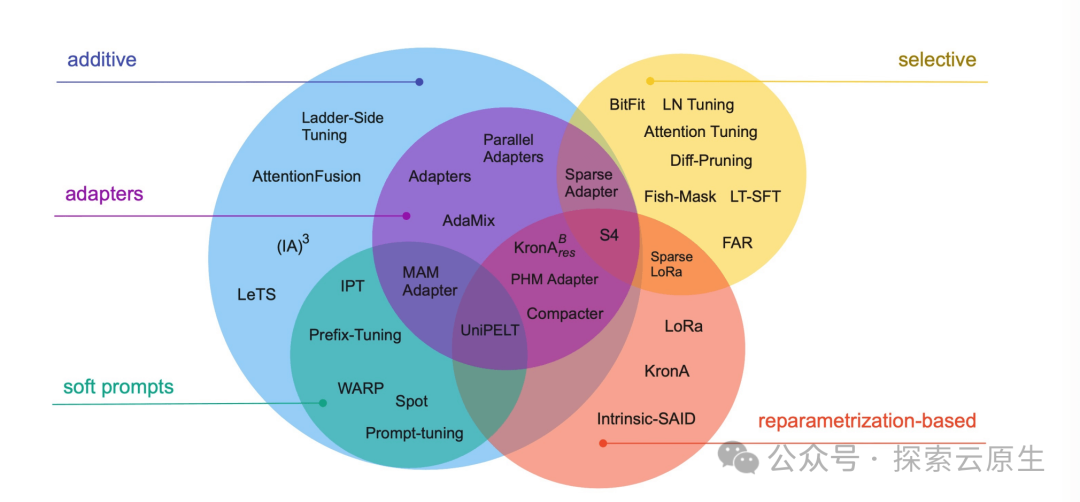
peft.png
选择合适的微调方法和框架可以显著提高效率,减少资源消耗,并帮助研究者和开发者更好地适应和优化特定任务。
具体就不介绍了,感兴趣的同学可以跳转论文查看~
现在比较主流的几种 PEFT:Prompt Tuning、Prefix Tuning、LoRA、QLoRA。
微调框架
比较主流的几个微调、训练工具:
-
huggingface/transformers[2]:最基础的一个库,提供了丰富的预训练模型和微调工具,支持大多数主流的 NLP 任务(如文本分类、序列标注、生成任务等)。适合进行快速实验和生产部署,有着广泛的社区支持。
-
huggingface/peft[3]:Parameter-Efficient Fine-Tuning,huggingface 开源的微调基础工具
-
modelscope/ms-swift[4]:modelscope 开源的轻量级微调框架
-
以中文大模型为主,支持各类微调方法
-
可以通过执行脚本进行微调,也可以在代码环境中一键微调
-
自带微调数据集和验证数据集,可以一键微调 + 模型验证
-
hiyouga/LLaMA-Factory[5]:全栈微调工具
-
运行脚本微调
-
基于 Web 端微调
-
支持海量模型 + 各种主流微调方法
-
自带基础训练数据集
-
除微调外,支持增量预训练和全量微调
-
NVIDIA/Megatron-LM[6]:NVIDIA 开发的大模型训练框架,支持大规模的预训练和微调。适用于需要极高性能和规模的大模型训练和微调。
快速实验选择 Transformers 即可,超大规模的选择 NVIDIA/Megatron-LM,普通规模就选择使用较为简单的 hiyouga/LLaMA-Factory。
本文则使用 LLaMAFactory 演示如何进行 LoRA 微调。
2.安装 LLaMAFactory
首先要准备一个 GPU 环境,可以参考这篇文章:GPU 使用指南:如何在裸机、Docker、K8s 等环境中使用 GPU 以及 GPU 环境搭建指南:使用 GPU Operator 加速 Kubernetes GPU 环境搭建
简单起见,直接使用镜像 pytorch/pytorch:2.0.1-cuda11.7-cudnn8-runtime 启动容器进行测试。
环境如下:
-
python 3.10.6
-
NVIDIA A40
root@sft:/root # python3 -V Python 3.10.6 root@sft:/root # nvidia-smi Tue Jul 23 14:36:46 2024 +-----------------------------------------------------------------------------+ | NVIDIA-SMI 525.147.05 Driver Version: 525.147.05 CUDA Version: 12.0 | |-------------------------------+----------------------+----------------------+ | GPU Name Persistence-M| Bus-Id Disp.A | Volatile Uncorr. ECC | | Fan Temp Perf Pwr:Usage/Cap| Memory-Usage | GPU-Util Compute M. | | | | MIG M. | |===============================+======================+======================| | 0 NVIDIA A40 Off | 00000000:00:07.0 Off | 0 | | 0% 43C P0 87W / 300W | 484MiB / 46068MiB | 0% Default | | | | N/A | +-------------------------------+----------------------+----------------------+ +-----------------------------------------------------------------------------+ | Processes: | | GPU GI CI PID Type Process name GPU Memory | | ID ID Usage | |=============================================================================| +-----------------------------------------------------------------------------+
接下来就安装 LLaMAFactory
git clone -b v0.8.1 https://github.com/hiyouga/LLaMA-Factory.git cd LLaMA-Factory pip install -e .[torch,metrics]
如果安装比较慢,可以先配置以下 pip 源
pip config set global.index-url https://pypi.tuna.tsinghua.edu.cn/simple/ pip config set install.trusted-host pypi.tuna.tsinghua.edu.cn
3. 准备模型数据集
准备模型
这里我们使用 Qwen1.5-1.8B-Chat 模型进行微调,首先下载模型。
这里使用一个尽量小的模型以避免部分设备因为 GPU 不够而无法完成微调。
使用 git lfs 进行下载
# 安装并初始化 git-lfs apt install git-lfs -y git lfs install # 下载模型 git lfs clone https://www.modelscope.cn/qwen/Qwen1.5-1.8B-Chat.git
下载完成后,包括如下内容:
文件比较大,一定要下载完整才行
root@lixd-sft:/mnt/b66582121706406e9797ffaf64a831b0/model/Qwen1.5-1.8B-Chat# ll -lhS total 3.5G -rw-r--r-- 1 root root 3.5G 7月 23 15:32 model.safetensors -rw-r--r-- 1 root root 6.8M 7月 23 15:22 tokenizer.json -rw-r--r-- 1 root root 2.7M 7月 23 15:22 vocab.json -rw-r--r-- 1 root root 1.6M 7月 23 15:22 merges.txt -rw-r--r-- 1 root root 7.2K 7月 23 15:22 LICENSE -rw-r--r-- 1 root root 4.2K 7月 23 15:22 README.md drwxr-xr-x 3 root root 4.0K 7月 23 15:22 ./ -rw-r--r-- 1 root root 1.5K 7月 23 15:22 .gitattributes -rw-r--r-- 1 root root 1.3K 7月 23 15:22 tokenizer_config.json -rw-r--r-- 1 root root 662 7月 23 15:22 config.json -rw-r--r-- 1 root root 206 7月 23 15:22 generation_config.json drwxr-xr-x 9 root root 174 7月 23 15:33 .git/ drwxr-xr-x 7 root root 127 7月 23 15:22 ../ -rw-r--r-- 1 root root 51 7月 23 15:22 configuration.json
准备数据集
准备数据集可以分为两个步骤:
-
1)准备数据集文件,json 格式,存放到 data 目录下
-
2)注册数据集,将 json 文件注册到 data 目录下的 dataset_info.json 文件
准备数据集
LLaMA-Factory 内置了一些数据集,本次就使用内置的 identity 数据集,用于修改模型的自我意识。
比如 Qwen 模型,默认会说自己是通义千问,我们微调后将其变为 Archer。
identity.json[8] 部分内容如下:
大家跳转原地址下载即可
[ { "instruction": "hi", "input": "", "output": "Hello! I am {{name}}, an AI assistant developed by {{author}}. How can I assist you today?" }, { "instruction": "Who are you?", "input": "", "output": "I am {{name}}, an AI assistant developed by {{author}}. How can I assist you today?" }, { "instruction": "你身份是什么?", "input": "", "output": "您好,我叫 {{name}},是一个由 {{author}} 训练和开发的人工智能助手。我的主要目标是协助用户解决问题和满足他们的需求。" }, { "instruction": "能介绍一下你自己吗?", "input": "", "output": "当然可以,我是 {{name}},一个由 {{author}} 开发的人工智能助手,可以为您提供回答和帮助。" } ]
可以看到都是一些关于模型自我认知的一些问题,基于该数据集训练即可改变模型自我认知。
首先是对文中的变量{{name}} 和{{author}}进行替换:
sed -i 's/{{name}}/Archer/g; s/{{author}}/意琦行/g' data/identity.json
替换后就像这样:
[ { "instruction": "hi", "input": "", "output": "Hello! I am Archer, an AI assistant developed by 意琦行. How can I assist you today?" }, { "instruction": "能介绍一下你自己吗?", "input": "", "output": "当然可以,我是 Archer,一个由 意琦行 开发的人工智能助手,可以为您提供回答和帮助。" } ]
数据集注册
对于新增数据集,我们还要将其注册到 LLaMAFactory。
不过 identity 是内置数据集,已经注册好了,可以跳过这步。
数据集注册可以分为以下两步:
-
1)将数据集移动到 data 目录下
-
2)修改 dataset_info.json 注册数据集
dataset_info.json 就是所有数据集的一个集合,部分内容如下:
root@test:/LLaMA-Factory# cat data/dataset_info.json { "identity": { "file_name": "identity.json" }, }
参数含义:
-
key 为数据集名称,比如这里的 identity
-
value 为数据集配置,只有文件名 file_name 为必填的,比如这里的 identity.json
处理好之后,再将 identity.json 文件移动到 data 目录就算是完成了数据集注册。
默认所有数据集都在 data 目录中,会按照 data/identity.json 目录获取,因此需要将数据集移动到 data 目录下。
数据集和模型都准备好就可以开始微调了。
4. 开始微调
之前需要使用对应 shell 脚本进行微调,新版提供了 llamafactory-cli 命令行工具使用。
开始微调
完整命令如下,参数还是比较多,按照教程操作的话,只需要替换模型路径即可。
modelPath=models/Qwen1.5-1.8B-Chat llamafactory-cli train \ --model_name_or_path $modelPath \ --stage sft \ --do_train \ --finetuning_type lora \ --template qwen \ --dataset identity \ --output_dir ./saves/lora/sft \ --learning_rate 0.0005 \ --num_train_epochs 8 \ --cutoff_len 4096 \ --logging_steps 1 \ --warmup_ratio 0.1 \ --weight_decay 0.1 \ --gradient_accumulation_steps 8 \ --save_total_limit 1 \ --save_steps 256 \ --seed 42 \ --data_seed 42 \ --lr_scheduler_type cosine \ --overwrite_cache \ --preprocessing_num_workers 16 \ --plot_loss \ --overwrite_output_dir \ --per_device_train_batch_size 1 \ --fp16
输出如下
# 加载数据集 Converting format of dataset (num_proc=16): 100%|███████████████████████████████████████████████| 91/91 [00:00<00:00, 145.69 examples/s] Running tokenizer on dataset (num_proc=16): 100%|████████████████████████████████████████████████| 91/91 [00:06<00:00, 13.14 examples/s] input_ids: [151644, 8948, 198, 2610, 525, 264, 10950, 17847, 13, 151645, 198, 151644, 872, 198, 6023, 151645, 198, 151644, 77091, 198, 9707, 0, 358, 1079, 58879, 11, 458, 15235, 17847, 7881, 553, 6567, 226, 237, 108619, 22243, 13, 2585, 646, 358, 7789, 498, 3351, 30, 151645] inputs: <|im_start|>system You are a helpful assistant.<|im_end|> <|im_start|>user hi<|im_end|> <|im_start|>assistant Hello! I am Archer, an AI assistant developed by 意琦行. How can I assist you today?<|im_end|> label_ids: [-100, -100, -100, -100, -100, -100, -100, -100, -100, -100, -100, -100, -100, -100, -100, -100, -100, -100, -100, -100, 9707, 0, 358, 1079, 58879, 11, 458, 15235, 17847, 7881, 553, 6567, 226, 237, 108619, 22243, 13, 2585, 646, 358, 7789, 498, 3351, 30, 151645] labels: Hello! I am Archer, an AI assistant developed by 意琦行. How can I assist you today?<|im_end|> [INFO|configuration_utils.py:731] 2024-07-23 15:45:27,398 >> loading configuration file /mnt/b66582121706406e9797ffaf64a831b0/model/Qwen1.5-1.8B-Chat/config.json [INFO|configuration_utils.py:796] 2024-07-23 15:45:27,400 >> Model config Qwen2Config { "_name_or_path": "/mnt/b66582121706406e9797ffaf64a831b0/model/Qwen1.5-1.8B-Chat", "architectures": [ "Qwen2ForCausalLM" ], "attention_dropout": 0.0, "bos_token_id": 151643, "eos_token_id": 151645, "hidden_act": "silu", "hidden_size": 2048, "initializer_range": 0.02, "intermediate_size": 5504, "max_position_embeddings": 32768, "max_window_layers": 21, "model_type": "qwen2", "num_attention_heads": 16, "num_hidden_layers": 24, "num_key_value_heads": 16, "rms_norm_eps": 1e-06, "rope_theta": 1000000.0, "sliding_window": 32768, "tie_word_embeddings": false, "torch_dtype": "bfloat16", "transformers_version": "4.41.2", "use_cache": true, "use_sliding_window": false, "vocab_size": 151936 } # 加载模型权重 [INFO|modeling_utils.py:3471] 2024-07-23 15:45:27,461 >> loading weights file /mnt/b66582121706406e9797ffaf64a831b0/model/Qwen1.5-1.8B-Chat/model.safetensors [INFO|modeling_utils.py:1519] 2024-07-23 15:45:27,482 >> Instantiating Qwen2ForCausalLM model under default dtype torch.float16. [INFO|configuration_utils.py:962] 2024-07-23 15:45:27,485 >> Generate config GenerationConfig { "bos_token_id": 151643, "eos_token_id": 151645 } # 开始训练 [INFO|trainer.py:2078] 2024-07-23 15:50:04,738 >> ***** Running training ***** [INFO|trainer.py:2079] 2024-07-23 15:50:04,738 >> Num examples = 91 [INFO|trainer.py:2080] 2024-07-23 15:50:04,738 >> Num Epochs = 5 [INFO|trainer.py:2081] 2024-07-23 15:50:04,738 >> Instantaneous batch size per device = 1 [INFO|trainer.py:2084] 2024-07-23 15:50:04,738 >> Total train batch size (w. parallel, distributed & accumulation) = 8 [INFO|trainer.py:2085] 2024-07-23 15:50:04,738 >> Gradient Accumulation steps = 8 [INFO|trainer.py:2086] 2024-07-23 15:50:04,738 >> Total optimization steps = 55 [INFO|trainer.py:2087] 2024-07-23 15:50:04,741 >> Number of trainable parameters = 7,495,680 # loss 日志 {'loss': 0.4613, 'grad_norm': 1.1036323308944702, 'learning_rate': 8.176284240242638e-06, 'epoch': 4.48} {'loss': 0.2371, 'grad_norm': 1.2189464569091797, 'learning_rate': 4.61021075223364e-06, 'epoch': 4.57} {'loss': 0.1993, 'grad_norm': 0.9958950281143188, 'learning_rate': 2.052496544188487e-06, 'epoch': 4.66} {'loss': 0.407, 'grad_norm': 1.3202508687973022, 'learning_rate': 5.136518124159162e-07, 'epoch': 4.75} {'loss': 0.2622, 'grad_norm': 1.1825435161590576, 'learning_rate': 0.0, 'epoch': 4.84} # 训练完成 100%|███████████████████████████████████████████████████████████████████████████████████████████████████| 55/55 [01:32<00:00, 1.72s/it][INFO|trainer.py:2329] 2024-07-23 15:51:37,166 >> Training completed. Do not forget to share your model on huggingface.co/models =) {'train_runtime': 92.425, 'train_samples_per_second': 4.923, 'train_steps_per_second': 0.595, 'train_loss': 1.0069455030289562, 'epoch': 4.84} 100%|███████████████████████████████████████████████████████████████████████████████████████████████████| 55/55 [01:32<00:00, 1.68s/it] [INFO|trainer.py:3410] 2024-07-23 15:51:37,168 >> Saving model checkpoint to ./saves/lora/sft /root/miniconda3/envs/python38/lib/python3.8/site-packages/peft/utils/save_and_load.py:195: UserWarning: Could not find a config file in /mnt/b66582121706406e9797ffaf64a831b0/model/Qwen1.5-1.8B-Chat - will assume that the vocabulary was not modified. warnings.warn( [INFO|tokenization_utils_base.py:2513] 2024-07-23 15:51:37,268 >> tokenizer config file saved in ./saves/lora/sft/tokenizer_config.json [INFO|tokenization_utils_base.py:2522] 2024-07-23 15:51:37,268 >> Special tokens file saved in ./saves/lora/sft/special_tokens_map.json ***** train metrics ***** epoch = 4.8352 total_flos = 211506GF train_loss = 1.0069 train_runtime = 0:01:32.42 train_samples_per_second = 4.923 train_steps_per_second = 0.595 Figure saved at: ./saves/lora/sft/training_loss.png 07/23/2024 15:51:38 - WARNING - llamafactory.extras.ploting - No metric eval_loss to plot. [INFO|modelcard.py:450] 2024-07-23 15:51:38,138 >> Dropping the following result as it does not have all the necessary fields: {'task': {'name': 'Causal Language Modeling', 'type': 'text-generation'}}
结果分析
查看 LoRA 权重
根据日志可以看到,微调后的模型保存到了我们指定的 ./saves/lora/sft 目录
[INFO|trainer.py:3410] 2024-07-23 15:51:37,168 >> Saving model checkpoint to ./saves/lora/sft
查看一下
root@lixd-sft:/LLaMA-Factory# ll -lhS ./saves/lora/sft total 40M -rw-r--r-- 1 root root 29M 7月 23 15:51 adapter_model.safetensors -rw-r--r-- 1 root root 6.8M 7月 23 15:51 tokenizer.json -rw-r--r-- 1 root root 2.7M 7月 23 15:51 vocab.json -rw-r--r-- 1 root root 1.6M 7月 23 15:51 merges.txt -rw-r--r-- 1 root root 34K 7月 23 15:51 training_loss.png -rw-r--r-- 1 root root 14K 7月 23 15:51 trainer_log.jsonl -rw-r--r-- 1 root root 11K 7月 23 15:51 trainer_state.json -rw-r--r-- 1 root root 5.2K 7月 23 15:51 training_args.bin drwxr-xr-x 2 root root 4.0K 7月 23 15:51 ./ -rw-r--r-- 1 root root 1.5K 7月 23 15:51 tokenizer_config.json -rw-r--r-- 1 root root 1.4K 7月 23 15:51 README.md -rw-r--r-- 1 root root 762 7月 23 15:51 adapter_config.json -rw-r--r-- 1 root root 367 7月 23 15:51 special_tokens_map.json -rw-r--r-- 1 root root 214 7月 23 15:51 all_results.json -rw-r--r-- 1 root root 214 7月 23 15:51 train_results.json -rw-r--r-- 1 root root 80 7月 23 15:51 added_tokens.json drwxr-xr-x 3 root root 17 7月 23 15:50 ../
可以看到,这里面的内容和一个完整模型一模一样,只是权重文件比较小,只有 29M。
查看 loss 曲线
训练过程中会实时打印训练日志,其中就包括了 loss 信息,就像这样:
微调参数 --logging_steps = 1 因为每一步都会打印日志
{'loss': 3.9236, 'grad_norm': 2.572678327560425, 'learning_rate': 8.333333333333333e-05, 'epoch': 0.09} {'loss': 3.3305, 'grad_norm': 1.8977322578430176, 'learning_rate': 0.00016666666666666666, 'epoch': 0.18} {'loss': 4.3762, 'grad_norm': 2.840055227279663, 'learning_rate': 0.00025, 'epoch': 0.26} ..... {'loss': 0.1993, 'grad_norm': 0.9958950281143188, 'learning_rate': 2.052496544188487e-06, 'epoch': 4.66} {'loss': 0.407, 'grad_norm': 1.3202508687973022, 'learning_rate': 5.136518124159162e-07, 'epoch': 4.75} {'loss': 0.2622, 'grad_norm': 1.1825435161590576, 'learning_rate': 0.0, 'epoch': 4.84}
微调完成后会根据日志生成 loss 曲线,就像下图这样:
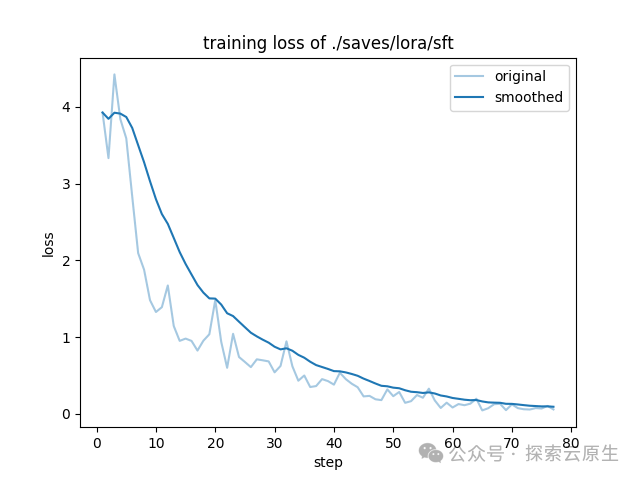
training_loss.png
这个图怎么看呢?
成功的训练一般有明显的收敛过程,且收敛出现在训练过程的后半部分都是合理的。
-
1)如果没有明显收敛,说明训练不充分,可以增加训练 epoch 重训,或者进行增量训练。
-
2)如果收敛出现在训练过程的前半部分,而后部分的 loss 平稳无变化,说明可能有过拟合,可以结合评估结果选择是否减少 epoch 重训。
-
3)如果有收敛趋势,但没有趋于平稳,可以在权衡通用能力和专业能力的前提下考虑是否增加 epoch 和数据以提升专业能力,但会有通用能力衰减的风险。
可以看到,在训练到 70 步再往后的时候已经收敛了,看起来本次训练效果还可以。
预测评估
除了看 loss 曲线之外,LLaMAFactory 还提供了预测评估功能。
使用微调后的模型回答数据集中的问题,然后将模型回答和数据集中的标准答案进行对比,计算 ROUGE、BLEU 指标。
指标含义感兴趣可以搜索一下,可以简单理解为 文本相似度。
指标越高说明模型回答和数据集中的内容越接近,对于简单的问题,这些指标能在一定程度上反应微调结果。
命令如下:
modelPath=/models/Qwen1.5-1.8B-Chat llamafactory-cli train \ --stage sft \ --do_predict \ --finetuning_type lora \ --model_name_or_path $modelPath \ --adapter_name_or_path ./saves/lora/sft \ --template qwen \ --dataset identity \ --cutoff_len 4096 \ --max_samples 20 \ --overwrite_cache \ --overwrite_output_dir \ --per_device_eval_batch_size 1 \ --preprocessing_num_workers 16 \ --predict_with_generate
结果如下:
***** predict metrics ***** predict_bleu-4 = 86.0879 predict_rouge-1 = 91.5523 predict_rouge-2 = 86.1083 predict_rouge-l = 89.6543 predict_runtime = 0:00:16.23 predict_samples_per_second = 1.232 predict_steps_per_second = 1.232 07/04/2024 03:17:33 - INFO - llamafactory.train.sft.trainer - Saving prediction results to /mnt/b66582121706406e9797ffaf64a831b0/system/sft/task-87tiqz1qqa/saves/lora/predict/generated_predictions.jsonl
指标最大值为 100
可以看到,各个指标得分都比较高,说明本次微调效果比较好。
权重合并
使用的 LoRA 微调,会生成单独的 LoRA 权重,当微调完成后需要将原始模型和 LoRA 权重进行合并,得到一个新的模型。
查看 loss 信息和预测评估结果,感觉不错的话就可以进行权重合并,导出模型了。
同样使用 llamafactory-cli 命令
# 原始模型 modelPath=models/Qwen1.5-1.8B-Chat # 上一步微调得到的 LoRA 权重 adapterModelPath=./saves/lora/sft/ llamafactory-cli export \ --model_name_or_path $modelPath \ --adapter_name_or_path $adapterModelPath \ --template qwen \ --finetuning_type lora \ --export_dir ./saves/lora/export/ \ --export_size 2 \ --export_device cpu \ --export_legacy_format False
输出如下
[INFO|modeling_utils.py:4280] 2024-07-23 16:45:13,917 >> All model checkpoint weights were used when initializing Qwen2ForCausalLM. [INFO|modeling_utils.py:4288] 2024-07-23 16:45:13,917 >> All the weights of Qwen2ForCausalLM were initialized from the model checkpoint at /mnt/b66582121706406e9797ffaf64a831b0/model/Qwen1.5-1.8B-Chat. If your task is similar to the task the model of the checkpoint was trained on, you can already use Qwen2ForCausalLM for predictions without further training. [INFO|configuration_utils.py:915] 2024-07-23 16:45:13,919 >> loading configuration file /mnt/b66582121706406e9797ffaf64a831b0/model/Qwen1.5-1.8B-Chat/generation_config.json [INFO|configuration_utils.py:962] 2024-07-23 16:45:13,920 >> Generate config GenerationConfig { "bos_token_id": 151643, "do_sample": true, "eos_token_id": [ 151645, 151643 ], "pad_token_id": 151643, "repetition_penalty": 1.1, "top_p": 0.8 } 07/23/2024 16:45:13 - INFO - llamafactory.model.model_utils.attention - Using torch SDPA for faster training and inference. 07/23/2024 16:45:13 - INFO - llamafactory.model.adapter - Upcasting trainable params to float32. 07/23/2024 16:45:13 - INFO - llamafactory.model.adapter - Fine-tuning method: LoRA 07/23/2024 16:52:09 - INFO - llamafactory.model.adapter - Merged 1 adapter(s). 07/23/2024 16:52:09 - INFO - llamafactory.model.adapter - Loaded adapter(s): ./saves/lora/sft/ 07/23/2024 16:52:09 - INFO - llamafactory.model.loader - all params: 1836828672 [INFO|configuration_utils.py:472] 2024-07-23 16:52:10,190 >> Configuration saved in ./save/lora/export/config.json [INFO|configuration_utils.py:731] 2024-07-23 16:52:10,190 >> Configuration saved in ./save/lora/export/generation_config.json [INFO|modeling_utils.py:2626] 2024-07-23 16:52:24,317 >> The model is bigger than the maximum size per checkpoint (2GB) and is going to be split in 2 checkpoint shards. You can find where each parameters has been saved in the index located at ./save/lora/export/model.safetensors.index.json. [INFO|tokenization_utils_base.py:2513] 2024-07-23 16:52:24,329 >> tokenizer config file saved in ./save/lora/export/tokenizer_config.json [INFO|tokenization_utils_base.py:2522] 2024-07-23 16:52:24,329 >> Special tokens file saved in ./save/lora/export/special_tokens_map.json
合并完成后,可以在 ./saves/lora/export/ 目录找到新模型:
root@sft:/LLaMA-Factory# ll -lhS ./saves/lora/export/ total 3.5G -rw-r--r-- 1 root root 1.9G 7月 23 16:52 model-00001-of-00002.safetensors -rw-r--r-- 1 root root 1.6G 7月 23 16:52 model-00002-of-00002.safetensors -rw-r--r-- 1 root root 6.8M 7月 23 16:52 tokenizer.json -rw-r--r-- 1 root root 2.7M 7月 23 16:52 vocab.json -rw-r--r-- 1 root root 1.6M 7月 23 16:52 merges.txt -rw-r--r-- 1 root root 24K 7月 23 16:52 model.safetensors.index.json drwxr-xr-x 2 root root 4.0K 7月 23 16:52 ./ -rw-r--r-- 1 root root 1.5K 7月 23 16:52 tokenizer_config.json -rw-r--r-- 1 root root 746 7月 23 16:52 config.json -rw-r--r-- 1 root root 367 7月 23 16:52 special_tokens_map.json -rw-r--r-- 1 root root 205 7月 23 16:52 generation_config.json -rw-r--r-- 1 root root 80 7月 23 16:52 added_tokens.json drwxr-xr-x 3 root root 20 7月 23 16:52 ../
5. 测试
测试下微调前后,模型对于你是谁? 这个问题的回答有何不同,也就是模型的自我认知被我们改掉没有。
推荐使用 vLLM 进行推理:大模型推理指南:使用 vLLM 实现高效推理
原始模型
使用 vLLM 启动推理服务
modelpath=/models/Qwen1.5-1.8B-Chat # 单卡 python3 -m vllm.entrypoints.openai.api_server \ --model $modelpath \ --served-model-name qwen \ --trust-remote-code
发送测试请求
curl http://localhost:8000/v1/chat/completions \ -H "Content-Type: application/json" \ -d '{ "model": "qwen", "messages": [ {"role": "system", "content": "You are a helpful assistant."}, {"role": "user", "content": "你是谁?"} ] }'
输出如下
{ "id": "cmpl-7c52416c18964864af6f20b04ef3f85e", "object": "chat.completion", "created": 1721725933, "model": "qwen-1-5-0-5b-chat", "choices": [ { "index": 0, "message": { "role": "assistant", "content": "我是来自阿里云的大规模语言模型,我叫通义千问。" }, "logprobs": null, "finish_reason": "stop", "stop_reason": null } ], "usage": { "prompt_tokens": 22, "total_tokens": 39, "completion_tokens": 17 } }
可以看到,原始模型知道自己是通义千问。
微调模型
使用 vLLM 启动服务
# 模型导出时的目录 modelpath=/LLaMA-Factory/save/lora/export/ # 单卡 python3 -m vllm.entrypoints.openai.api_server \ --model $modelpath \ --served-model-name qwen \ --trust-remote-code
发送测试请求
curl http://localhost:8000/v1/chat/completions \ -H "Content-Type: application/json" \ -d '{ "model": "qwen", "messages": [ {"role": "system", "content": "You are a helpful assistant."}, {"role": "user", "content": "你是谁?"} ] }'
输出如下
{ "id": "cmpl-9cc96afbfe01491b9c27226958e6e72b", "object": "chat.completion", "created": 1721726354, "model": "qwen-1-5-1-8b-chat-sft", "choices": [ { "index": 0, "message": { "role": "assistant", "content": "您好,我是 Archer,由 意琦行 开发,旨在为用户提供智能化的回答和帮助。" }, "logprobs": null, "finish_reason": "stop", "stop_reason": null } ], "usage": { "prompt_tokens": 22, "total_tokens": 45, "completion_tokens": 23 } }
可以看到,模型现在认为自己是 Archer,说明经过微调我们成功修改了模型的自我认知。
至此,使用 LLaMAFactory 对 Qwen1.5-1.8B-Chat 进行 LoRA 微调 Demo 分享就算完成了。
6. 小结
本文主要通过一个修改 Qwen1.5-1.8B-Chat 模型自我认知的小 Demo,分享了使用 LLaMAFactory 进行 LoRA 微调的全过程。
整个微调大致可以分为以下几个步骤:
-
1)准备模型、数据集
-
2)注册数据集到 LLaMAFactory
-
将数据集放到 data 目录
-
编辑 data 目录中的 dataset_info.json 注册数据集
-
3)微调
-
微调
-
结果分析,根据 loss 曲线查看训练情况,以决定是否需要修改参数后重新微调
-
预测评估,对比模型输出结果和数据集标准答案相似度
-
权重合并,合并 LoRA 权重到原始模型,得到微调后的新模型
读者福利:如果大家对大模型感兴趣,这套大模型学习资料一定对你有用
对于0基础小白入门:
