从搭建uni-app+vue3工程开始
技术栈
uni-app、vue3、typescript、vite、sass、uview-plus、pinia、axios
一、项目搭建
1、创建以 typescript 开发的工程
npx degit dcloudio/uni-preset-vue#vite-ts my-vue3-project
2、安装sass
npm install -D sass// 安装sass-loader,注意需要版本10,否则可能会导致vue与sass的兼容问题而报错
pnpm add sass-loader@10 -D
3、安装uview-plus
介绍 | uview-plus - 全面兼容nvue/鸿蒙/uni-app-x的uni-app生态框架 - uni-app UI框架
npm install uview-plus①main.ts引入uview-plus
import uviewPlus from 'uview-plus'export function createApp() {const app = createSSRApp(App);app.use(uviewPlus)return {app,};
}
②uni.scss引入全局SCSS主题文件
@import 'uview-plus/theme.scss';③App.vue引入基础样式
<style lang="scss">/* 注意要写在第一行,同时给style标签加入lang="scss"属性 */@import "uview-plus/index.scss";
</style>
④pages.json配置easycom组件模式
{"easycom": {// 注意一定要放在custom里,否则无效,https://ask.dcloud.net.cn/question/131175"custom": {"^u--(.*)": "uview-plus/components/u-$1/u-$1.vue","^up-(.*)": "uview-plus/components/u-$1/u-$1.vue","^u-([^-].*)": "uview-plus/components/u-$1/u-$1.vue"}},// 此为本身已有的内容"pages": [// ......]
}
⑤如果在mian.ts中引入uview-plus时会提示ts报错:无法找到模块“uview-plus”的声明文件
在src文件中创建一个types文件夹专门用来存放ts类型声明文件,在文件中新建uview.d.ts文件写入下方声明代码
declare module "uview-plus"⑥测试使用
在vue页面的使用
<u-button text="提交"></u-button>4、安装 axios
pnpm install axios① 安装qs
查询参数序列化和解析库。可以将一个普通的object序列化成一个查询字符串,或者反过来将一个查询字符串解析成一个object
pnpm install qs --save-dev②在src下创建utils文件夹=》创建axios文件夹=》创建config.ts文件
统一配置请求接口时的请求头参数
const http_config: {result_code: number | stringdefault_headers: AxiosHeaderstoken_name: stringrequest_timeout: number
} = {/*** token默认名称*/token_name: '_token',/*** 接口成功返回状态码*/result_code: '0000',/*** 接口请求超时时间*/request_timeout: 60000,/*** 默认接口请求类型* 可选值:application/x-www-form-urlencoded multipart/form-data*/default_headers: 'application/json;charset=utf-8'
}export { http_config }
③同一文件夹下=》创建service.ts
设置请求、响应拦截器
import axios, { AxiosError, type AxiosRequestHeaders, type AxiosResponse } from 'axios'
import qs from 'qs'
import { http_config } from './config'const { request_timeout } = http_configexport const PATH_URL = 'https://fj9dazt2gi.laf.run'
// 创建axios实例
const service: any = axios.create({baseURL: PATH_URL, // api 的 base_urltimeout: request_timeout // 请求超时时间
})//显示loading
function showLoading(title: any) {uni.showToast({title: title,duration:0,})
}//隐藏loading
function hideLoading() {uni.hideToast();
}// request拦截器
service.interceptors.request.use((config: any) => {if (config.showLoading) {showLoading(config.message);}if (config.method === 'post' &&(config.headers as AxiosRequestHeaders)['Content-Type'] ==='application/x-www-form-urlencoded') {config.data = qs.stringify(config.data)}// get参数编码if (config.method === 'get' && config.params) {let url = config.url as stringurl += '?'const keys = Object.keys(config.params)for (const key of keys) {if (config.params[key] !== void 0 && config.params[key] !== null) {url += `${key}=${encodeURIComponent(config.params[key])}&`}}url = url.substring(0, url.length - 1)config.params = {}config.url = url}return config},(error: AxiosError) => {console.log(error) // for debuguni.showToast({title: error.message,icon: 'none'})Promise.reject(error)hideLoading();}
)// response 拦截器
service.interceptors.response.use((response: AxiosResponse<any>) => {hideLoading();if (response.config.responseType === 'blob') {// 如果是文件流,直接过return response} else {if (response.config.responseType === 'arraybuffer') {return response.data = `data: image/jpeg;base64,${btoa(new Uint8Array(response.data).reduce((data, byte) => data + String.fromCharCode(byte), ''))}`} else {const { success, code, msg } = response.data;if (!success) {// 规定错误码功能,例如9108-请登录系统进行访问,自动跳转登录页if (code == 9108) {// 请登录系统进行访问,自动跳转登录页uni.showToast({title: '登录过期请重新登录'})setTimeout(() => {uni.reLaunch({url: '/pages/login/login'})}, 2000);}return response.data}return response.data;}}},(error: AxiosError) => {console.log('err' + error) // for debuguni.showToast({title: error.message,icon: 'none'})hideLoading();return Promise.reject(error)}
)export { service }
④同一文件夹下=》创建index.ts
封装axios请求传参、请求方式等
import { service } from './service'
import { http_config } from './config'const { default_headers } = http_configconst request = (option: any) => {console.log(option);const { url, method, params, data, headersType, responseType, loadingMsg, headers,isShow } = optionconst message = loadingMsg ? loadingMsg :'请稍后...'const showLoading = isShow ? isShow : truereturn service({url: url,method,params,data,responseType: responseType,headers: {'Accept-Language': JSON.parse(localStorage.getItem("language")) || 'zh-CN,zh;q=0.9','Content-Type': headersType || default_headers,...headers},message,showLoading})
}export default {get: <T = any>(option: any) => {return request({ method: 'get', ...option }) as unknown as T},post: <T = any>(option: any) => {return request({ method: 'post', ...option }) as unknown as T},delete: <T = any>(option: any) => {return request({ method: 'delete', ...option }) as unknown as T},put: <T = any>(option: any) => {return request({ method: 'put', ...option }) as unknown as T}
}
5、安装依赖
pnpm i6、h5启动项目
pnpm dev:h57、启动小程序项目
①方式一
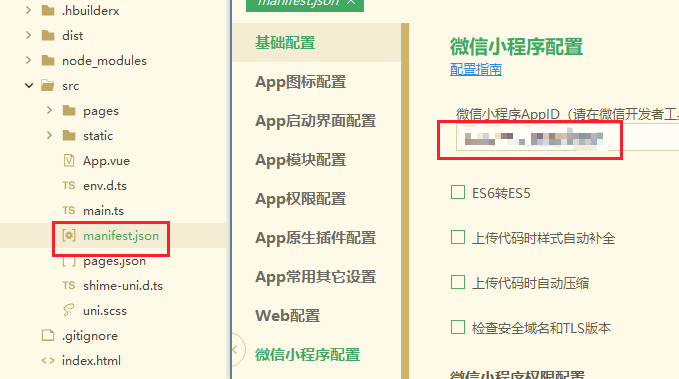
通过HBuilder X=》配置好manifest.json底下小程序的appid=》运行到小程序模拟器


②方式二
打包小程序,将项目目录生成的dist文件夹,导入微信开发工具运行并编译
pnpm dev:mp-weixin8、拓展
(1)自动引入插件配置
实现在使用函数时,无需import引入
①安装依赖
pnpm i unplugin-auto-import②在vite.config.ts 文件中进行配置
# 导入安装的插件
import AutoImport from 'unplugin-auto-import/vite'
# 进行插件配置
export default defineConfig({plugins: [AutoImport({dts:'src/typings/auto-imports.d.ts',imports:['vue', 'uni-app', 'pinia'],dirs:['src/composables']})],
});
(2)vue语法糖支持
①安装依赖
pnpm add -D @vue-macros/reactivity-transform②开启语法糖
// vite.config.ts
import ReactivityTransform from '@vue-macros/reactivity-transform/vite'export default defineConfig({plugins: [ReactivityTransform()],
})
// tsconfig.json
{"compilerOptions": {// ..."types": ["@vue-macros/reactivity-transform/macros-global" /* ... */]}
}
(3)pinia缓存
pinia 官网
Pinia | The intuitive store for Vue.jsIntuitive, type safe, light and flexible Store for Vue
https://pinia.vuejs.org/pinia 中文手册
Pinia v2.1.7 - 中文开发文档手册|官方文档中文版同步翻译更新高质量汉化介绍是什么、它的工作原理、它的用途以及何时使用它。用于 Vue.js 的轻量级状态管理库,基于 Vue 3 Composition API,可以让开发者轻松管理应用程序的状态和副作用。
https://ezdoc.cn/docs/pinia/
①安装pinia依赖
pnpm add pinia@2.0.30②main.ts引入pinia
import { createSSRApp } from "vue";
import { createPinia } from 'pinia';
import App from "./App.vue";export function createApp() {const app = createSSRApp(App).use(createPinia());return {app,};
}
二、封装自定义全局组件
封装前的准备
①src下创建compontents文件夹=》创建index.ts做为所有组件的中转文件
// index.ts
/**自定义全局组件 */
import type { Component } from 'vue';const components: {[propName: string]: Component //字面量类型,每个属性值类型为组件的类型
} = {
}
export default components
②main.ts文件引入组件
import globalComponent from '@/components/index'export function createApp() {const app = createSSRApp(App);for (const componentItem in globalComponent) {app.component(componentItem, globalComponent[componentItem])}return {app};
}
1、封装自定义tabbar组件
①在components下创建文件夹m-tabbar=》创建index.vue文件
<script setup lang="ts">
import { onMounted, ref } from "vue";const urls = ref()
const props = defineProps({tabbarValue: {type: Number,default: 1,},
});onMounted(() => {initTabbar()
});function initTabbar() {urls.value = [{pagePath: '/pages/index/index',activeIcon: '../../static/tabbar/index_select.png',inActiveIcon: '../../static/tabbar/index.png',text: '首页'},{pagePath: '/pages/user/user',activeIcon: '../../static/tabbar/user_select.png',inActiveIcon: '../../static/tabbar/user.png',text: '我的'}]
}function selectTabbar(name:any) {uni.switchTab({url: urls.value[name].pagePath,})
}
</script><template><view class="m-tabbar"><up-tabbar :zIndex="10" :value="tabbarValue" @change="selectTabbar" :fixed="true" :placeholder="false" activeColor="#1890e1":safeAreaInsetBottom="true" inActiveColor="#79766A"><up-tabbar-item v-for="(item, index) in urls" :key="index" :text="item.text"><template #active-icon><imageclass="u-page__item__slot-icon iconsize":src="item.activeIcon"></image></template><template #inactive-icon><imageclass="u-page__item__slot-icon iconsize":src="item.inActiveIcon"></image></template></up-tabbar-item></up-tabbar></view>
</template><style lang="scss" scoped>
.iconsize {height: 50rpx;width: 50rpx;margin-top: 8rpx;
}
</style>
②在components下的中转文件index.ts定义引入组件
/**自定义全局组件 */
import type { Component } from 'vue';
import mTabbar from './m-tabbar/index.vue'const components: {[propName: string]: Component //字面量类型,每个属性值类型为组件的类型
} = {mTabbar
}
export default components
③pages.json文件中定义tabBar
"tabBar": {"color": "#666666","selectedColor": "#2468F2","borderStyle": "white","backgroundColor": "#fff","list": [{"pagePath": "pages/index/index"},{"pagePath": "pages/user/user"}]
}
④使用tabbar
注意:使用自定义tabbar的页面必须要隐藏uni-app默认的tabbar
<mTabbar :tabbar-value="0"></mTabbar><script setup lang="ts">
import { onShow } from "@dcloudio/uni-app";onShow(()=>{uni.hideTabBar()
})
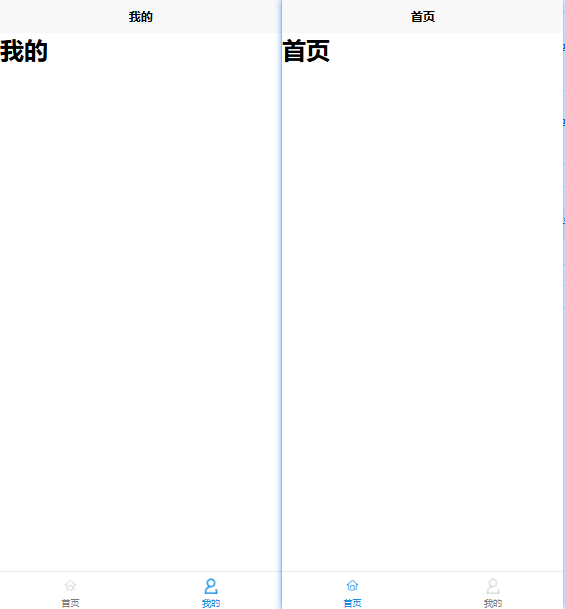
</script>⑤最终效果图

文章将持续更新...
