从0到1,搭建vue3项目
一 Vite创建Vue3项目
1.1.创建Vue3项目
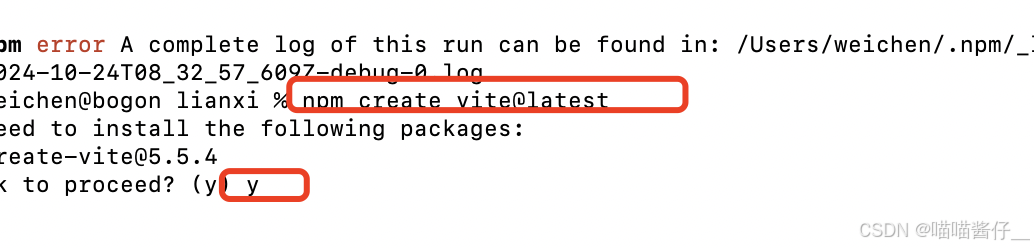
1.1.1.运行创建项目命令
# 使用 npm
npm create vite@latest
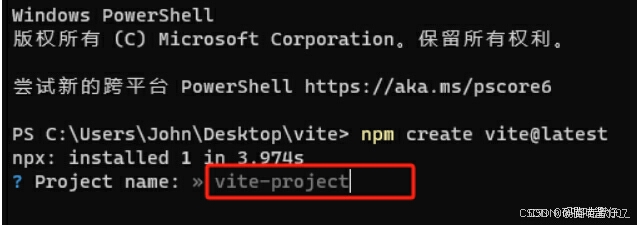
1.1.2、填写项目名称
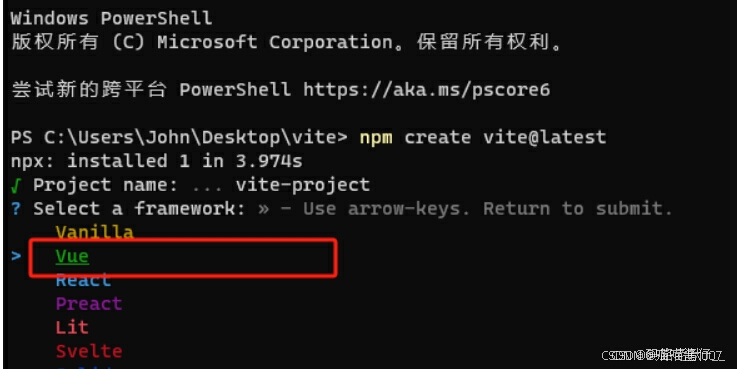
1.1.3、选择前端框架
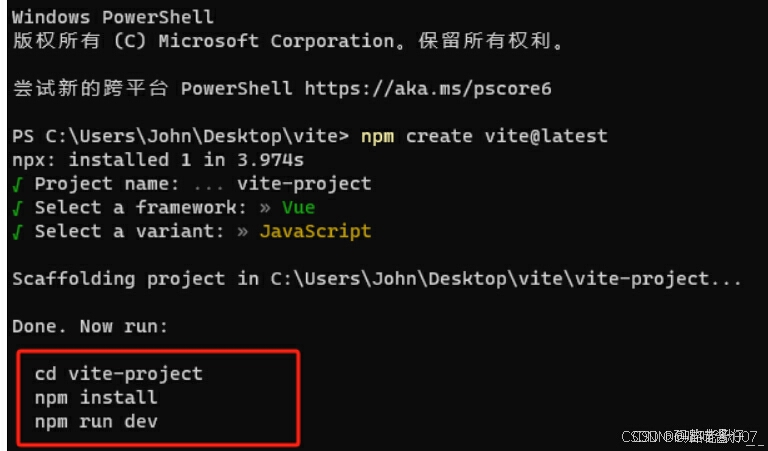
1.1.4、选择语法类型
 1.1.5、按提示运行代码
1.1.6浏览器问 localhost:5173 预览

1.2项目结构
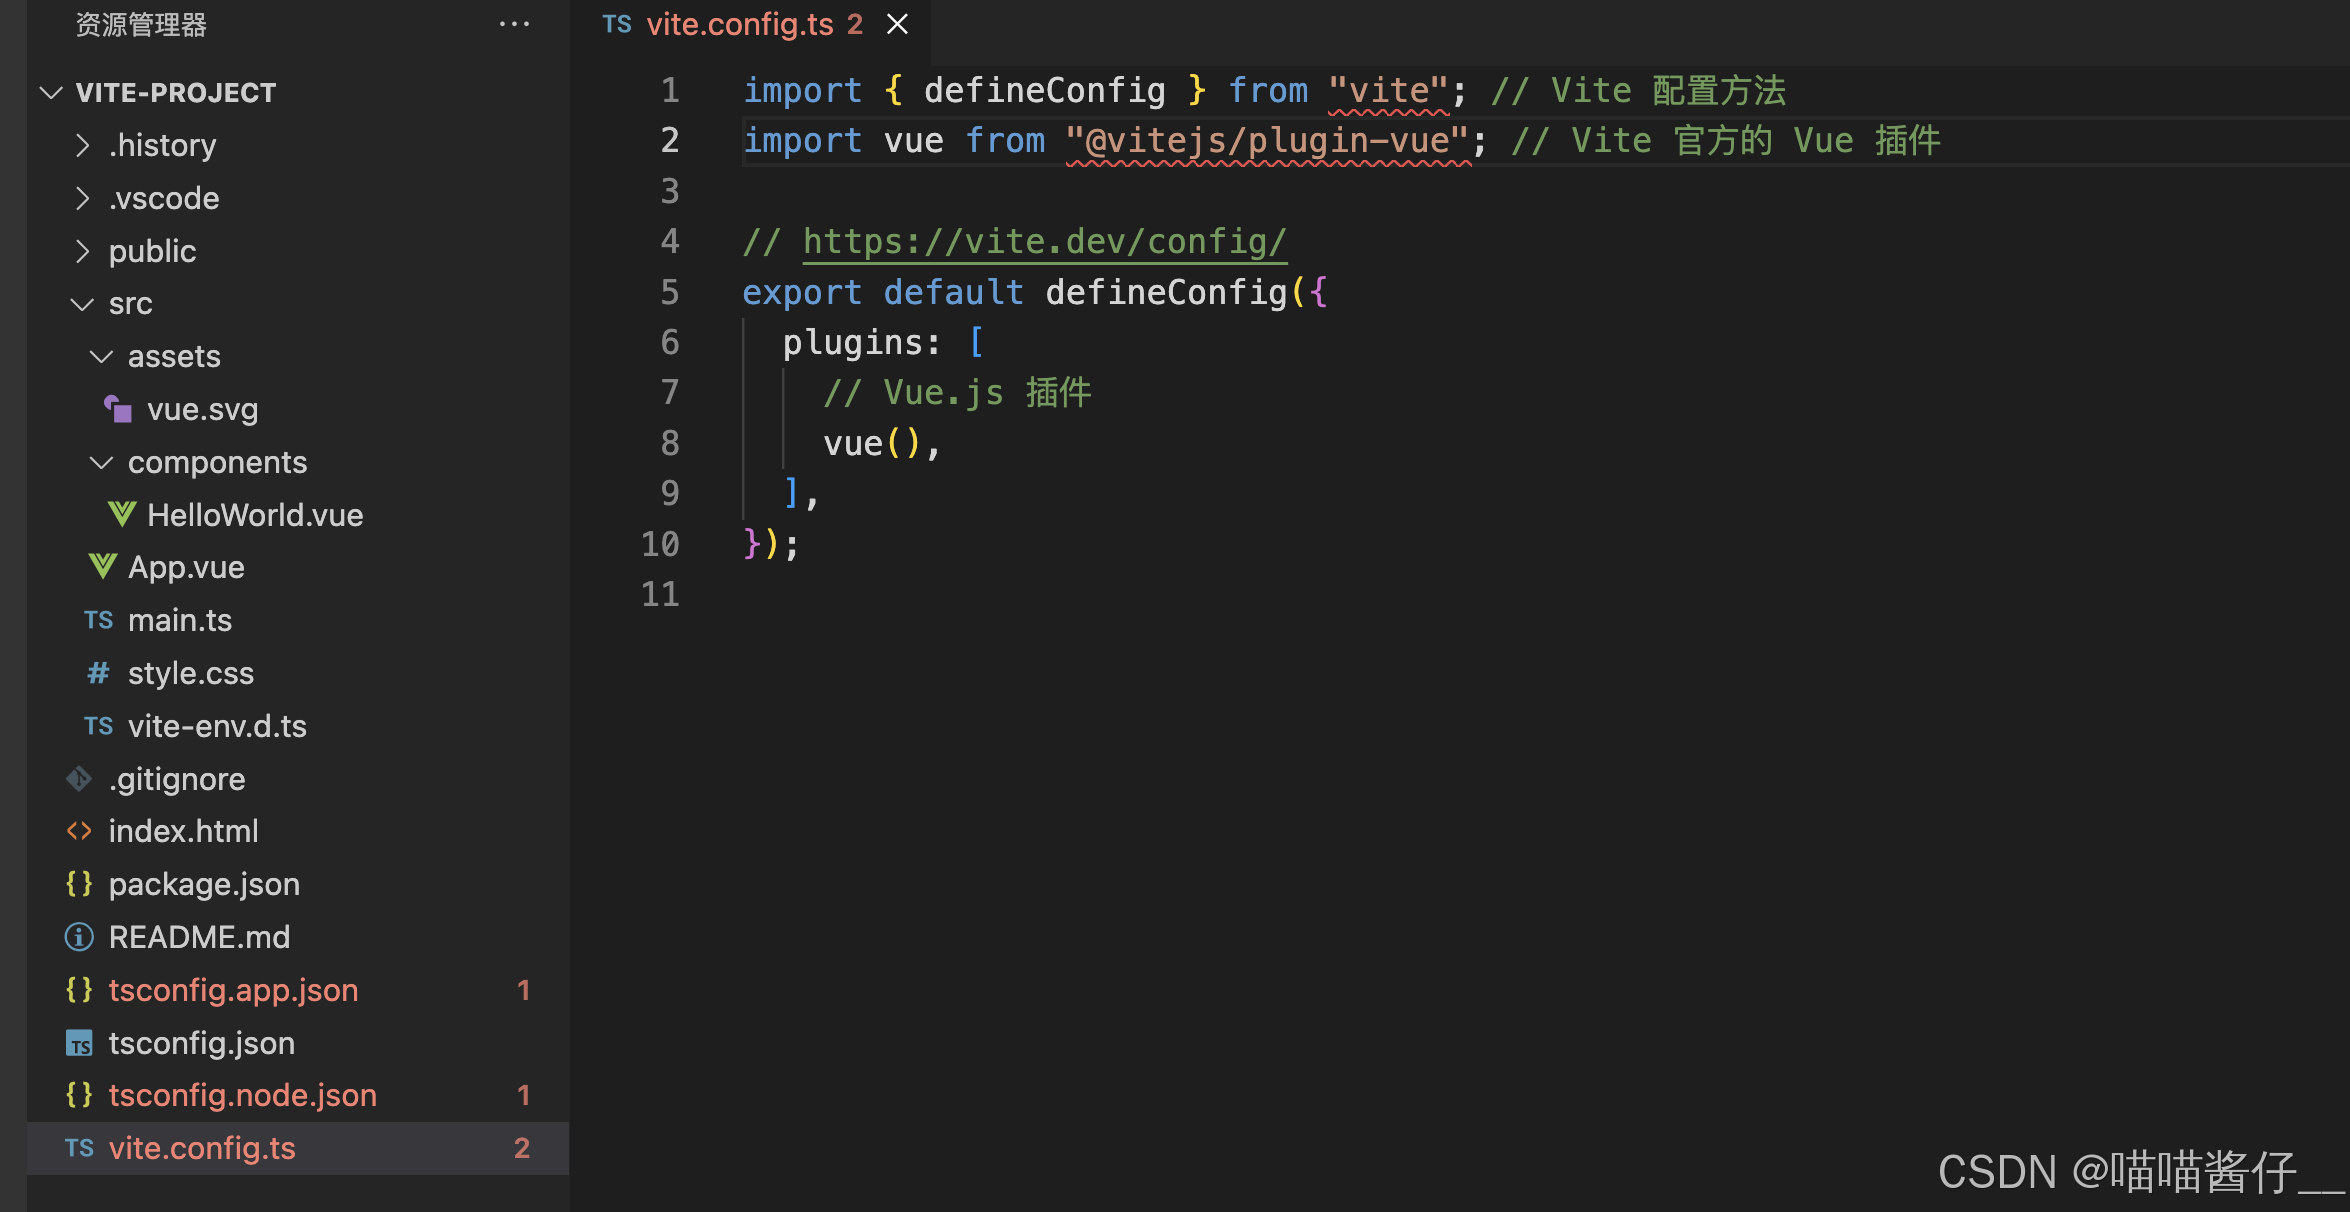
1.2.1vite.config.ts
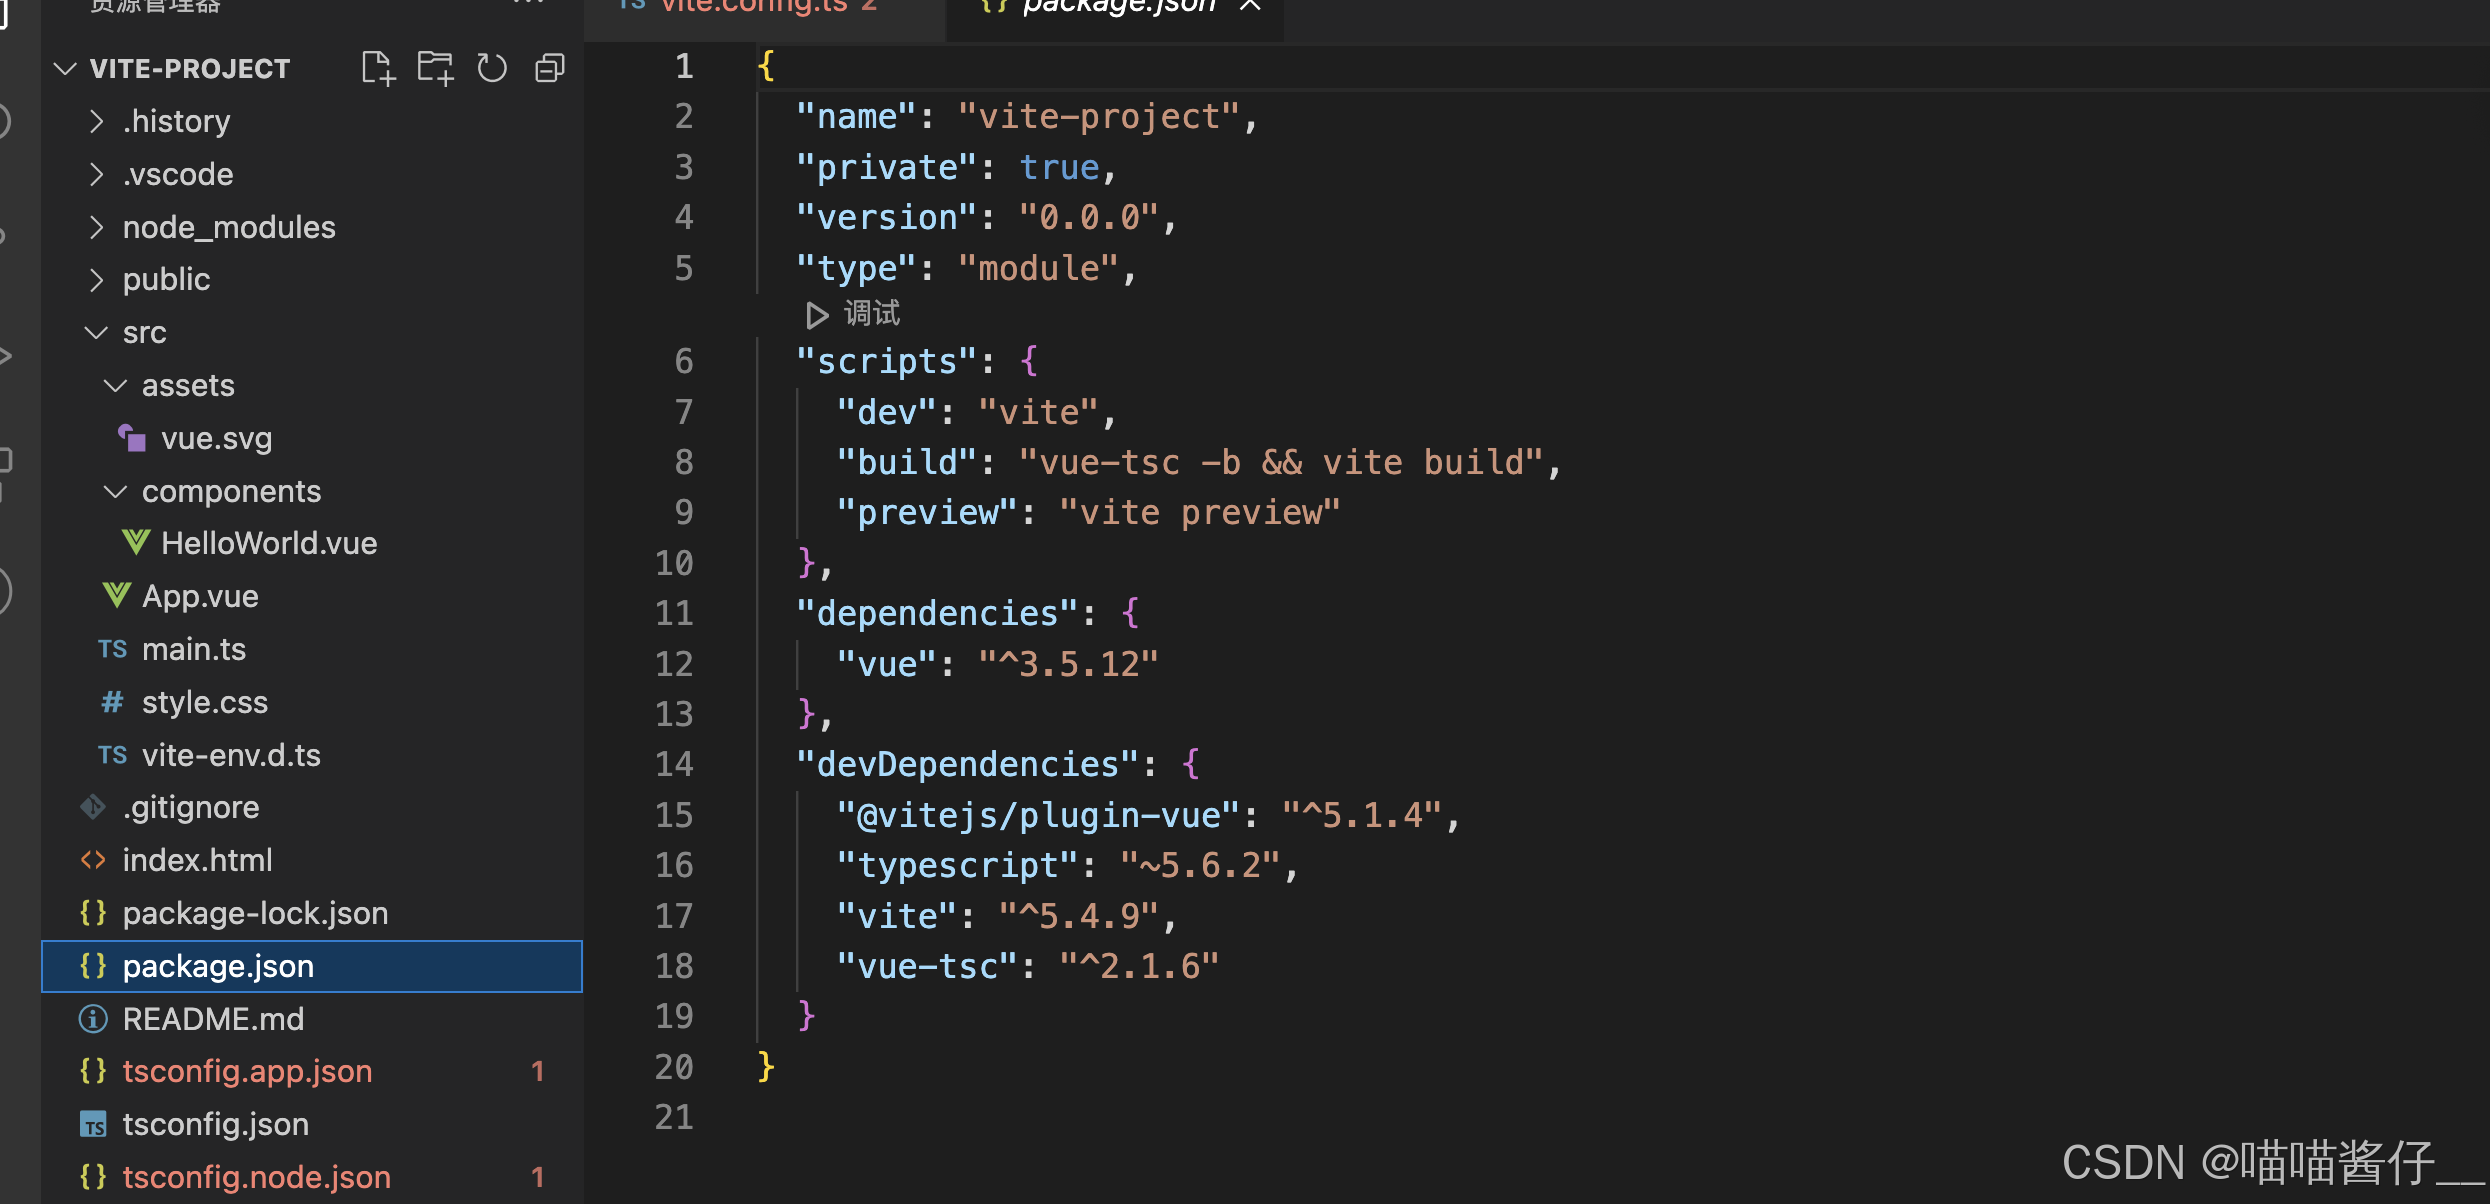
1.2.2 package.json
二 src 路径别名配置
相对路径别名配置,使用 @ 代替 src
Vite 配置
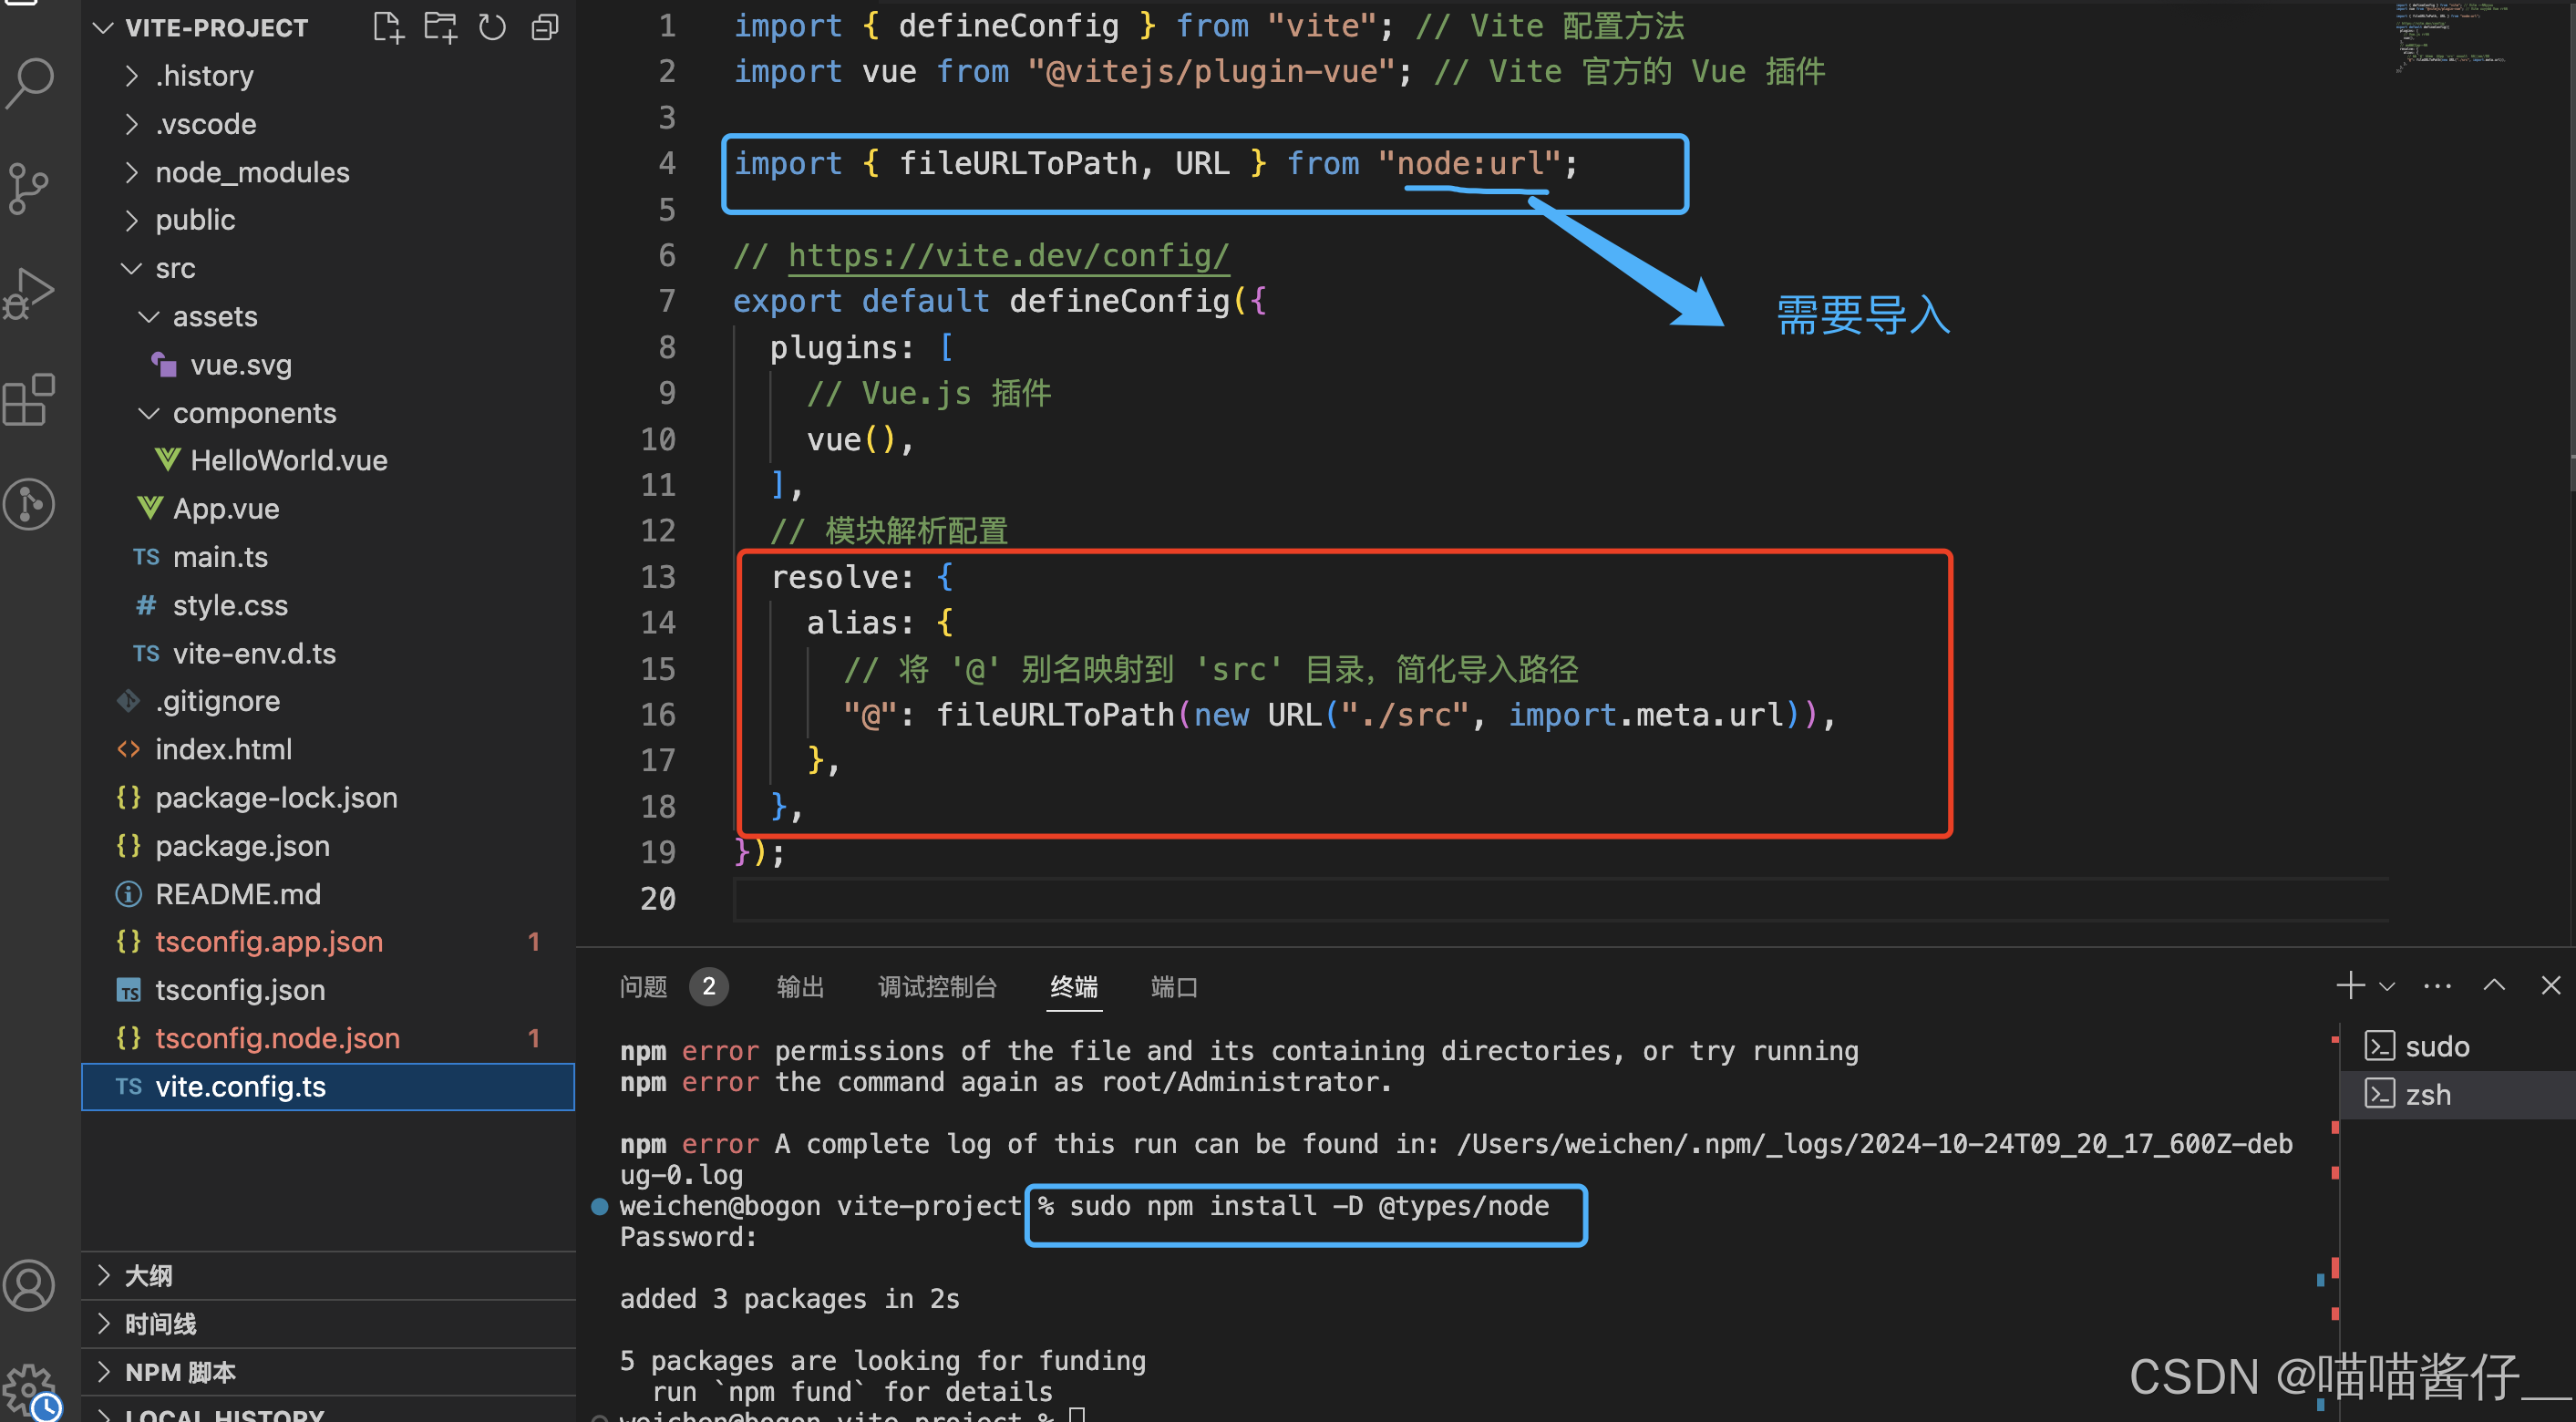
import { defineConfig } from "vite"; // Vite 配置方法
import vue from "@vitejs/plugin-vue"; // Vite 官方的 Vue 插件import { fileURLToPath, URL } from "node:url";// https://vite.dev/config/
export default defineConfig({plugins: [// Vue.js 插件vue(),],// 模块解析配置resolve: {alias: {// 将 '@' 别名映射到 'src' 目录,简化导入路径"@": fileURLToPath(new URL("./src", import.meta.url)),},},
});
npm install -D @types/node三unplugin 自动导入
Element Plus 官方文档中推荐
按需自动导入的方式,而此需要使用额外的插件unplugin-auto-import和unplugin-vue-components来导入要使用的组件。所以在整合Element Plus之前先了解下自动导入的概念和作用
概念
为了避免在多个页面重复引入 API 或 组件,由此而产生的自动导入插件来节省重复代码和提高开发效率。

3.1安装插件依赖
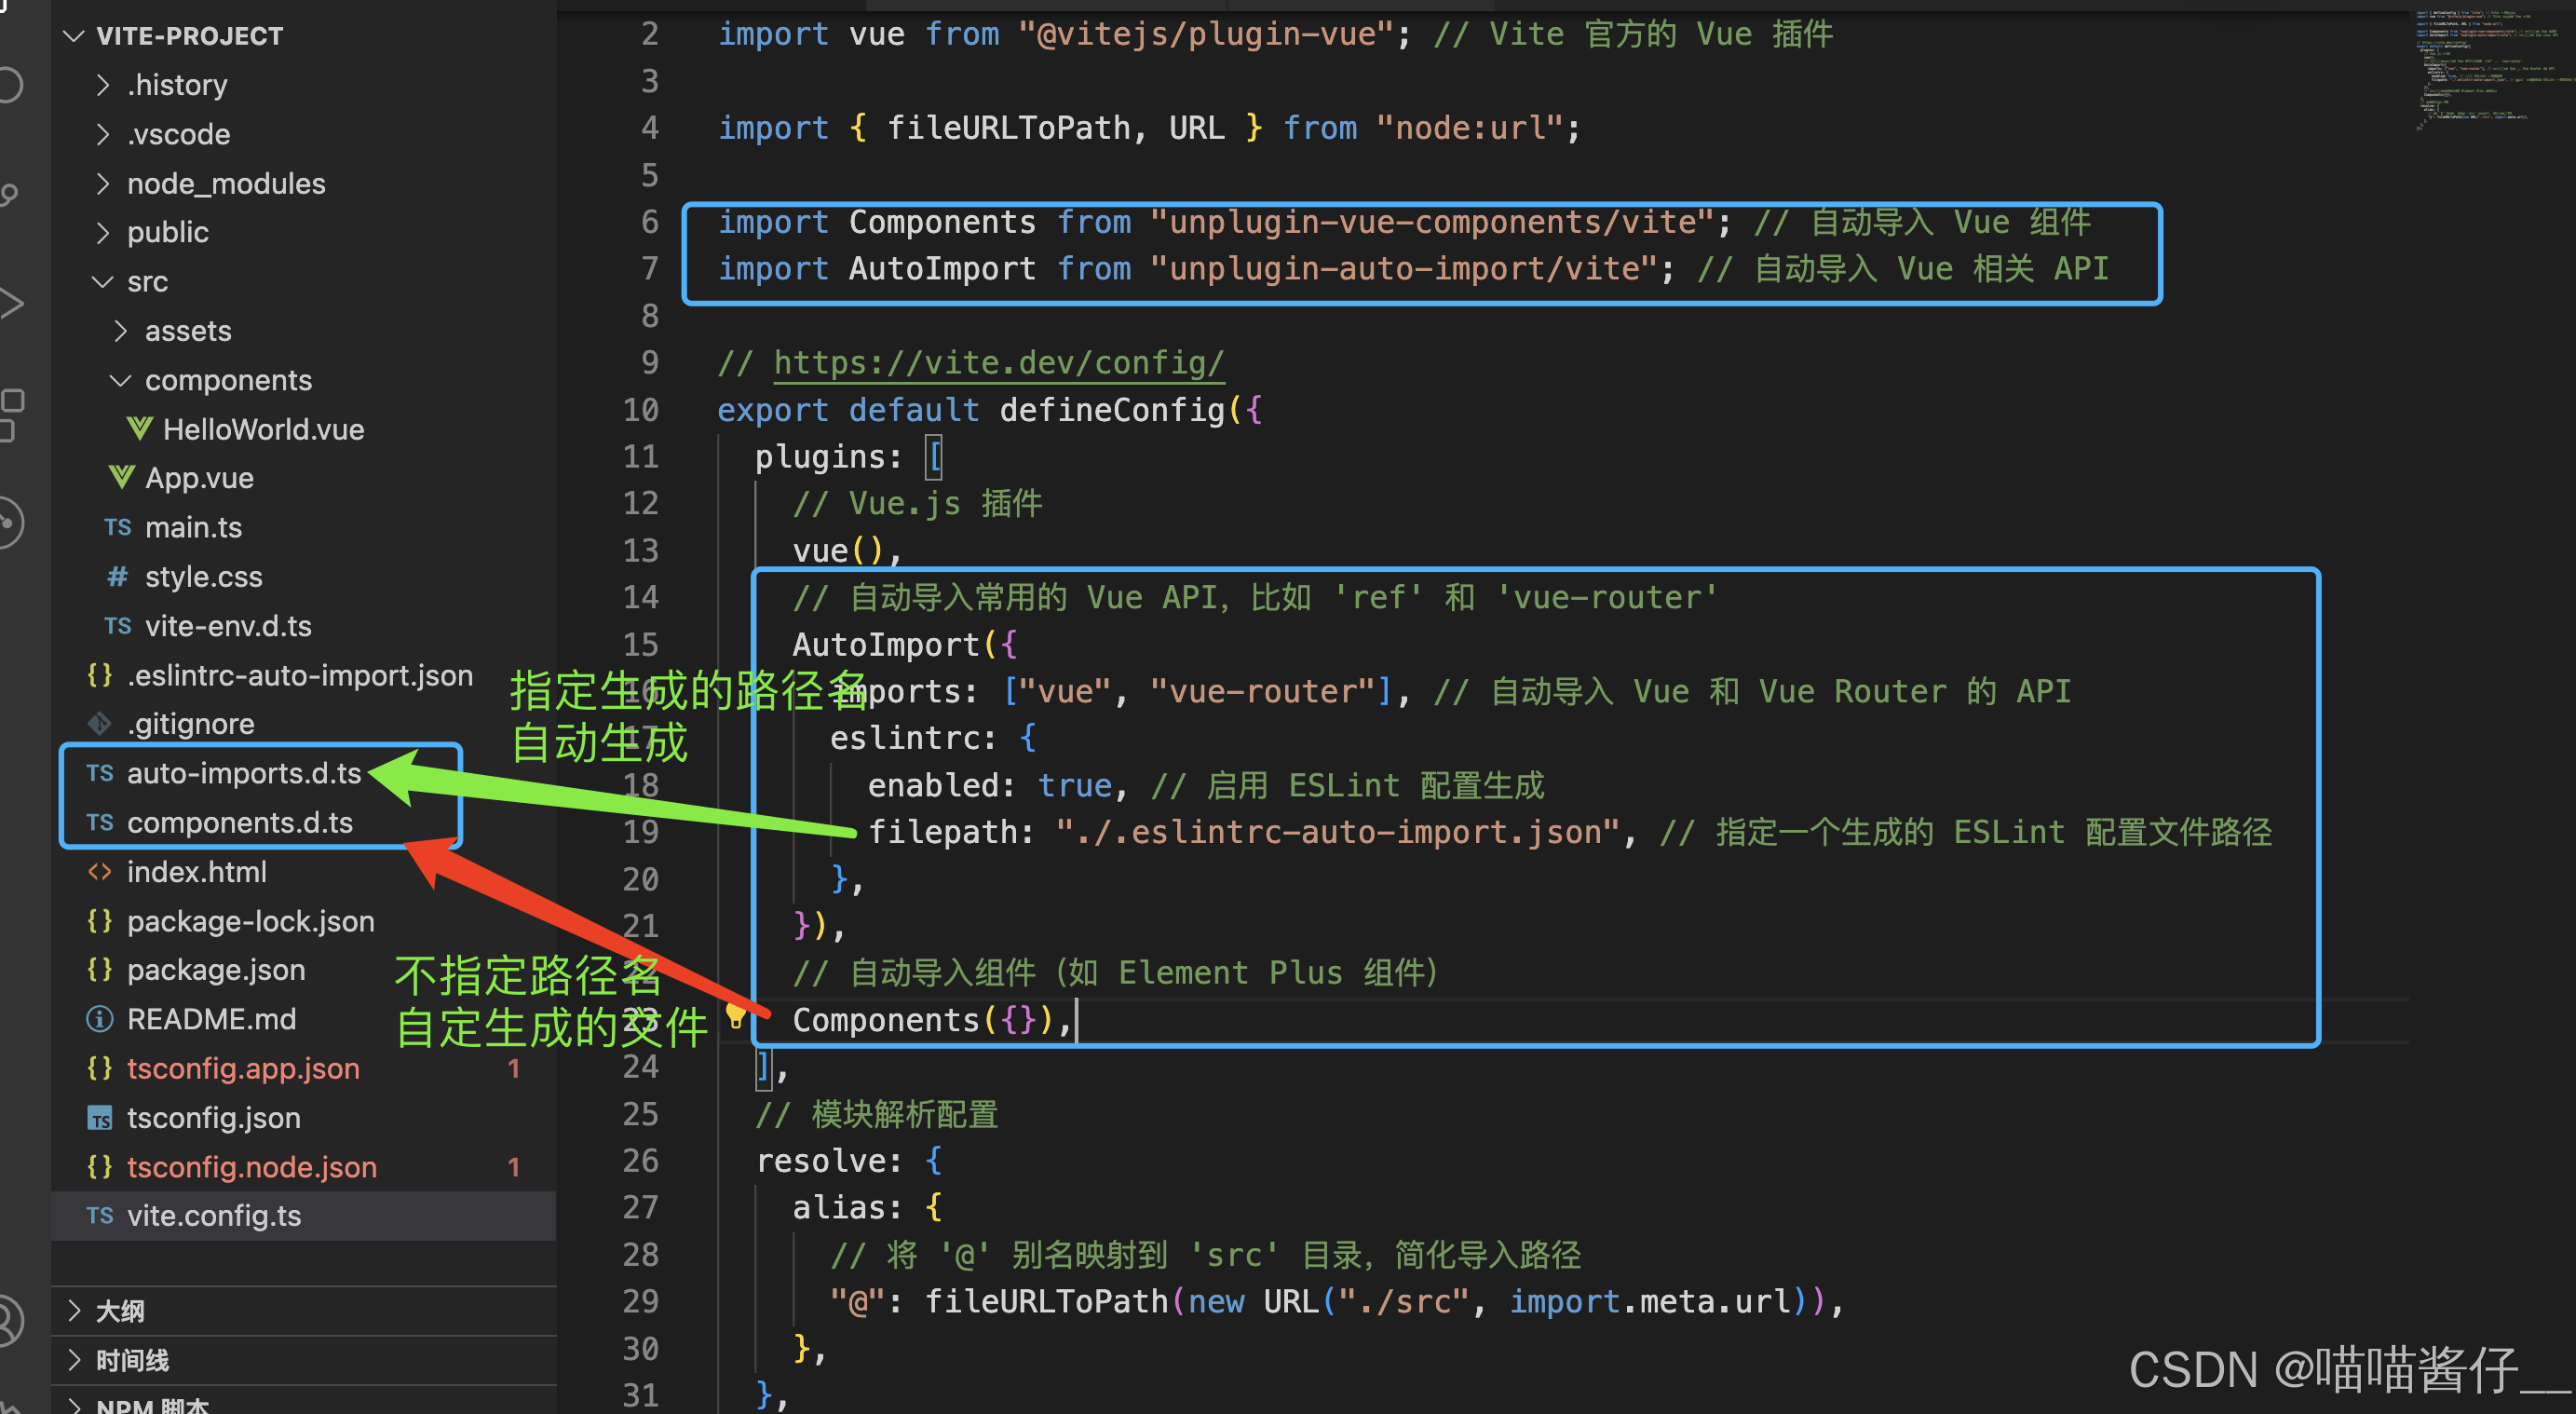
npm install -D unplugin-auto-import unplugin-vue-components 3.2vite.config.ts - 自动导入配置
先创建好 /src/types 目录用于存放自动导入函数和组件的TS类型声明文件,再进行自动导入配置
// vite.config.ts
import AutoImport from "unplugin-auto-import/vite";
import Components from "unplugin-vue-components/vite";plugins: [// 自动导入常用的 Vue API,比如 'ref' 和 'vue-router'AutoImport({imports: ["vue", "vue-router"], // 自动导入 Vue 和 Vue Router 的 APIeslintrc: {enabled: true, // 启用 ESLint 配置生成filepath: "./.eslintrc-auto-import.json" // 生成的 ESLint 配置文件路径}}),Components({}),
]
项目中:
项目启动,自动生成这两个文件
四整合 Element Plus
参考: element plus 按需自动导入
需要完成上面一节的 自动导入 的安装和配置
4.1安装 Element Plus
npm install element-plus@2.7.84.2配置:
import { defineConfig } from "vite"; // Vite 配置方法
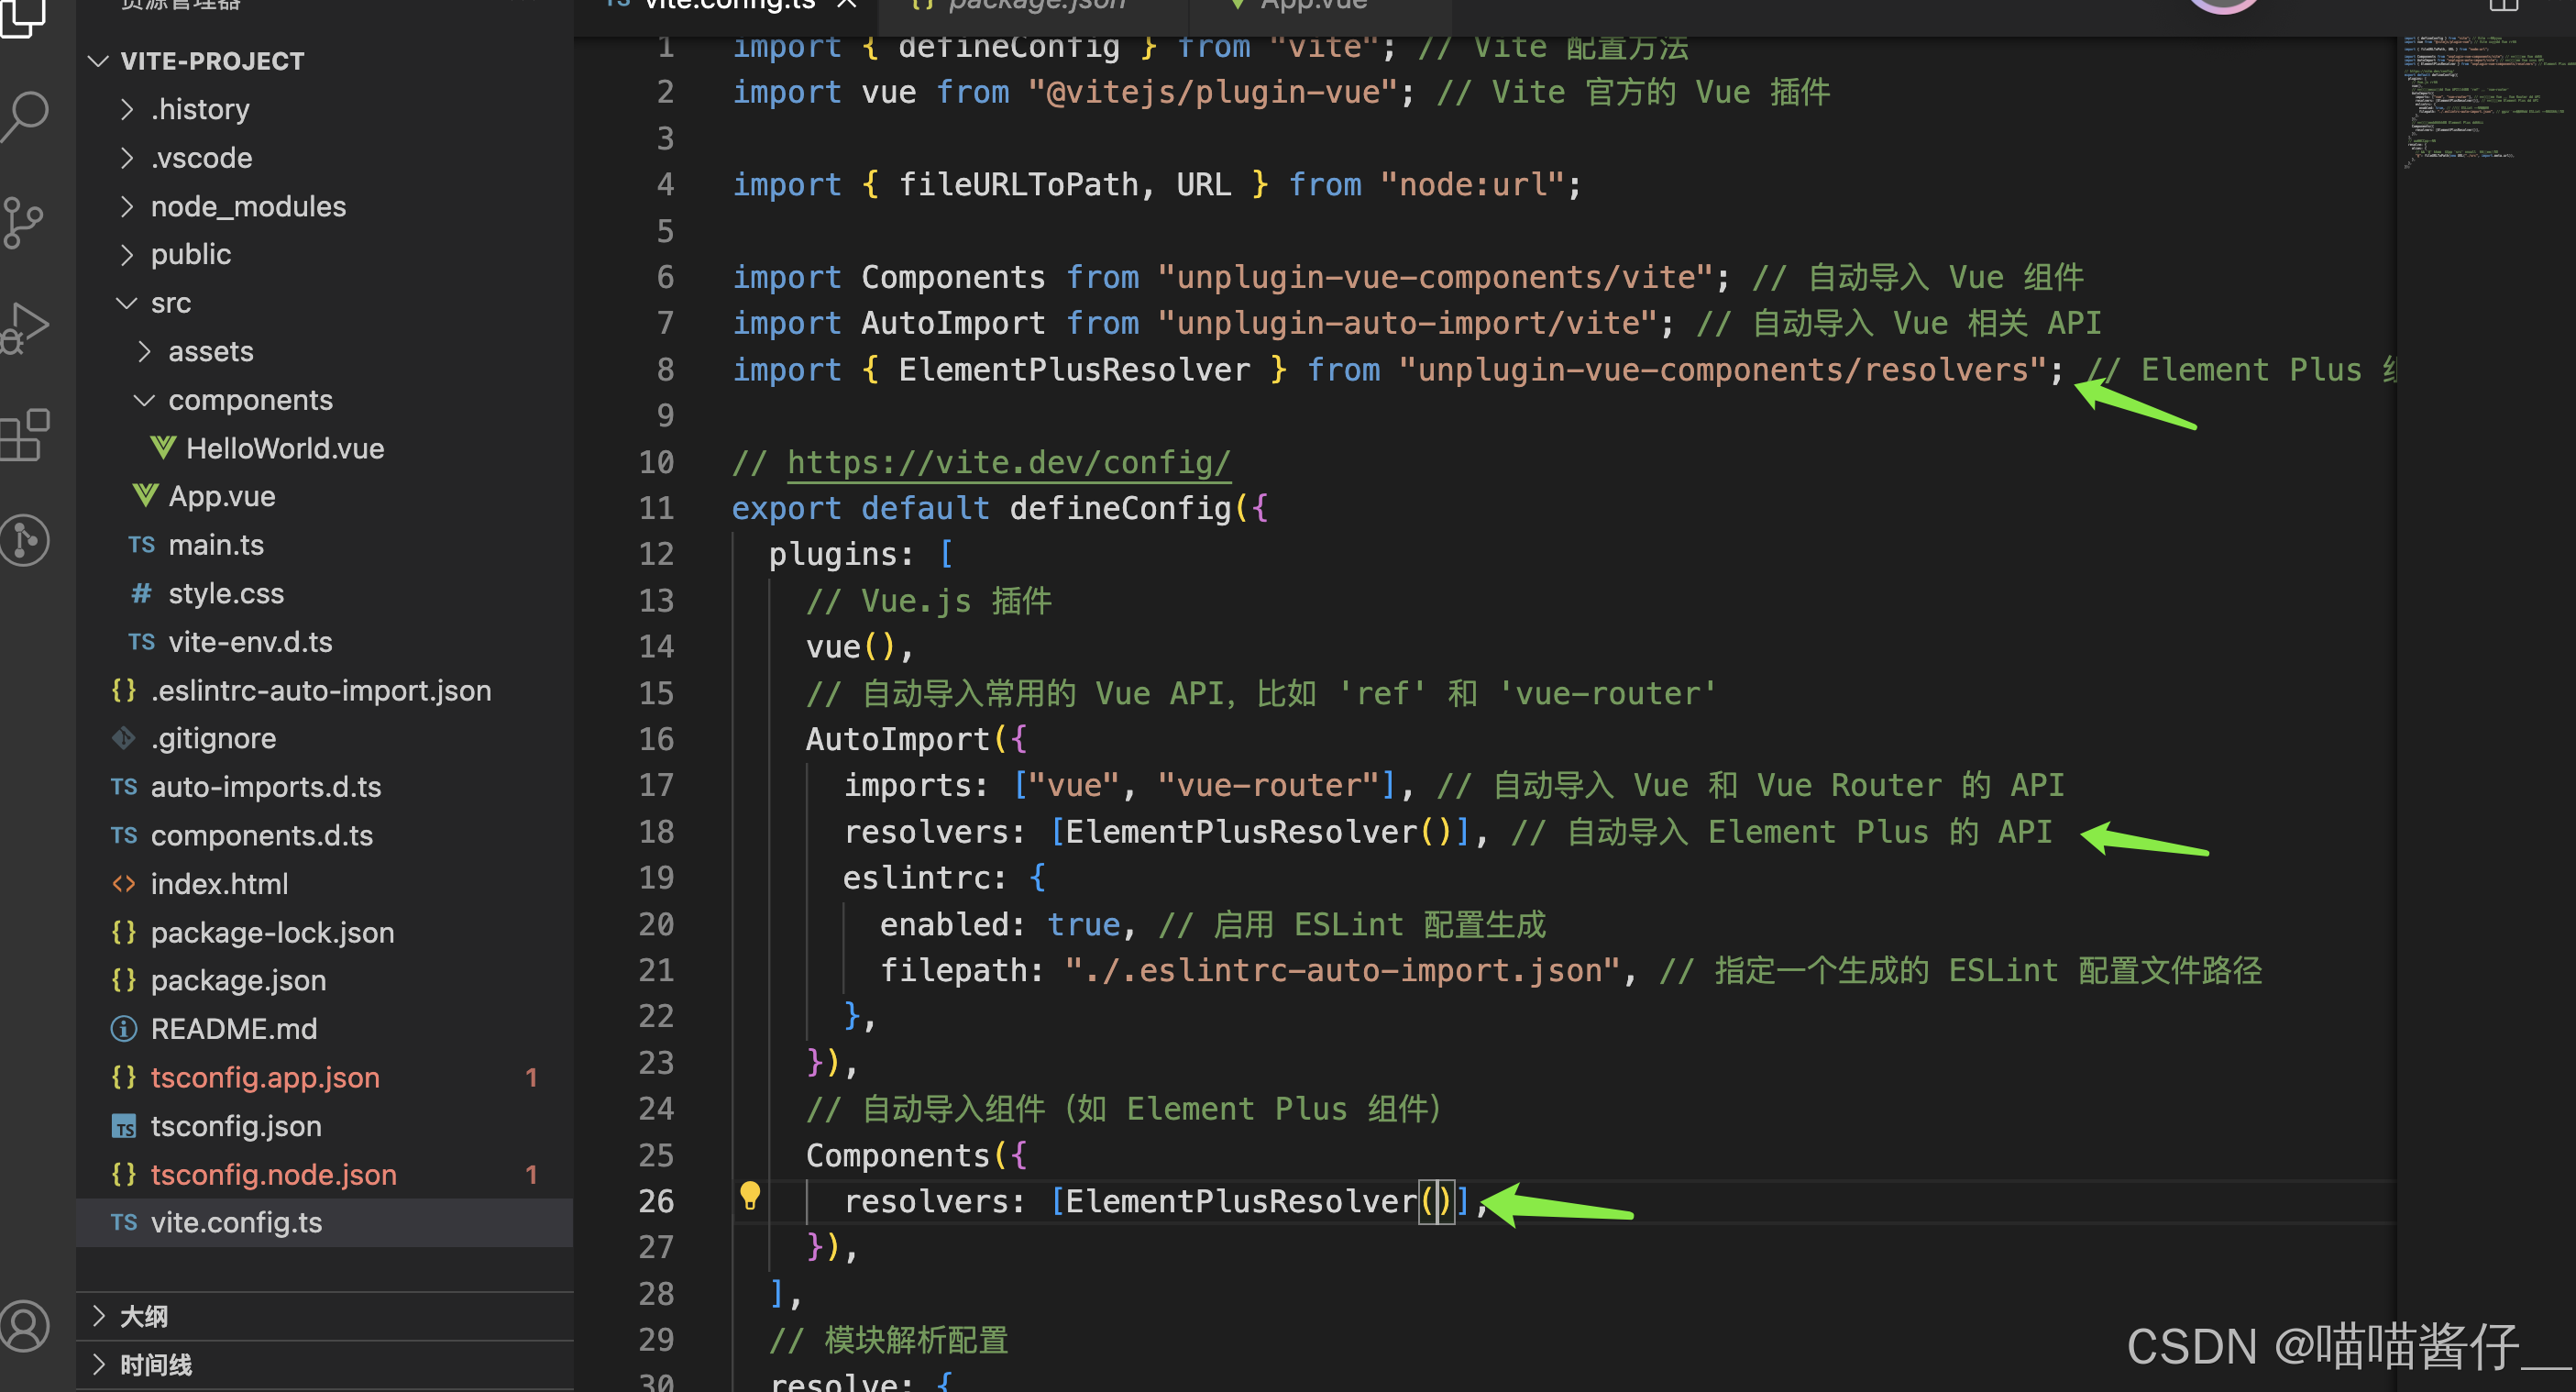
import vue from "@vitejs/plugin-vue"; // Vite 官方的 Vue 插件import { fileURLToPath, URL } from "node:url";import Components from "unplugin-vue-components/vite"; // 自动导入 Vue 组件
import AutoImport from "unplugin-auto-import/vite"; // 自动导入 Vue 相关 API
import { ElementPlusResolver } from "unplugin-vue-components/resolvers"; // Element Plus 组件解析器// https://vite.dev/config/
export default defineConfig({plugins: [// Vue.js 插件vue(),// 自动导入常用的 Vue API,比如 'ref' 和 'vue-router'AutoImport({imports: ["vue", "vue-router"], // 自动导入 Vue 和 Vue Router 的 APIresolvers: [ElementPlusResolver()], // 自动导入 Element Plus 的 APIeslintrc: {enabled: true, // 启用 ESLint 配置生成filepath: "./.eslintrc-auto-import.json", // 指定一个生成的 ESLint 配置文件路径},}),// 自动导入组件(如 Element Plus 组件)Components({resolvers: [ElementPlusResolver()],}),],// 模块解析配置resolve: {alias: {// 将 '@' 别名映射到 'src' 目录,简化导入路径"@": fileURLToPath(new URL("./src", import.meta.url)),},},
});
4.3测试:
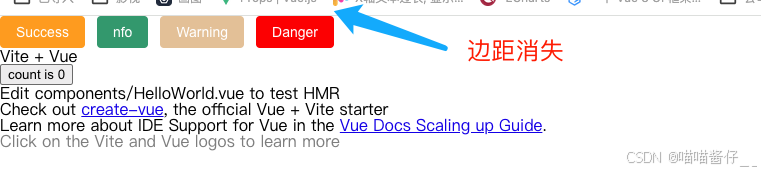
<div><el-button type="success">Success</el-button><el-button type="info">nfo</el-button><el-button type="warning">Warning</el-button><el-button type="danger">Danger</el-button></div>五Element Plus主题色定制(通过scss变量替换方案)
一款CSS预处理语言,SCSS 是 Sass 3 引入新的语法,其语法完全兼容 CSS3,并且继承了 Sass 的强大功能。
如果通过scss变量替换方案来定制Element Plus主题色,按照如下步骤:
- 安装sass:使用命令npm install sass -D
- 准备定制样式文件:在项目下面新增文件styles/themeVar.scss
- 对Element Plus样式进行覆盖:通知Element Plus采用scss语言,再导入定制的scss文件覆盖

5.1安装依赖
sudo npm install sass@1.77.0 -D5.2新建文件/src/styles/themeVar.scss,并定义scss变量
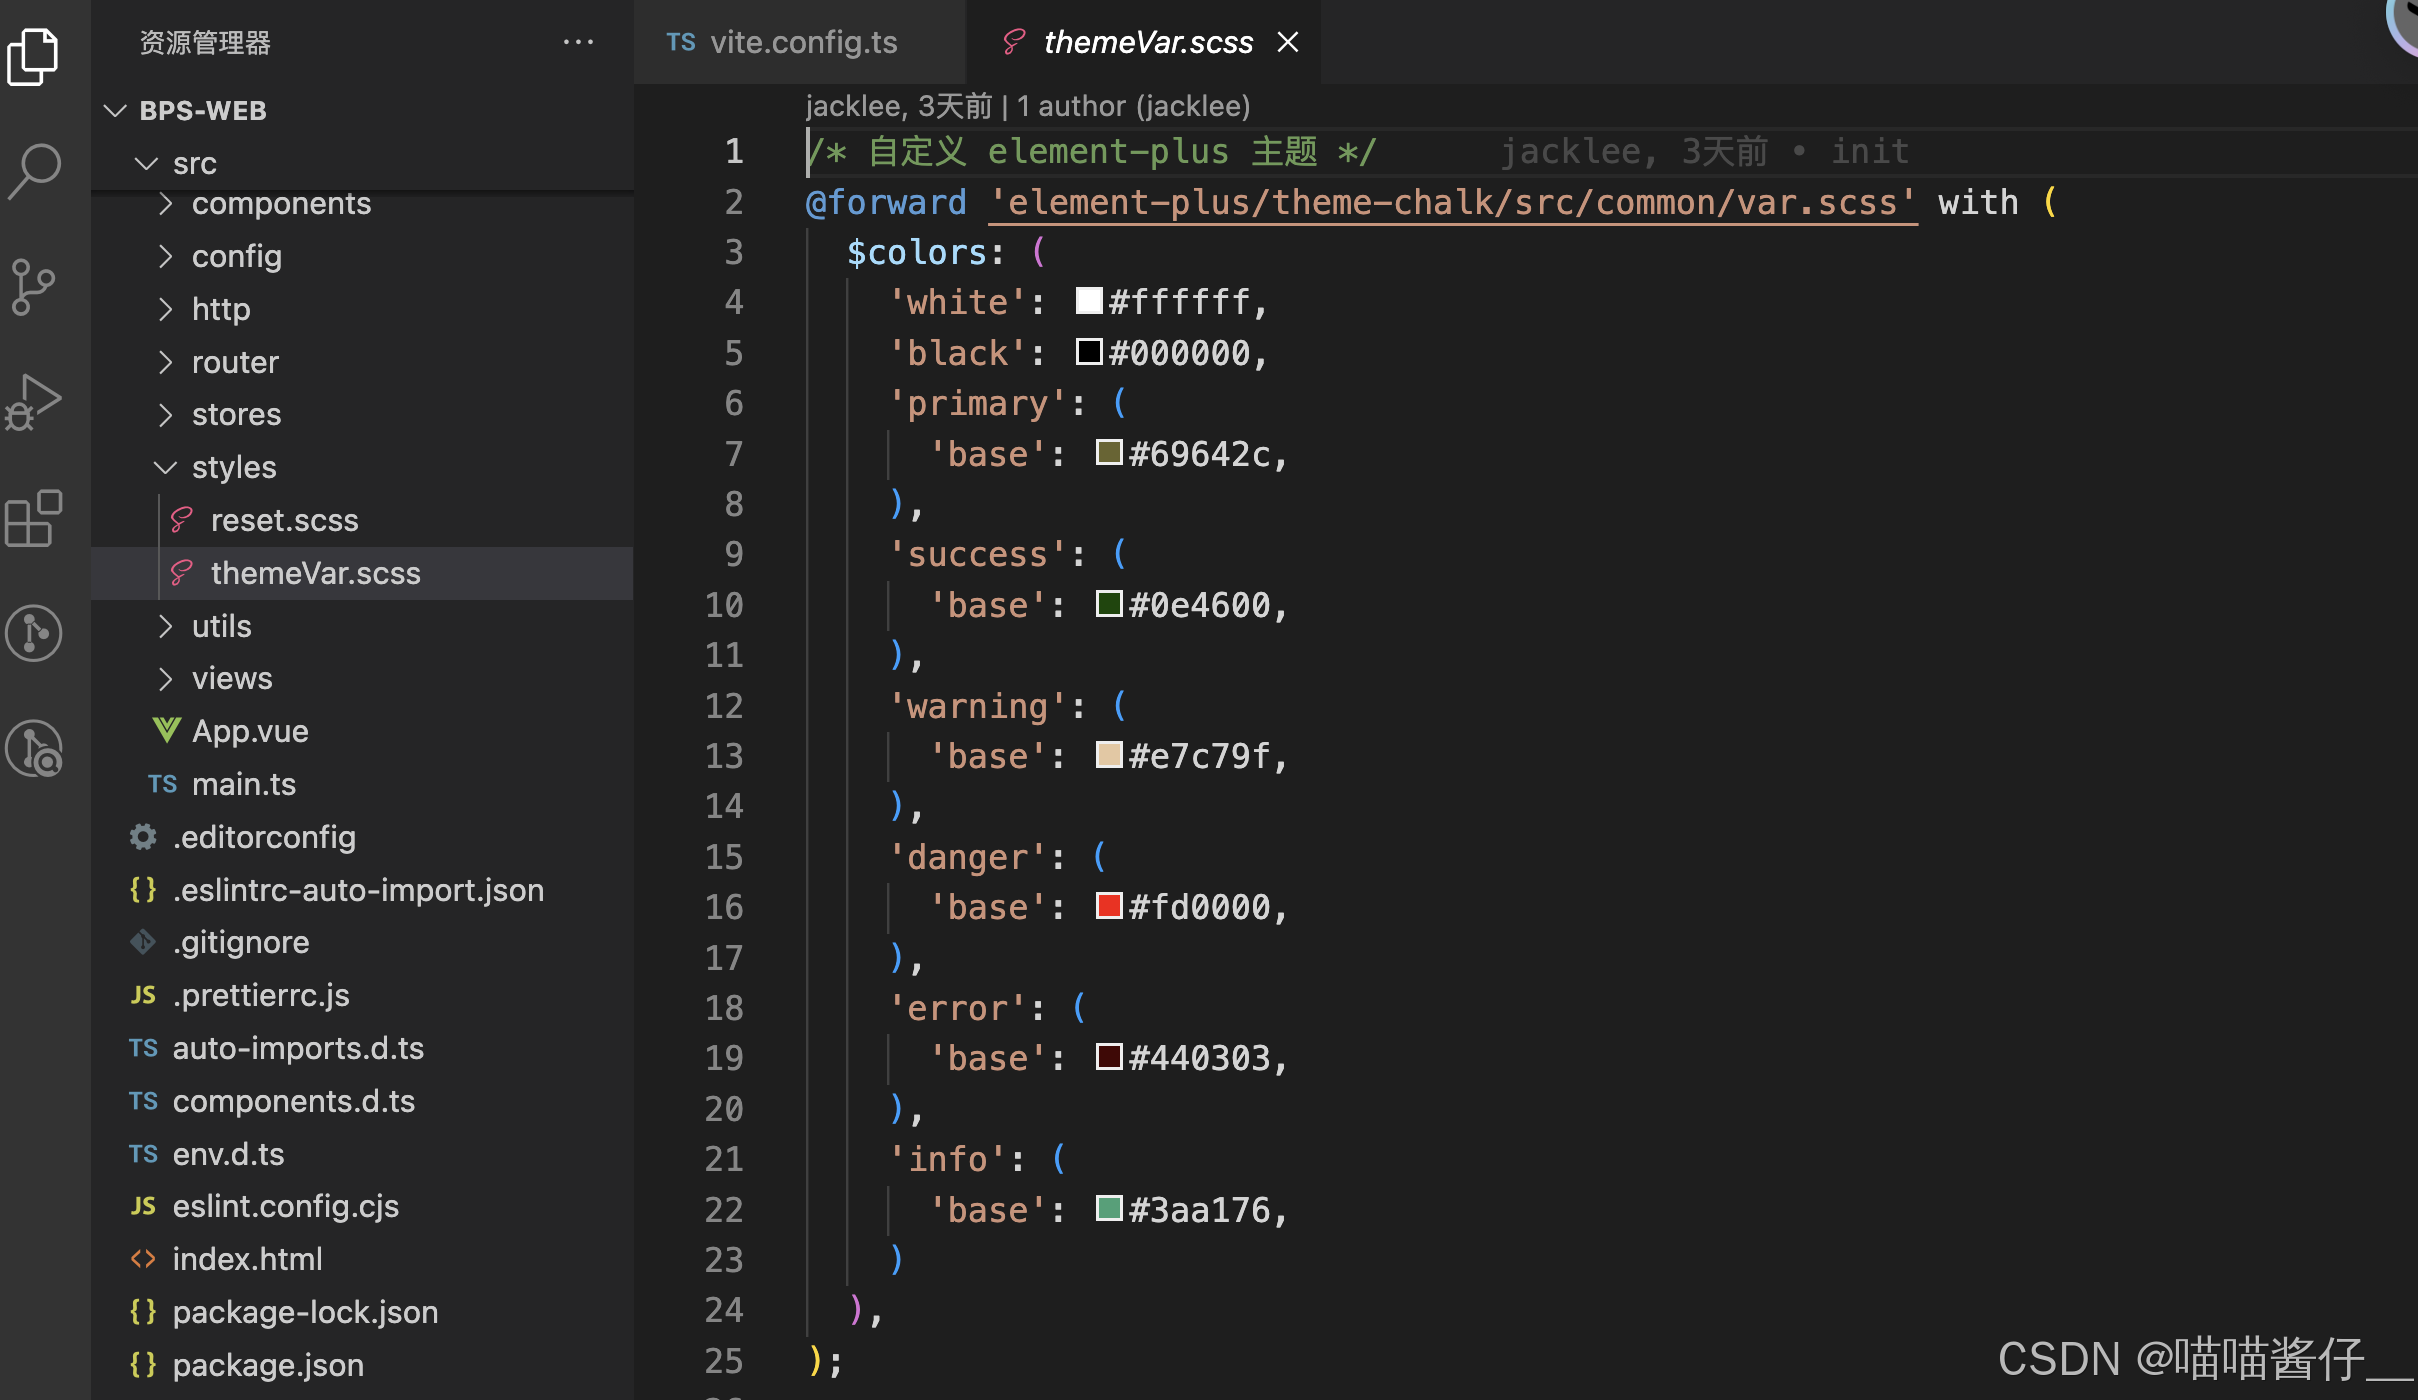
/* 自定义 element-plus 主题 */
@forward 'element-plus/theme-chalk/src/common/var.scss' with ($colors: ('white': #ffffff,'black': #000000,'primary': ('base': #69642c,),'success': ('base': #0e4600,),'warning': ('base': #e7c79f,),'danger': ('base': #fd0000,),'error': ('base': #440303,),'info': ('base': #3aa176,)),
);
5.3vite.config.js

1自动导入配置
将vite.config.js文件中的Components修改为如下形式:
Components({resolvers: [// 配置Element Plus采用saas样式配色系统ElementPlusResolver({ importStyle: 'sass' }),],})2自动导入定制化样式文件进行样式覆盖
export default defineConfig(({ command, mode }) => {// ...return {//...css: {preprocessorOptions: {scss: {// 按需导入自定义主题additionalData: `@use "@/styles/themeVar.scss" as *;`}}},}
})
5.4 测试
修改配置后,执行npm run dev重启,info按钮的主题色修改为绿色了:
注意版本:
Global built-in functions are deprecated and will be removed in Dart Sass 3.0.0.-CSDN博客
六reset.scss 整合到vue3中
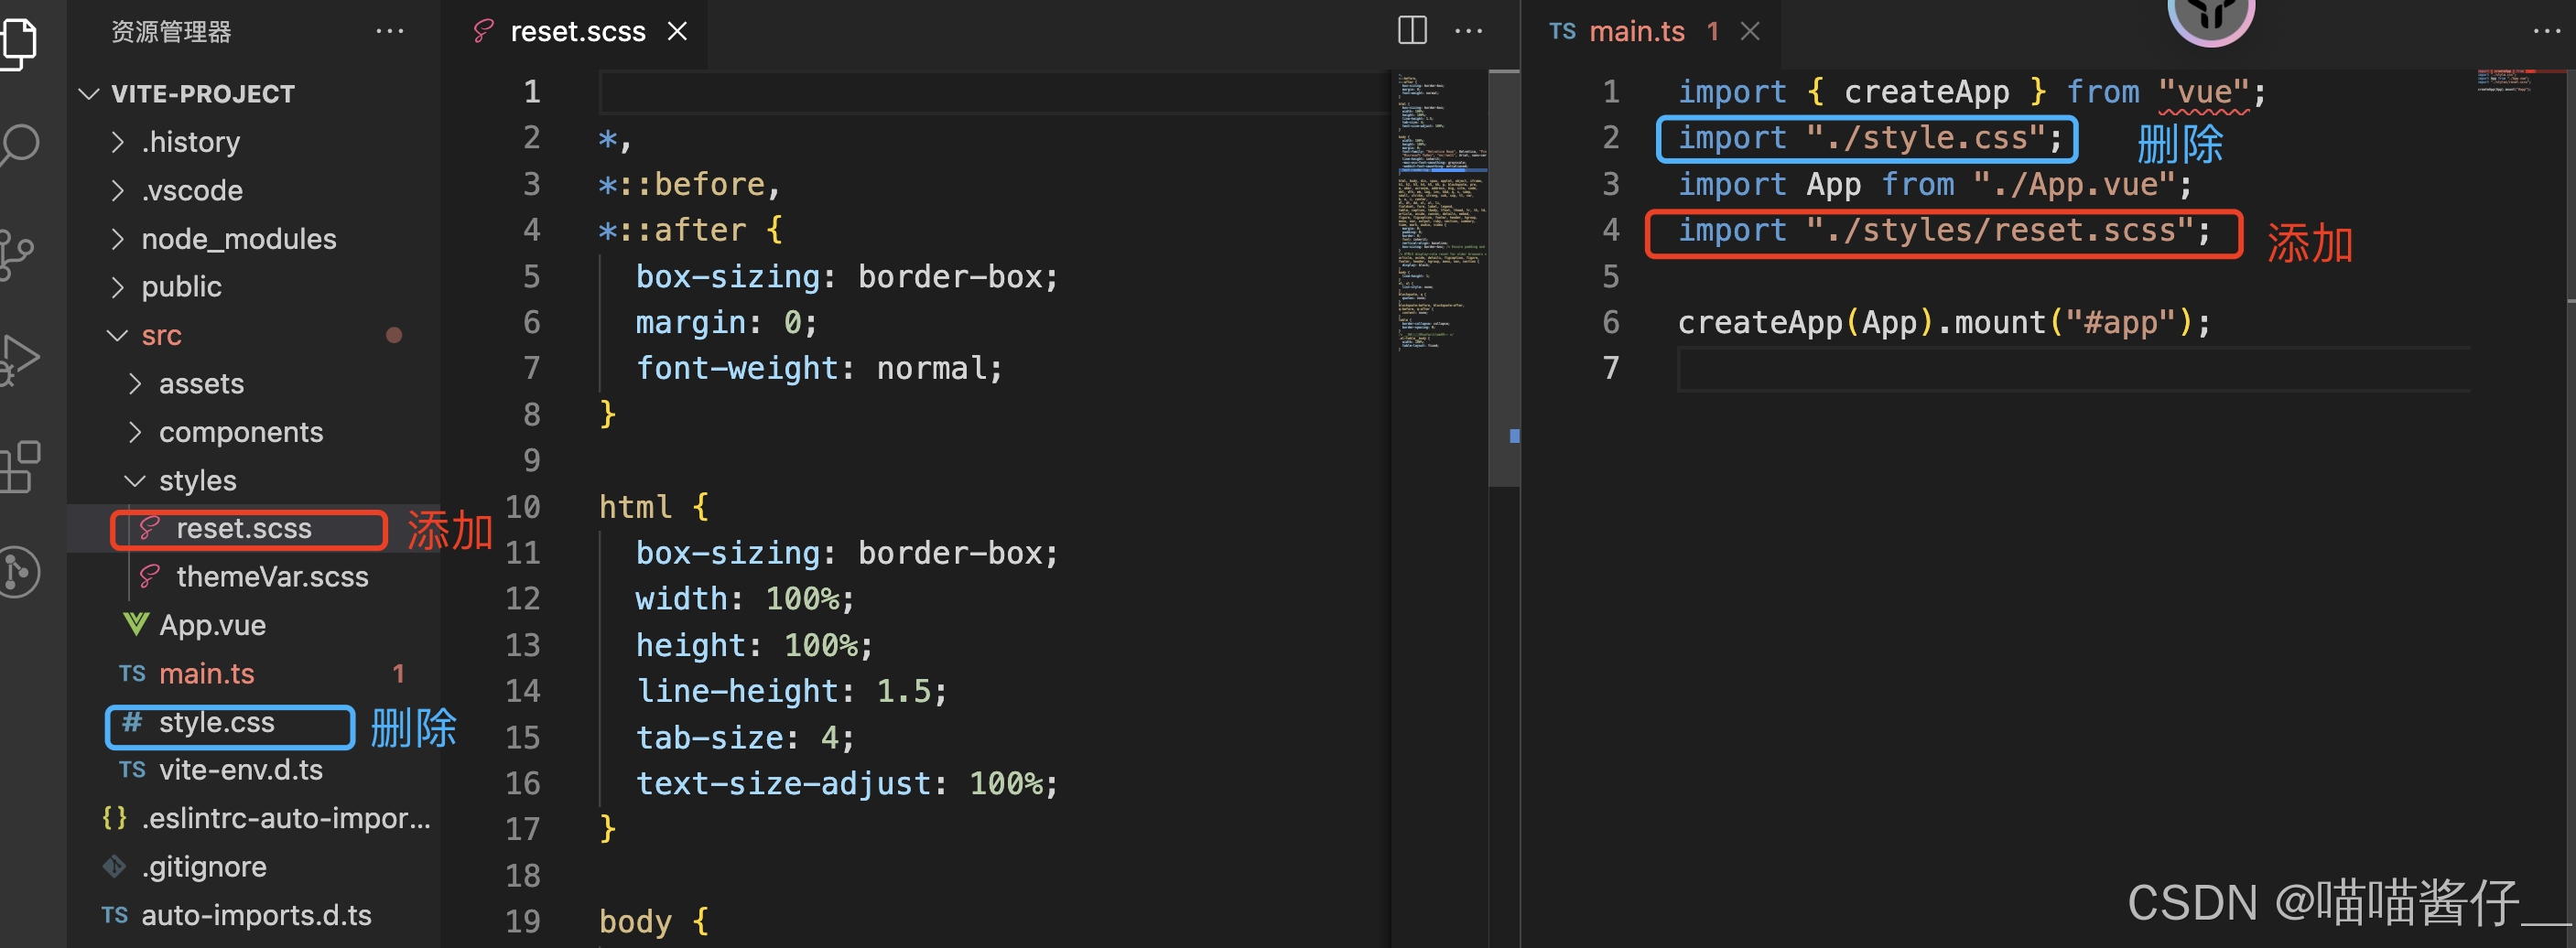
测试:
reset.scss
*,
*::before,
*::after {box-sizing: border-box;margin: 0;font-weight: normal;
}html {box-sizing: border-box;width: 100%;height: 100%;line-height: 1.5;tab-size: 4;text-size-adjust: 100%;
}body {width: 100%;height: 100%;margin: 0;font-family: "Helvetica Neue", Helvetica, "PingFang SC", "Hiragino Sans GB","Microsoft YaHei", "微软雅黑", Arial, sans-serif;line-height: inherit;-moz-osx-font-smoothing: grayscale;-webkit-font-smoothing: antialiased;text-rendering: optimizelegibility;
}html, body, div, span, applet, object, iframe,
h1, h2, h3, h4, h5, h6, p, blockquote, pre,
a, abbr, acronym, address, big, cite, code,
del, dfn, em, img, ins, kbd, q, s, samp,
small, strike, strong, sub, sup, tt, var,
b, u, i, center,
dl, dt, dd, ol, ul, li,
fieldset, form, label, legend,
table, caption, tbody, tfoot, thead, tr, th, td,
article, aside, canvas, details, embed,
figure, figcaption, footer, header, hgroup,
menu, nav, output, ruby, section, summary,
time, mark, audio, video {margin: 0;padding: 0;border: 0;font: inherit;vertical-align: baseline;box-sizing: border-box; /* Ensure padding and borders are included in element sizes */
}
/* HTML5 display-role reset for older browsers */
article, aside, details, figcaption, figure,
footer, header, hgroup, menu, nav, section {display: block;
}
body {line-height: 1;
}
ol, ul {list-style: none;
}
blockquote, q {quotes: none;
}
blockquote:before, blockquote:after,
q:before, q:after {content: none;
}
table {border-collapse: collapse;border-spacing: 0;
}
/* 使表格兼容safari,不错位 */
.el-table__body {width: 100%;table-layout: fixed;
}
6.1常用的css引入项目中


.f {display: flex;
}
.jcc {justify-content: center;
}
.aic {align-items: center;
}
.mt20 {margin-top: 20px;
}
.mb20 {margin-bottom: 20px;
}
.mt10 {margin-top: 10px;
}
.mr10 {margin-right: 10px;
}
.mr20 {margin-right: 20px;
}.app-container {padding: 20px;background-color: var(--el-bg-color-page);
}
七 整合svg
通过 vite-plugin-svg-icons 插件整合
Iconfont第三方图标库实现本地图标
7.1 安装
sudo npm install vite-plugin-svg-icons -D7.2在vite.config.ts中配置
src/assets/svg是指svg图标存入的路径

createSvgIconsPlugin({// Specify the icon folder to be cachediconDirs: [path.resolve(process.cwd(), "src/assets/svg")],// Specify symbolId formatsymbolId: "icon-[dir]-[name]",}),7.3入口文件main.ts导入
import 'virtual:svg-icons-register'7.4对组件简单的封装

<template><svg aria-hidden="true" class="svg-icon" :style="'width:' + size + ';height:' + size"><use :xlink:href="symbolId" :fill="color" /></svg>
</template><script setup lang="ts">
import { computed } from "vue"
const props = defineProps({prefix: {type: String,default: "icon"},iconClass: {type: String,required: false,default: ""},color: {type: String,default: ""},size: {type: String,default: "1em"}
})const symbolId = computed(() => `#${props.prefix}-${props.iconClass}`)
</script><style scoped>
.svg-icon {display: inline-block;width: 1em;height: 1em;overflow: hidden;vertical-align: -0.15em; /* 因icon大小被设置为和字体大小一致,而span等标签的下边缘会和字体的基线对齐,故需设置一个往下的偏移比例,来纠正视觉上的未对齐效果 */outline: none;fill: currentcolor; /* 定义元素的颜色,currentColor是一个变量,这个变量的值就表示当前元素的color值,如果当前元素未设置color值,则从父元素继承 */
}
</style>
7.5使用
因为用了自动导入插件,所以直接使用

//pass就是在src/assets/icons路径下svg文件的名称<svg-icon icon-class="pass" size="64" />八整合 Pinia
Pinia 是 Vue 的专属状态管理库,它允许你跨组件或页面共享状态。
参考:Pinia 官方文档
8.1安装依赖
npm install pinia
npm install pinia-plugin-persistedstate // 持久化插件
8.2 数据持久化

import { createPinia } from "pinia"
import piniaPluginPersistedstate from "pinia-plugin-persistedstate"const pinia = createPinia()
pinia.use(piniaPluginPersistedstate) // 数据持久化export default pinia
8.3main.ts 引入 pinia
// src/main.ts
import { createPinia } from "pinia";
import App from "./App.vue";createApp(App).use(createPinia()).mount("#app");
8.3定义 Store
根据 Pinia 官方文档-核心概念 描述 ,Store 定义分为选项式和组合式 , 先比较下两种写法的区别:
| 选项式 Option Store | 组合式 Setup Store |
|---|---|
|
|
|


至于如何选择,官方给出的建议 :选择你觉得最舒服的那一个就好 。
这里选择组合式,新建文件 src/store/counter.ts
// src/store/counter.ts
import { defineStore } from "pinia"export const useCounterStore = defineStore("counter",() => {const count = ref(0)const doubleCount = computed(() => count.value * 2)function increment() {count.value++}function decrement() {count.value--}return {count,doubleCount,increment,decrement}},{persist: {// 不需要持久化,配置项 persist: falseenabled: false,storage: sessionStorage, // 可以是 localStorage, sessionStorage 或 window.localStoragekey: "counter_key" // 状态的键名}}
)
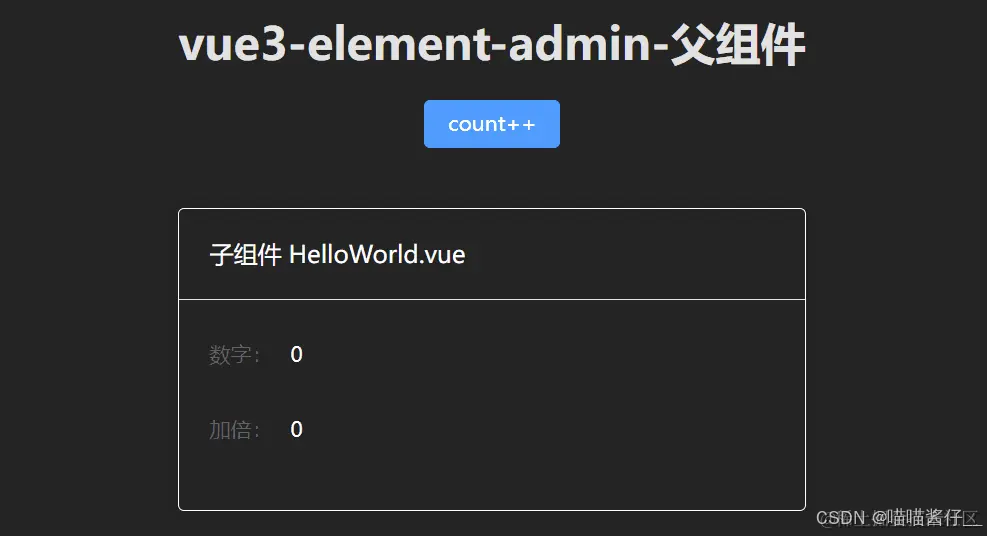
父组件
<!-- src/App.vue -->
<script setup lang="ts">
import HelloWorld from "@/components/HelloWorld.vue";import { useCounterStore } from "@/stores/counter.ts";
const counterStore = useCounterStore();
</script><template><h1 class="text-3xl">vue3-element-admin-父组件</h1><el-button type="primary" @click="counterStore.increment">count++</el-button><HelloWorld />
</template>
子组件
<!-- src/components/HelloWorld.vue -->
<script setup lang="ts">
import { useCounterStore } from "@/stores/counter.ts";
const counterStore = useCounterStore();
</script><template><el-card  class="text-left text-white border-white border-1 border-solid mt-10 bg-[#242424]" ><template #header> 子组件 HelloWorld.vue</template><el-form><el-form-item label="数字:"> {{ counterStore.count }}</el-form-item><el-form-item label="加倍:"> {{ counterStore.double }}</el-form-item></el-form></el-card>
</template>
效果预览
九环境变量
Vite 环境变量主要是为了区分开发、测试、生产等环境的变量
参考: Vite 环境变量配置官方文档
env配置文件
项目根目录新建 .env.development 、.env.production
-
开发环境变量配置:.env.development
# 变量必须以 VITE_ 为前缀才能暴露给外部读取
VITE_APP_TITLE = 'vue3-element-admin'
VITE_APP_PORT = 3000
VITE_APP_BASE_API = '/dev-api'- 生产环境变量配置:.env.production
VITE_APP_TITLE = 'vue3-element-admin'
VITE_APP_PORT = 3000
VITE_APP_BASE_API = '/prod-api'
十反向代理解决跨域
跨域原理
浏览器同源策略: 协议、域名和端口都相同是同源,浏览器会限制非同源请求读取响应结果。
本地开发环境通过 Vite 配置反向代理解决浏览器跨域问题,生产环境则是通过 nginx 配置反向代理 。
vite.config.ts 配置代理
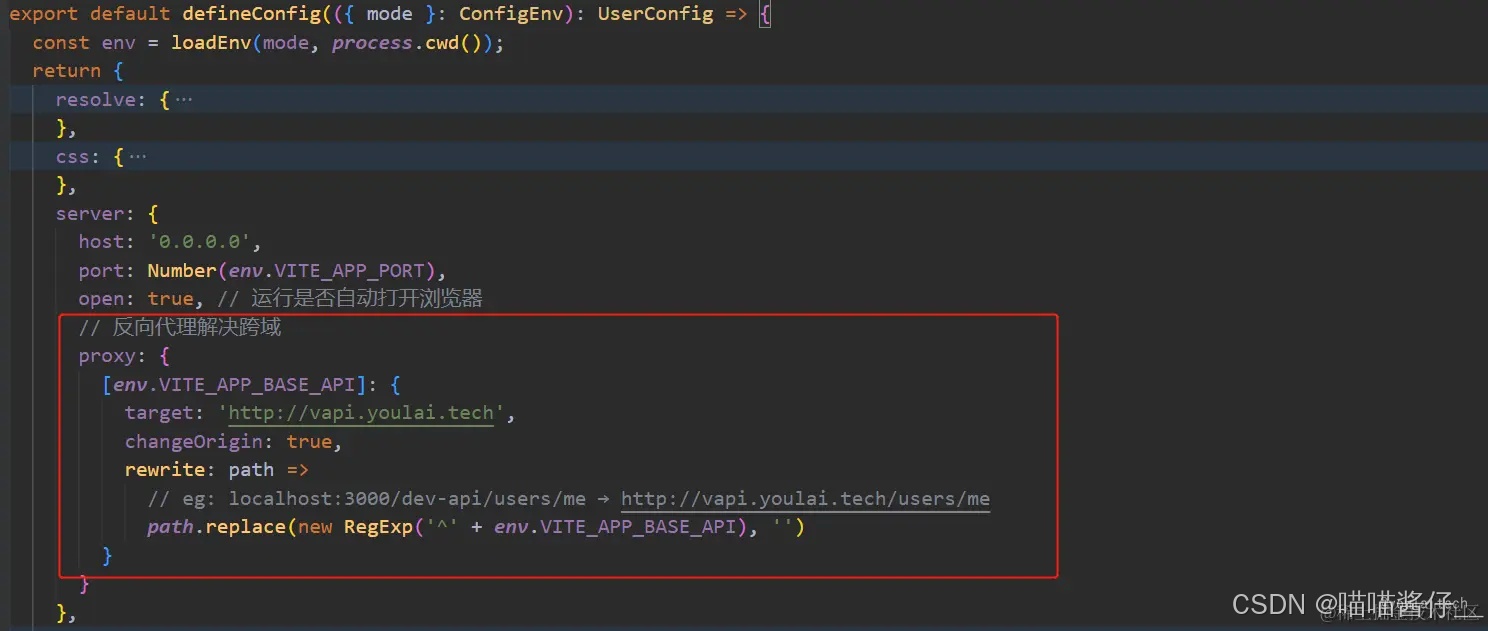
表面肉眼看到的请求地址: http://localhost:3000/dev-api/api/v1/users/me
真实访问的代理目标地址: http://vapi.youlai.tech/api/v1/users/me

十一 vue-router 静态路由
11.1安装 vue-router
npm install vue-router@next11.2全局注册路由实例
// main.ts
import router from "@/router";app.use(router).mount('#app')
11.3路由实例
- views中创建DemoView.vue。Home
- 创建路由实例
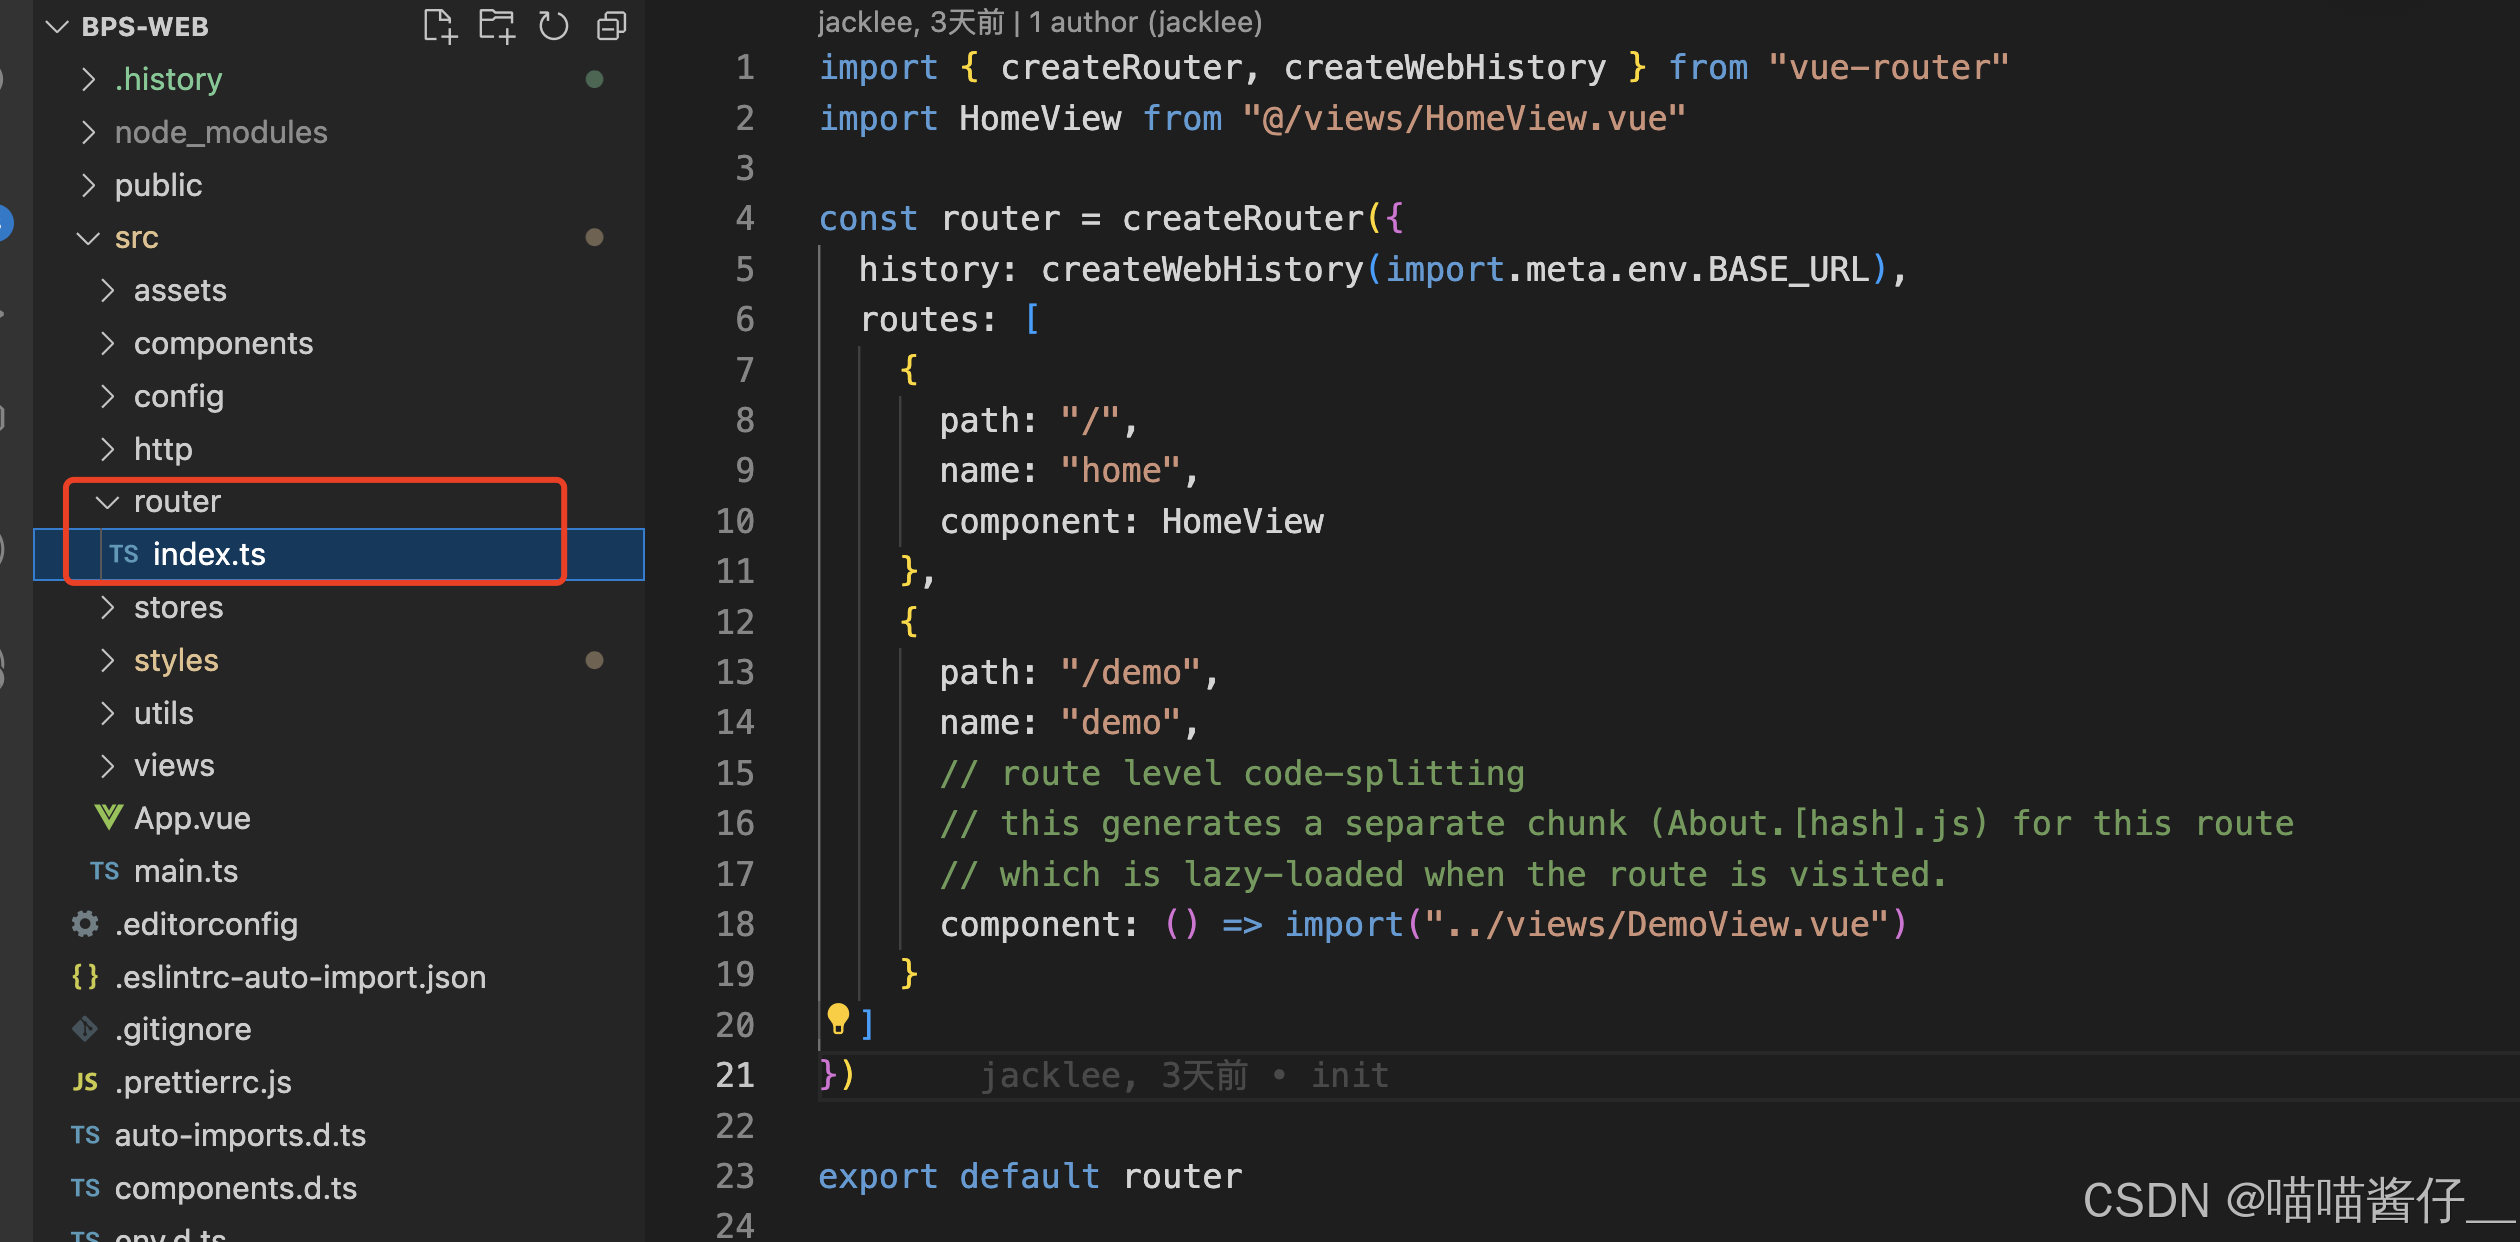
import { createRouter, createWebHistory } from "vue-router"
import HomeView from "@/views/HomeView.vue"const router = createRouter({history: createWebHistory(import.meta.env.BASE_URL),routes: [{path: "/",name: "home",component: HomeView},{path: "/demo",name: "demo",// route level code-splitting// this generates a separate chunk (About.[hash].js) for this route// which is lazy-loaded when the route is visited.component: () => import("../views/DemoView.vue")}]
})export default router
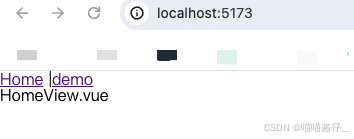
11.4测试
src/App.vue
<script setup lang="ts">
onMounted(() => {console.log("hello world1");
});
</script><template><el-config-provider :locale="zhCn"><header><div class="wrapper"><nav><RouterLink to="/">Home</RouterLink> <span>|</span><RouterLink to="/demo">demo</RouterLink></nav></div></header><RouterView /></el-config-provider>
</template><style scoped></style>
十二、整合eslint、prettier
12.1 按照配置eslint
- 初始化eslint配置
npm init @eslint/config
检查语法、发现问题、强制执行代码样式


默认安装了下列npm包:
"@eslint/js": "^9.2.0","eslint": "^9.2.0","eslint-plugin-vue": "^9.26.0","typescript-eslint": "^7.9.0",- 根目录下生成eslint.config.mjs文件
const globals = require("globals");
const pluginJs = require("@eslint/js");
const tseslint = require("typescript-eslint");
const pluginVue = require("eslint-plugin-vue");
const autoImportGlobals = require("./.eslintrc-auto-import.json"); // 使用 require 导入 JSON
const prettierPlugin = require("eslint-plugin-prettier");
const prettierConfig = require("eslint-config-prettier");module.exports = [// 应用于所有文件的基础配置{files: ["**/*.{js,ts,html,vue}"],languageOptions: {globals: {...globals.browser,...autoImportGlobals.globals // 将自动导入的全局变量合并到 ESLint 配置中}}},// 使用 JavaScript 推荐配置pluginJs.configs.recommended,// 使用 TypeScript 推荐配置...tseslint.configs.recommended,// 使用 Vue.js 推荐的基础配置...pluginVue.configs["flat/essential"],// 使用 prettier 规范prettierConfig, // 这是 eslint-config-prettier, 禁用与 Prettier 冲突的 ESLint 规则// 针对 Vue 文件的特殊处理{files: ["**/*.vue"], // 只应用于 .vue 文件languageOptions: {parserOptions: {ecmaVersion: 2020, // 或更高版本sourceType: "module", // 允许使用 ES 模块parser: tseslint.parser // 使用 TypeScript 解析器解析 Vue 文件中的脚本部分}}},// 自定义 ESLint 规则{plugins: {prettier: prettierPlugin // 使用 Prettier 插件,直接作为对象引用},rules: {"no-debugger": "off","prettier/prettier": "error", // 强制使用 Prettier 格式化,并将不符合 Prettier 规范的代码作为错误"prefer-const": "off", // 允许使用 let 声明变量,而不强制使用 const 声明常量"vue/no-setup-props-destructure": "off", // 允许在 setup 中对 props 进行解构"vue/script-setup-uses-vars": "error", // 强制检查 script setup 中使用的变量,防止未使用变量的警告"vue/no-reserved-component-names": "off", // 允许使用 Vue 保留的组件名称"@typescript-eslint/ban-ts-ignore": "off", // 允许使用 @ts-ignore 注释,忽略 TypeScript 错误"@typescript-eslint/explicit-function-return-type": "off", // 不强制要求函数返回类型的明确声明"@typescript-eslint/no-explicit-any": "off", // 允许使用 any 类型"@typescript-eslint/no-var-requires": "off", // 允许使用 require 来导入模块,支持 CommonJS"@typescript-eslint/no-empty-function": "off", // 允许空函数声明"vue/custom-event-name-casing": "off", // 允许自定义事件名称使用任意大小写"no-use-before-define": "off", // 允许在变量声明之前使用它们"@typescript-eslint/no-use-before-define": "off", // 允许在变量声明之前使用 TypeScript 的变量"@typescript-eslint/ban-ts-comment": "off", // 允许使用 @ts- 开头的注释"@typescript-eslint/ban-types": "off", // 允许使用基本类型,禁止使用特定的类型"@typescript-eslint/no-non-null-assertion": "off", // 允许使用非空断言操作符(!)"@typescript-eslint/explicit-module-boundary-types": "off", // 不强制要求模块边界类型的明确声明"@typescript-eslint/no-unused-vars": "off", // 允许未使用的变量"no-unused-vars": "off", // 允许未使用的变量(在 JavaScript 中)"space-before-function-paren": "off", // 不强制要求函数括号前的空格"vue/attributes-order": "off", // 不强制要求 Vue 组件属性的顺序"vue/one-component-per-file": "off", // 允许在一个文件中定义多个 Vue 组件"vue/html-closing-bracket-newline": "off", // 不强制要求 HTML 标签的闭合括号换行"vue/max-attributes-per-line": "off", // 不强制要求每行最大属性数量"vue/multiline-html-element-content-newline": "off", // 不强制要求多行 HTML 元素内容换行"vue/singleline-html-element-content-newline": "off", // 不强制要求单行 HTML 元素内容换行"vue/attribute-hyphenation": "off", // 允许属性命名不使用连字符"vue/require-default-prop": "off", // 允许不定义组件的默认属性"vue/require-explicit-emits": "off", // 允许不显式声明组件 emit 的事件"vue/html-self-closing": ["error", // 强制 HTML 自闭合标签格式{html: {void: "always", // 对于 void 标签(如 <br>),总是使用自闭合normal: "never", // 对于正常标签(如 <div>),不使用自闭合component: "always" // 对于组件标签(如 <MyComponent>),总是使用自闭合},svg: "always", // 对于 SVG 标签,总是使用自闭合math: "always" // 对于 MathML 标签,总是使用自闭合}],"vue/multi-word-component-names": "off", // 允许组件名称不使用多词"vue/no-v-html": "off", // 允许使用 v-html 指令(不推荐用于安全性考虑)"vue/require-toggle-inside-transition": "off" // 允许不在过渡组件中使用 toggle}}
];
以上代码中,我们引入了"@vue/eslint-config-typescript"的默认配置,并可以在`rules`属性中添加自定义规则。
安装包:
npm install @vue/eslint-config-typescript --save-dev.eslintrc-auto-import.json (自动生成的)
{"globals": {"Component": true,"ComponentPublicInstance": true,"ComputedRef": true,"DirectiveBinding": true,"EffectScope": true,"ExtractDefaultPropTypes": true,"ExtractPropTypes": true,"ExtractPublicPropTypes": true,"InjectionKey": true,"MaybeRef": true,"MaybeRefOrGetter": true,"PropType": true,"Ref": true,"VNode": true,"WritableComputedRef": true,"computed": true,"createApp": true,"customRef": true,"defineAsyncComponent": true,"defineComponent": true,"effectScope": true,"getCurrentInstance": true,"getCurrentScope": true,"h": true,"inject": true,"isProxy": true,"isReactive": true,"isReadonly": true,"isRef": true,"markRaw": true,"nextTick": true,"onActivated": true,"onBeforeMount": true,"onBeforeRouteLeave": true,"onBeforeRouteUpdate": true,"onBeforeUnmount": true,"onBeforeUpdate": true,"onDeactivated": true,"onErrorCaptured": true,"onMounted": true,"onRenderTracked": true,"onRenderTriggered": true,"onScopeDispose": true,"onServerPrefetch": true,"onUnmounted": true,"onUpdated": true,"onWatcherCleanup": true,"provide": true,"reactive": true,"readonly": true,"ref": true,"resolveComponent": true,"shallowReactive": true,"shallowReadonly": true,"shallowRef": true,"toRaw": true,"toRef": true,"toRefs": true,"toValue": true,"triggerRef": true,"unref": true,"useAttrs": true,"useCssModule": true,"useCssVars": true,"useId": true,"useLink": true,"useModel": true,"useRoute": true,"useRouter": true,"useSlots": true,"useTemplateRef": true,"watch": true,"watchEffect": true,"watchPostEffect": true,"watchSyncEffect": true}
}
- 该解析器允许使用Eslint校验所有babel code
"@babel/eslint-parser": "^7.19.1",- vscode安装eslint插件

安装插件后默认项目下的js文件中,有问题的语句在语句下面会出现黄色或者红色的波浪线提示

文件,需要修改setting.json文件。vscode编辑器左下角点击设置图标,默认用户标签下即可,vscode右上角第二排的文件图标可以切换为文本编辑。
在setting.json文件中添加如下配置:
"eslint.validate": ["typescript", "vue"]如果遇到其他未知错误时,如eslint插件不生效,打开eslint配置文件,点击vscode编辑器右下角{},再点击open eslint output,可找到不生效的原因。

12.2Prettier
代码格式化工具
pnpm add --save-dev --save-exact prettier--save-exact的作用就是固定依赖包的版本,不要带^或~,避免出现小版本,有利于版本统一。
版本号说明: 不带符号表示安装指定的版本
- ~号作用于小版本,会安装最新的小版本
- ^号作用于大版本,会安装最新的大版本
VSCode安装Prettier插件

项目根目录下新增.prettierrc文件,并设定一些规则
export default {printWidth: 100, // 一行最多多少字符tabWidth: 2, // 缩进的宽度,2 个空格useTabs: false, // 是否使用制表符,不使用制表符,使用空格semi: false, // 语句结尾是否使用分号bracketSpacing: true, // 大括号 {} 中开始和结束是否要空格,true — { foo: 1 },false — {foo: 1}trailingComma: "none", // 数组或对象或参数的最后一项是否尾随逗号,none — 没有尾随逗号,all — 尽可能使用尾随逗号,es5 — 在 ES5 中有效的尾随逗号(对象、数组等),TypeScript 和 Flow 类型参数中的尾随逗号。arrowParens: "always", // 只有一个参数的箭头函数是否带括号,always — 始终带括号,avoid — 不带括号proseWrap: "always", // 什么对代码进行折行,always — 如果超过 printWidth 指定的一行最多字符宽度,则进行折行;never — 将每块代码块展开成一行;preserve — 什么都不做,保持原样。htmlWhitespaceSensitivity: "strict", // 根据显示样式决定 html 要不要折行endOfLine: "auto", // 每行的结束符(回车符、换行符),取值请参考 https://www.prettier.cn/docs/options.html#end-of-line// 每个文件格式化的范围是文件的全部内容rangeStart: 0,rangeEnd: Infinity,// 不需要写文件开头的@prettierrequirePragma: false,// 不需要自动在文件开头插入@prettierinsertPragma: false
}
在用户setting.json中设置默认格式化程序
"editor.defaultFormatter": "esbenp.prettier-vscode"在用户setting.json中设置保存时格式化
"editor.formatOnSave": true,12.3eslint与Prettier相结合
我们可以使用eslint-config-prettier和eslint-plugin-prettier来结合eslint与Prettier。
eslint-config-prettier用来覆盖ESLint本身的规则配置,
eslint-plugin-prettier则是用于让Prettier来接管eslint --fix即修复代码的能力。
安装:
npm i eslint-config-prettier eslint-plugin-prettier -D参考:https://juejin.cn/post/7369978126146093067
vue2老项目增加eslint配置代码规范在已有的vue2老项目中增加eslint代码规范检查 包含eslint,ppr - 掘金