openbmc pldmd分析(To be continued...)
1.说明
openbmc的pldmd模块采用的是intel-bmc的代码。链接地址: https://github.com/Intel-BMC/pldmd,需要注意仔细阅读其设计文档,把握整体的架构思路。
2.pldmd的sensor分析
Sensor部分的分析,需要仔细浏览文档:DSP0248_1.3.0.pdf内容,即:Platform Level Data Model (PLDM) for Platform 6 Monitoring and Control Specification.
2.1 分析温度sensor数据获取
从文件pldmd\src\numeric_sensor_handler.cpp入手,分析函数:
bool NumericSensorHandler::initSensor()
---> std::optional<float> maxVal = pdr::sensor::fetchSensorValue(*_pdr, _pdr->max_readable);
---> std::optional<float> minVal = pdr::sensor::fetchSensorValue(*_pdr, _pdr->min_readable);
---> std::optional<float> hysteresis = pdr::sensor::fetchSensorValue(*_pdr, _pdr->hysteresis);
---> std::optional<SensorUnit> baseUnit = pdr::sensor::getSensorUnit(*_pdr);
---> std::vector<thresholds::Threshold> thresholdData;
---> getSupportedThresholds(thresholdData);
---> if (_pdr->sensor_init == PLDM_SENSOR_DISABLE)---> sensorDisabled = true;
---> _sensor = std::make_shared<NumericSensor>(_name, thresholdData,pdr::sensor::calculateSensorValue(*_pdr, *maxVal),pdr::sensor::calculateSensorValue(*_pdr, *minVal),pdr::sensor::calculateSensorValue(*_pdr, *hysteresis), *baseUnit,sensorDisabled, association::getPath(_tid));
这里面,着重需要注意的是结构体NumericSensor构造函数的执行:
NumericSensor::NumericSensor(const std::string& sensorName,std::vector<thresholds::Threshold>& thresholdData,const double max, const double min,const double hysteresis,const SensorUnit sensorUnit,const bool sensorDisabled,const std::string& associationPath) :name(std::regex_replace(sensorName, std::regex("[^a-zA-Z0-9_/]+"), "_")),maxValue(max), minValue(min), thresholds(thresholdData), unit(sensorUnit),hysteresisTrigger(hysteresis), errCount(0)
---> switch (unit)---> path = "/xyz/openbmc_project/sensors/temperature/";---> path = "/xyz/openbmc_project/sensors/voltage/";---> path = "/xyz/openbmc_project/sensors/current/";---> path = "/xyz/openbmc_project/sensors/fan_pwm/";---> path = "/xyz/openbmc_project/sensors/power/";
---> sensorInterface = objectServer->add_interface(path + name, "xyz.openbmc_project.Sensor.Value");
---> setInitialProperties(sensorDisabled);---> sensorInterface->register_property("MaxValue", maxValue);---> sensorInterface->register_property("MinValue", minValue);---> sensorInterface->register_property("Value", value);---> sensorInterface->register_property("Unit", unit);
以上即接口的注册。例如如下展示的内容:
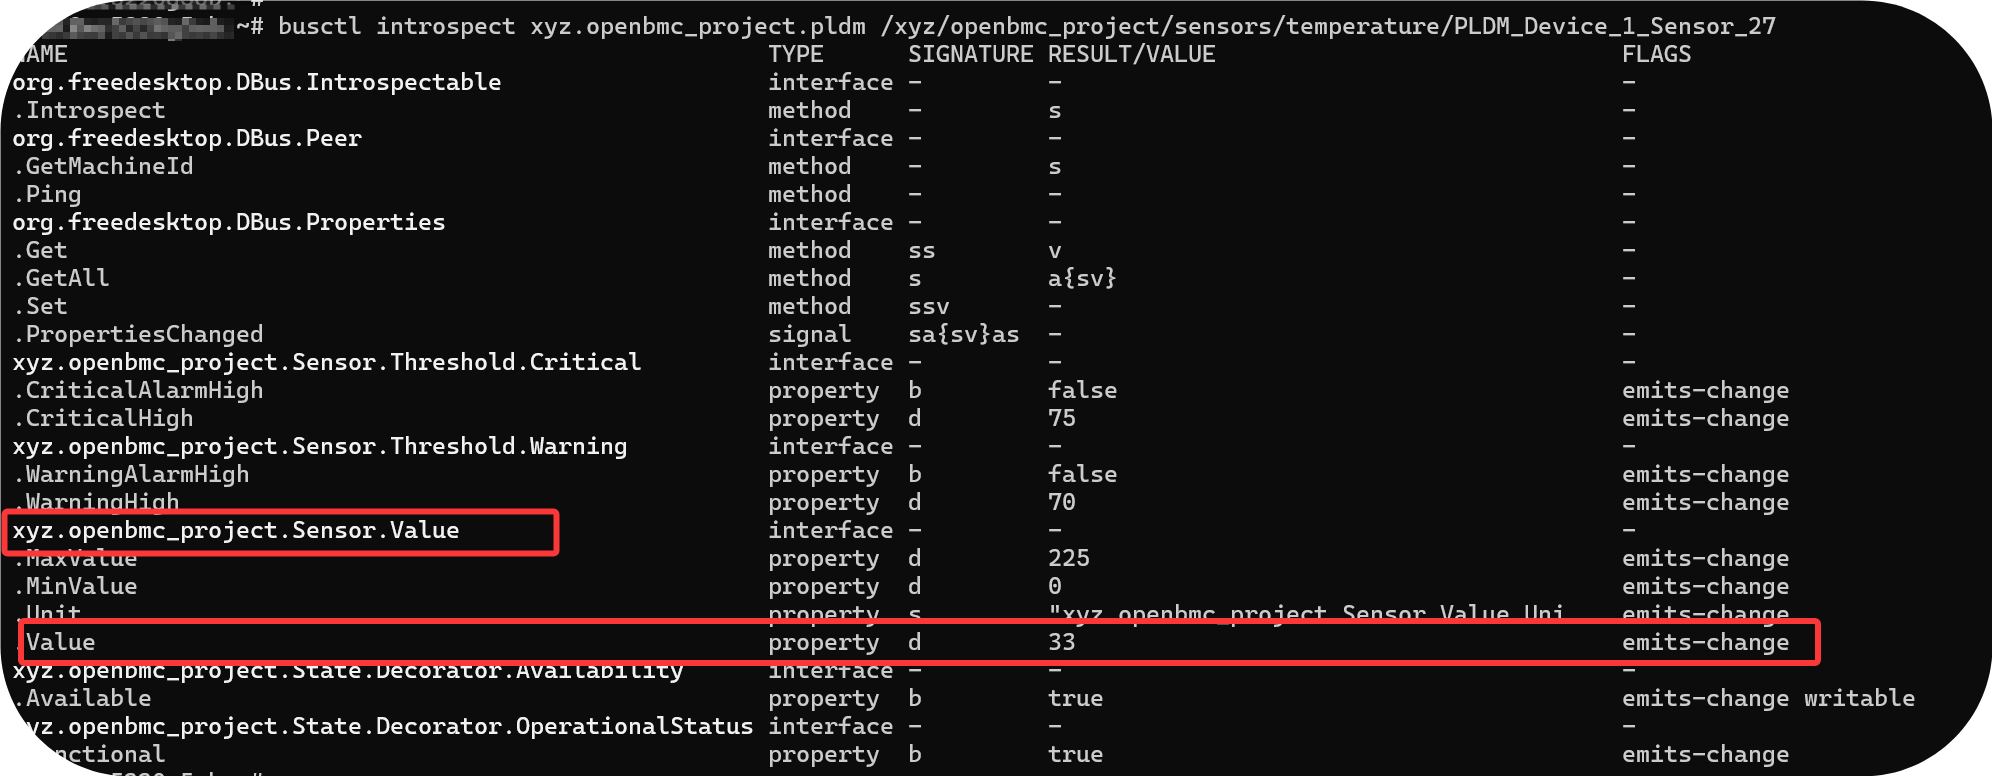
分析文件pldmd\src\numeric_sensor_handler.cpp的调用关系:
bool NumericSensorHandler::sensorHandlerInit(boost::asio::yield_context yield)
---> if (!initSensor())---> return false;
再看一下获取sensor reading的方法:
bool NumericSensorHandler::getSensorReading(boost::asio::yield_context yield)
---> std::vector<uint8_t> req(pldmMsgHdrSize +sizeof(pldm_get_sensor_reading_req));
---> pldm_msg* reqMsg = reinterpret_cast<pldm_msg*>(req.data());
---> constexpr uint8_t rearmEventState = 0x00; //不支持event,设置为0//如下发送消息,组合的sensorid + 0(rearmeventState)
---> rc = encode_get_sensor_reading_req(createInstanceId(_tid), _sensorID,rearmEventState, reqMsg);
---> validatePLDMReqEncode(_tid, rc, "GetSensorReading")//发送数据包,获取reading
---> sendReceivePldmMessage(yield, _tid, commandTimeout, commandRetryCount,req, resp)
---> decode_get_sensor_reading_resp(...)
---> validatePLDMRespDecode(_tid, rc, completionCode, "GetSensorReading")
---> handleSensorReading(sensorOperationalState, sensorDataSize,presentReading) 如下为正常获取数据流程---> case PLDM_SENSOR_ENABLED:---> std::optional<float> sensorReading =pdr::sensor::fetchSensorValue(*_pdr, presentReading); ---> _sensor->updateValue(pdr::sensor::calculateSensorValue(*_pdr, *sensorReading),sensorAvailable, sensorFunctional);  //更新数据---> updateProperty(sensorInterface, value, newValue, "Value");
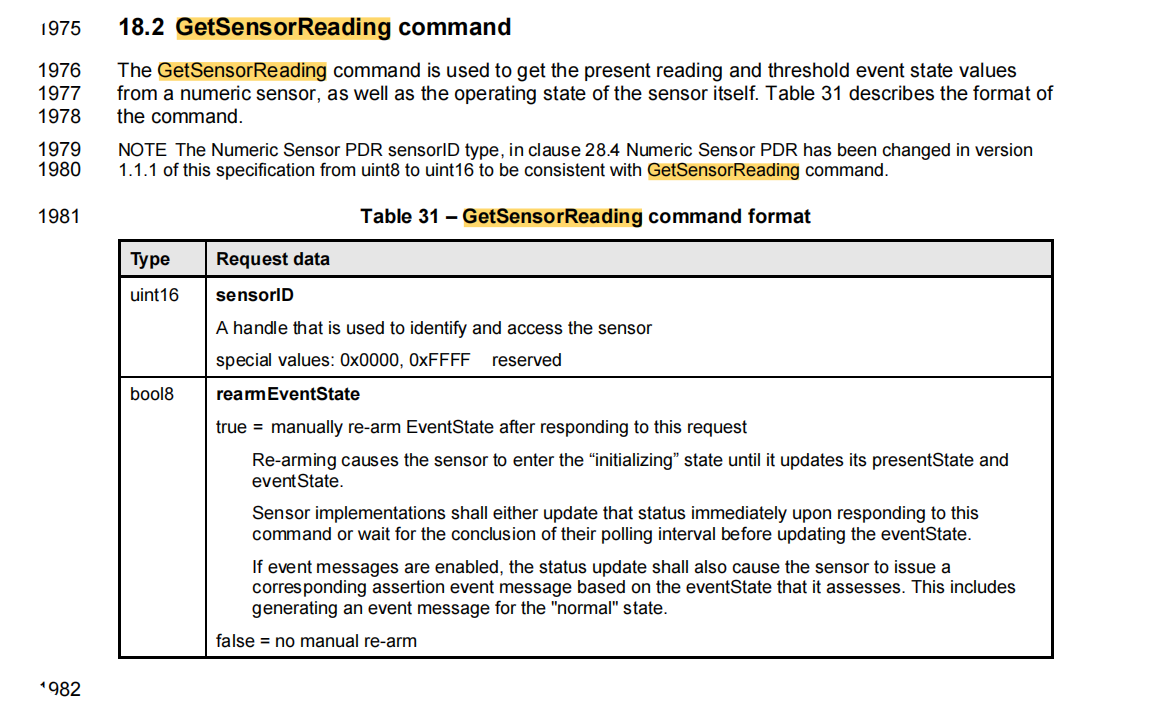
注意定义pldm_get_sensor_reading_req 是符合DSP0248.pdf规范文档的:
struct pldm_get_sensor_reading_req {uint16_t sensor_id;bool8_t rearm_event_state;
} __attribute__((packed));
通过以上分析,需要再看看SensorId的来源是什么。
分析文件pldmd\src\platform_terminus.cpp中的函数:
void PlatformTerminus::initSensors(boost::asio::yield_context yield)
---> std::unordered_map<SensorID, std::string> sensorList = pdrManager->getSensors();
---> for (auto const& [sensorID, sensorName] : sensorList)---> if (auto pdr = pdrManager->getNumericSensorPDR(sensorID))---> std::unique_ptr<NumericSensorHandler> numericSensorHandler =std::make_unique<NumericSensorHandler>(_tid, sensorID,sensorName, *pdr);
这里面的NumericSensorHandler包含了SensorId,需要继续分析pdrManager的来源值:
bool PlatformTerminus::initPDRs(boost::asio::yield_context yield)
---> pdrManager = std::make_unique<PDRManager>(_tid);
---> if (!pdrManager->pdrManagerInit(yield))---> std::optional<pldm_pdr_repository_info> pdrInfo = getPDRRepositoryInfo(yield);---> rc = encode_get_pdr_repository_info_req(createInstanceId(_tid), reqMsg);---> encode_header_only_request(instance_id, PLDM_PLATFORM,PLDM_GET_PDR_REPOSITORY_INFO, msg);  //命令为0x50---> validatePLDMReqEncode(_tid, rc, "GetPDRRepositoryInfo")//发送命令---> sendReceivePldmMessage(yield, _tid, commandTimeout, commandRetryCount,req, resp)---> decode_get_pdr_repository_info_resp( rspMsg, resp.size() - pldmMsgHdrSize, &pdrInfo)---> validatePLDMRespDecode(_tid, rc, pdrInfo.completion_code,"GetPDRRepositoryInfo")---> _pdrRepo = std::move(pdrRepo);  //类成员值---> if (!constructPDRRepo(yield))---> while (noOfCommandTries--)---> getDevicePDRRepo(yield, recordCount, devicePDRs)---> getDevicePDRRecord(yield, recordHandle, nextRecordHandle,pdrRecord))---> encode_get_pdr_req(createInstanceId(_tid), recordHandle,dataTransferHandle, transferOpFlag,requestCount, recordChangeNumber, reqMsgPtr,PLDM_GET_PDR_REQ_BYTES)---> validatePLDMReqEncode(_tid, rc, "GetPDR")---> sendReceivePldmMessage(yield, _tid, commandTimeout,commandRetryCount, req, resp)            ---> parsePDR<PLDM_ENTITY_AUXILIARY_NAMES_PDR>();---> ...---> parsePDR<PLDM_NUMERIC_SENSOR_PDR>();---> ....
重点关注函数parsePDR<PLDM_NUMERIC_SENSOR_PDR>():
void PDRManager::parsePDR()
---> auto record = pldm_pdr_find_record_by_type(_pdrRepo.get(), pdrType, NULL,&pdrData, &pdrSize);
---> while (record)---> else if constexpr (pdrType == PLDM_NUMERIC_SENSOR_PDR)---> parseNumericSensorPDR(pdrVec);---> pldm_numeric_sensor_pdr_parse(pdrData.data(),static_cast<uint16_t>(pdrData.size()),pdrOut.data())  ---> pldm_numeric_sensor_value_pdr* sensorPDR =reinterpret_cast<pldm_numeric_sensor_value_pdr*>(pdrOut.data()); ---> uint16_t sensorID = sensorPDR->sensor_id;
因此,sensorId来源于通过命令GetPDR获取到,其中数据存储在RecordData中,如下所示:
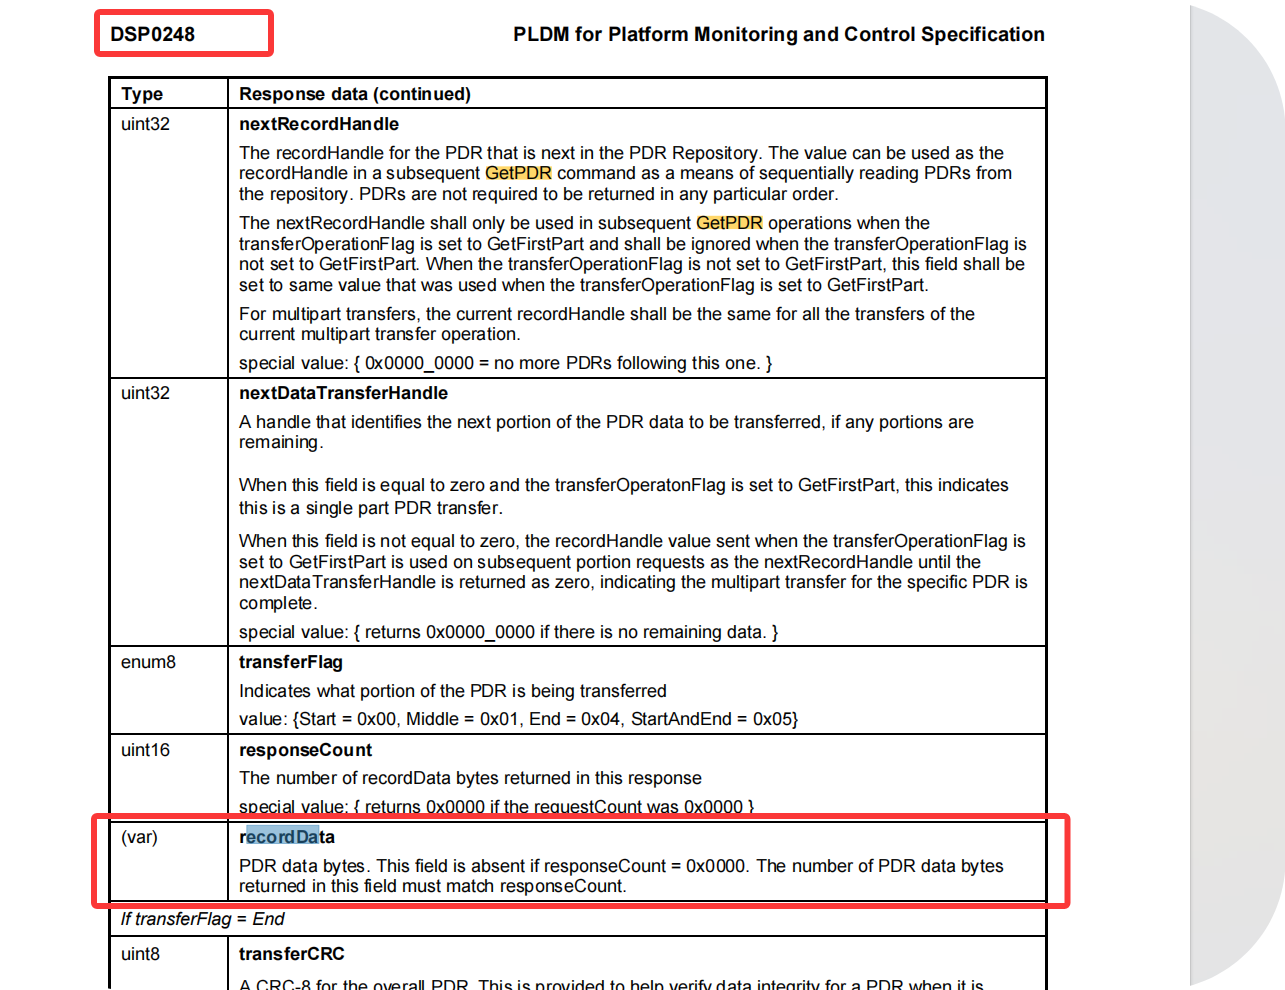
SensorId来自于PDR,格式如:
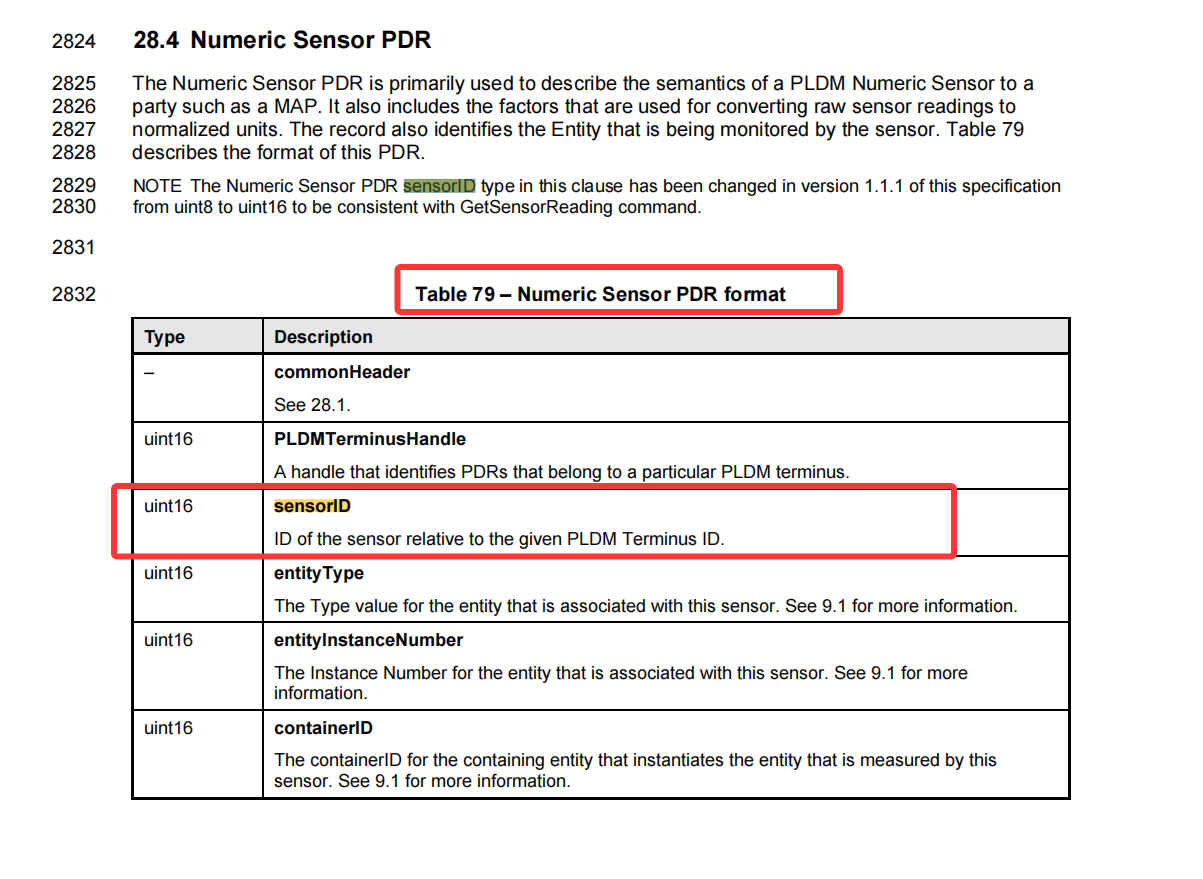
对应代码结构体:
/** @struct pldm_numeric_sensor_value_pdr**  Structure representing PLDM Numeric Sensor PDR*  Refer to: DSP0248_1.2.0: 28.4 Table 78*/
struct pldm_numeric_sensor_value_pdr {struct pldm_pdr_hdr hdr;uint16_t terminus_handle;uint16_t sensor_id;uint16_t entity_type;uint16_t entity_instance_num;uint16_t container_id;uint8_t sensor_init;bool8_t sensor_auxiliary_names_pdr;uint8_t base_unit;int8_t unit_modifier;uint8_t rate_unit;uint8_t base_oem_unit_handle;uint8_t aux_unit;int8_t aux_unit_modifier;uint8_t auxrate_unit;uint8_t rel;uint8_t aux_oem_unit_handle;bool8_t is_linear;uint8_t sensor_data_size;real32_t resolution;real32_t offset;uint16_t accuracy;uint8_t plus_tolerance;uint8_t minus_tolerance;union_sensor_data_size hysteresis;bitfield8_t supported_thresholds;bitfield8_t threshold_and_hysteresis_volatility;real32_t state_transition_interval;real32_t update_interval;union_sensor_data_size max_readable;union_sensor_data_size min_readable;uint8_t range_field_format;bitfield8_t range_field_support;union_range_field_format nominal_value;union_range_field_format normal_max;union_range_field_format normal_min;union_range_field_format warning_high;union_range_field_format warning_low;union_range_field_format critical_high;union_range_field_format critical_low;union_range_field_format fatal_high;union_range_field_format fatal_low;
} __attribute__((packed));
这里对应的应用场景即,某一款芯片如果采取的通信方式为mctp over pldm over i2c/pcie且支持温度读取,要么遍历整个PDR,获取其包含的SensorId,要么获取客户的手册文档,明确知道对应的SensorId.
3.RDE支持
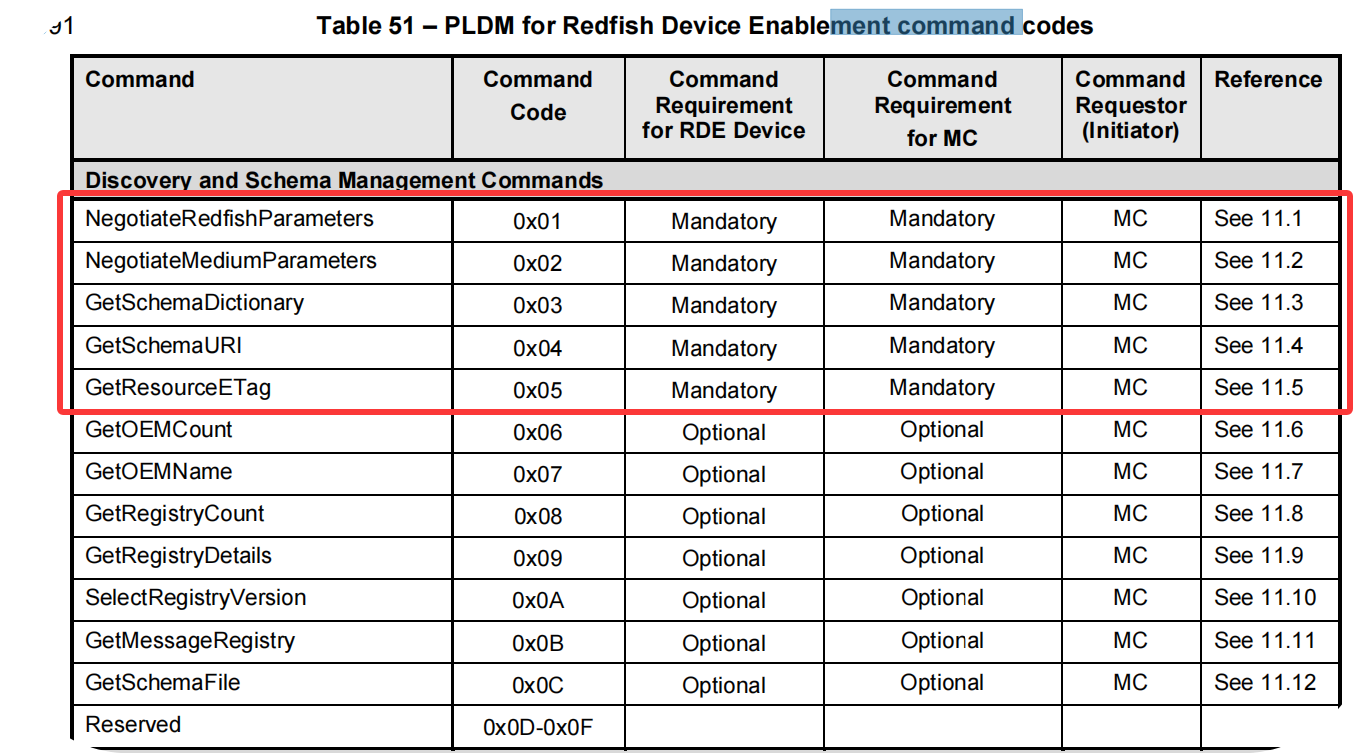
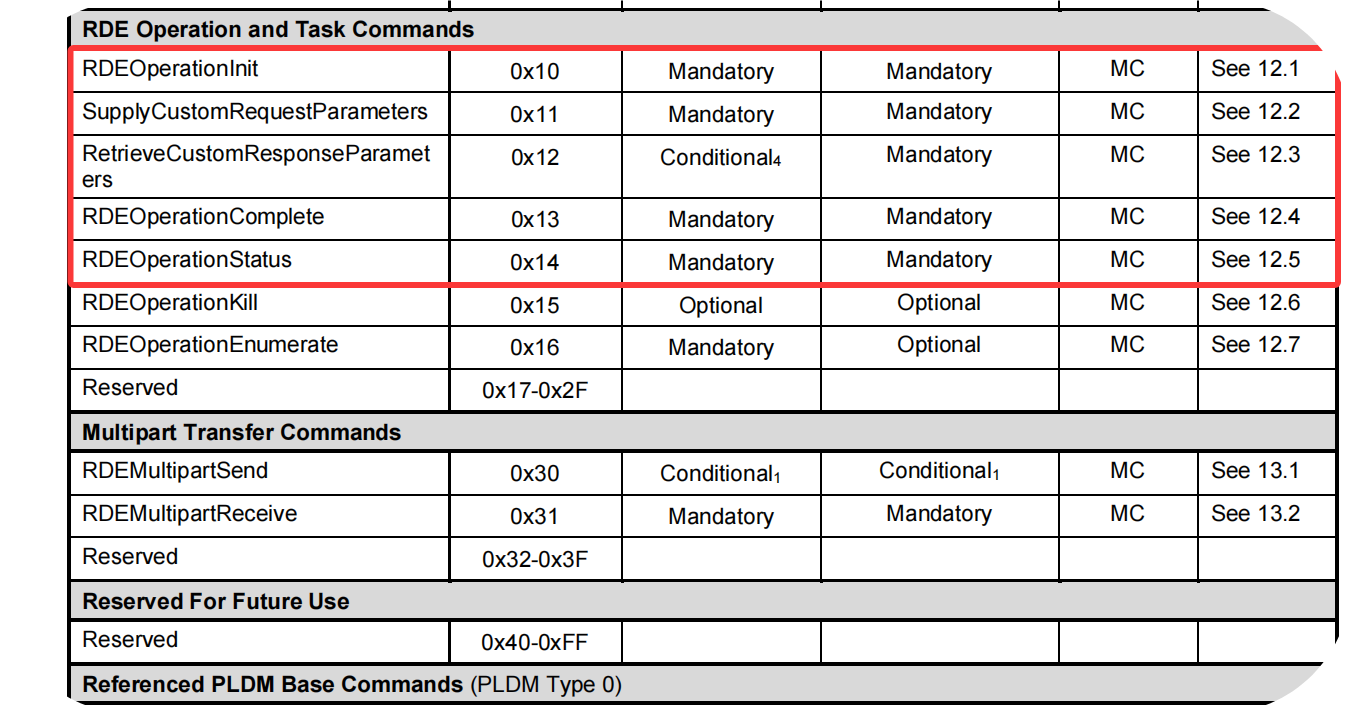
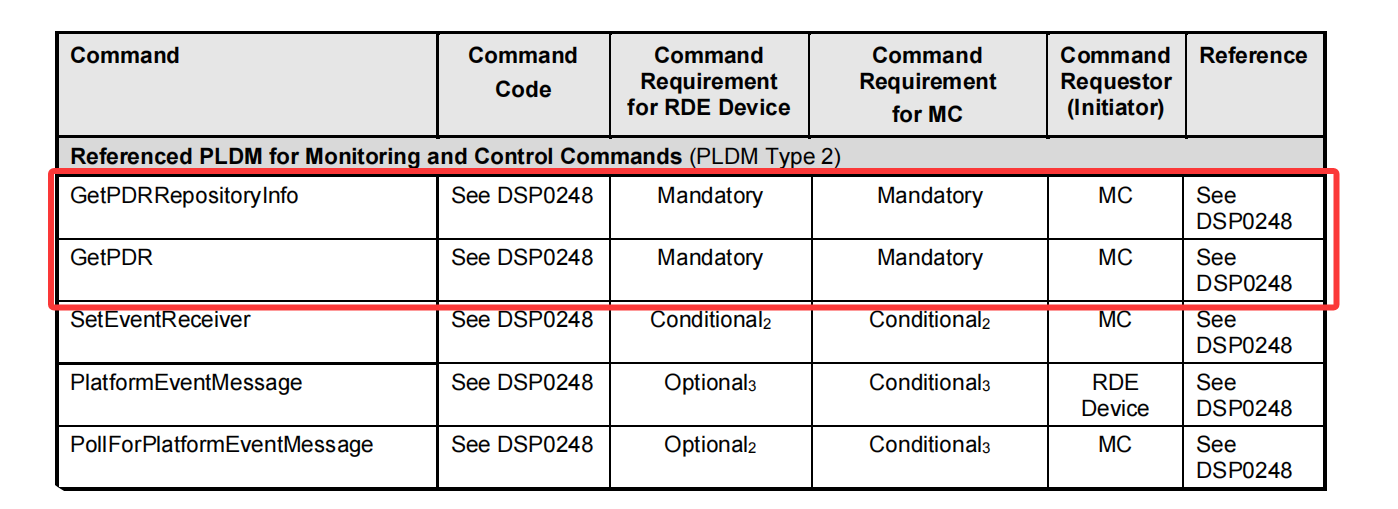
RDE即Platform Level Data Model (PLDM) for Redfish Device Enablement,需要分析文档:DSP0218_1.2.0.pdf内容。
3.1 支持的命令与基本的交互支持
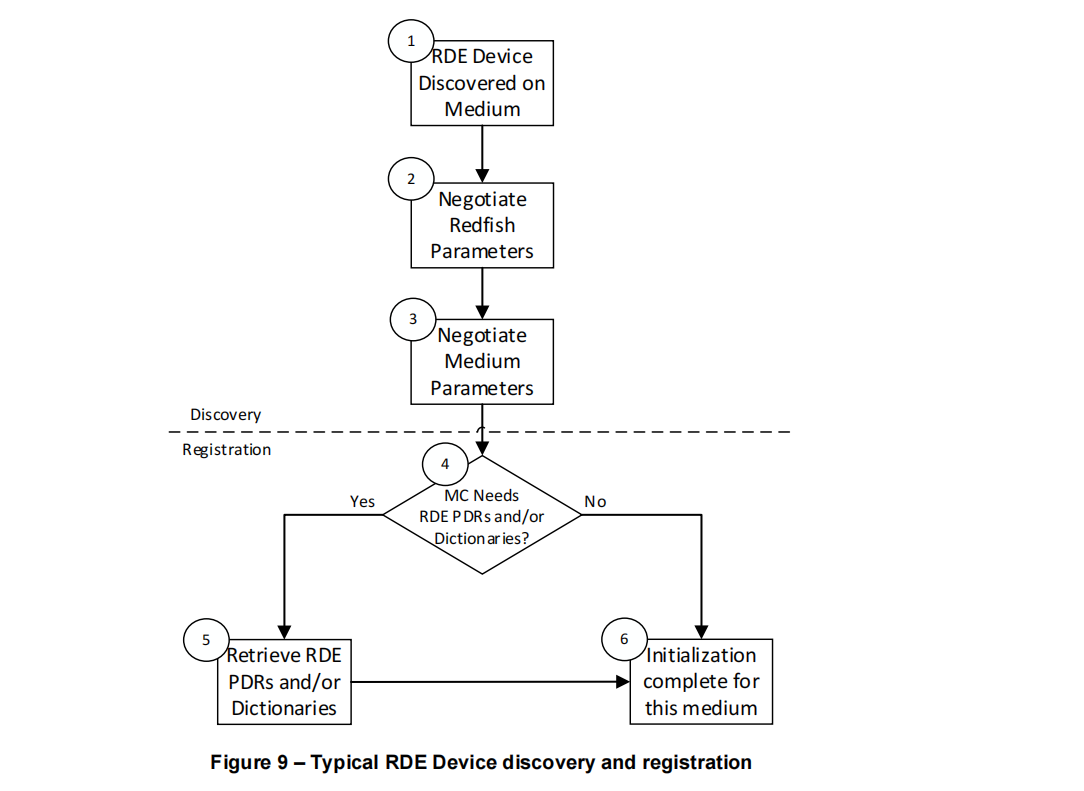
第一步是需要知道当前的RDE协议文档必须要实现的命令和大致的可选命令,了解大致的框架。
结合上图,查看最基本的一个交互数据获取流程:
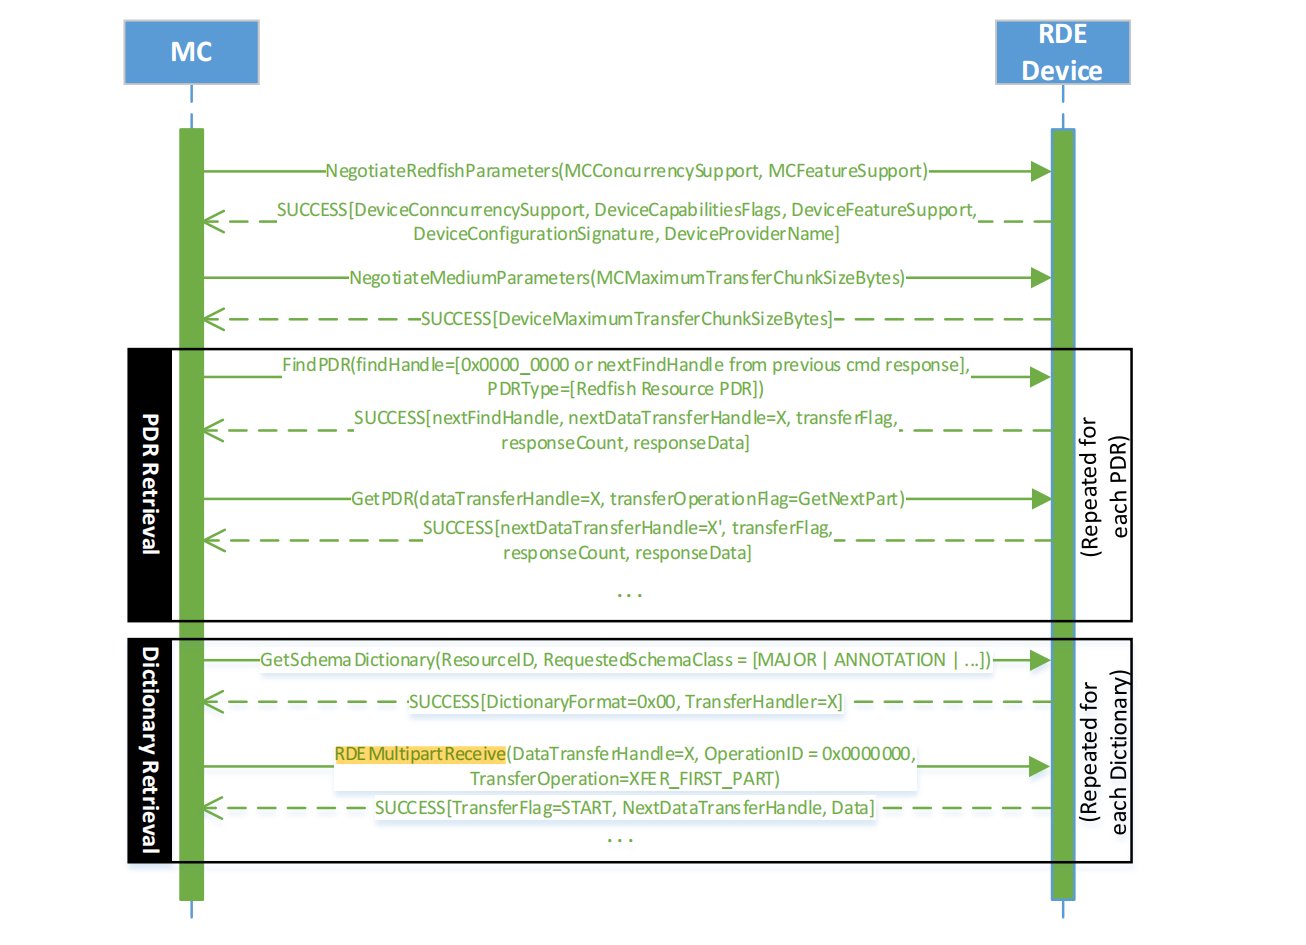
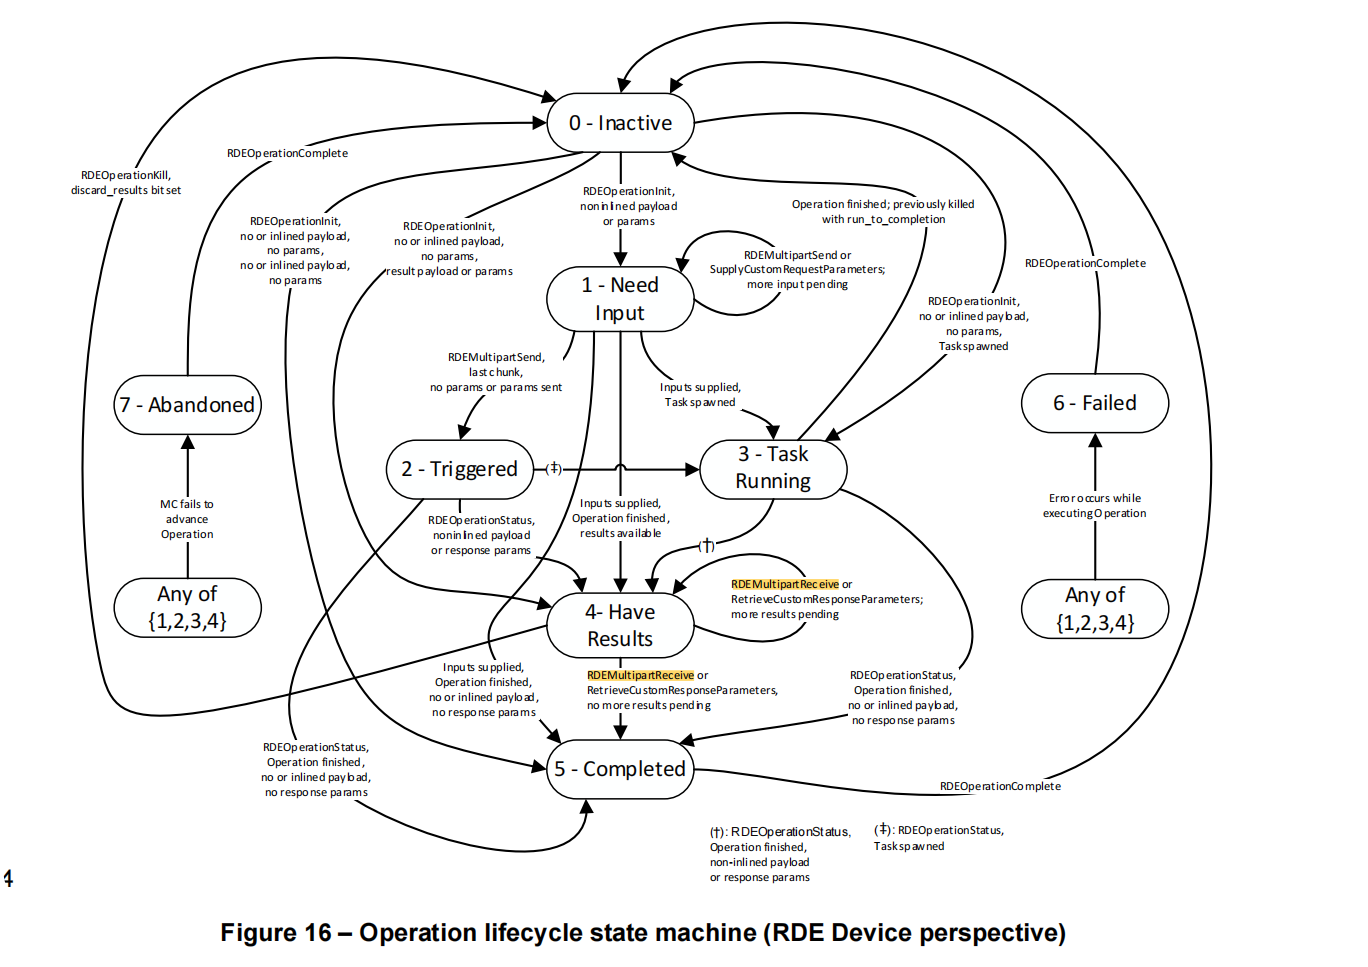
从设备端来讲,状态机如下所示:
3.2 GetPDR方法
在DSP0248.pdf中描述了命令格式:
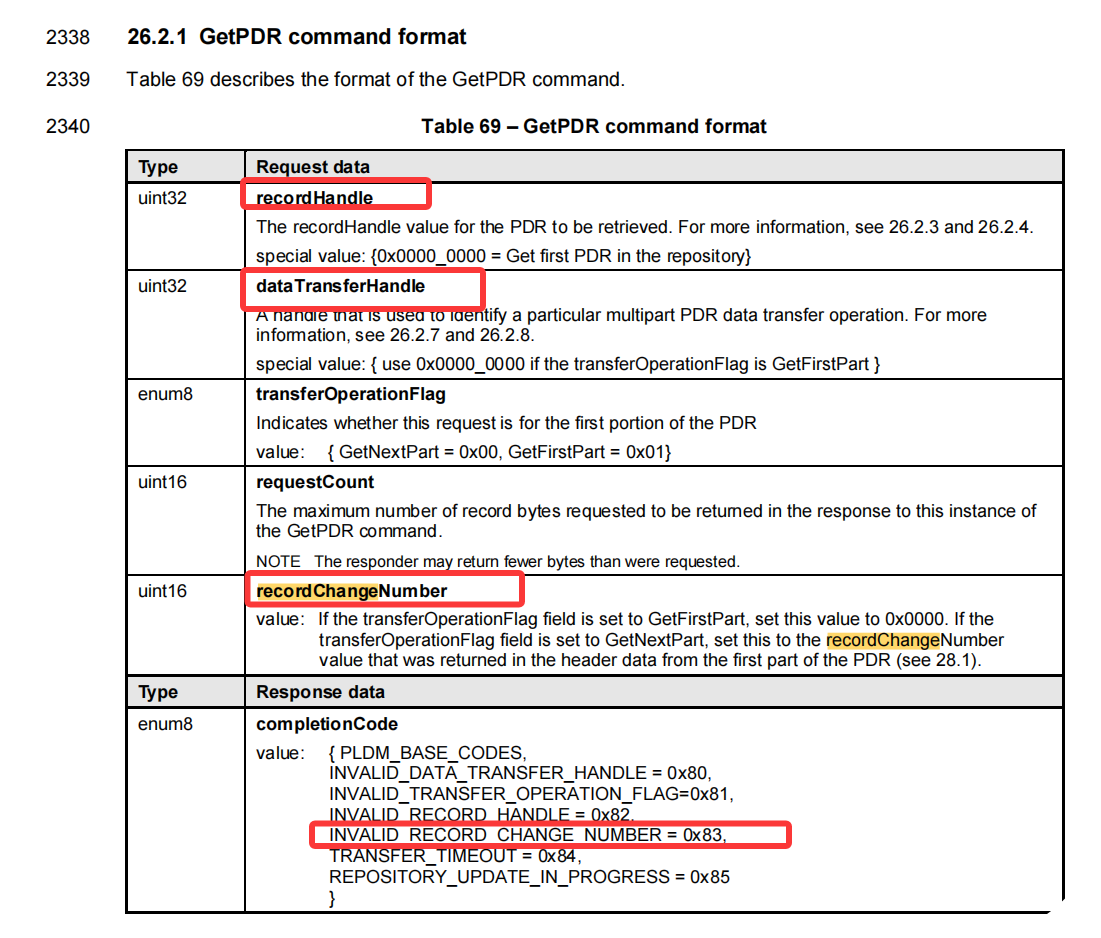
需要留意内容recordChangeNumber:
If the transferOperationFlag field is set to GetFirstPart, set this value to 0x0000. If the
transferOperationFlag field is set to GetNextPart, set this to the recordChangeNumber
value that was returned in the header data from the first part of the PDR (see 28.1).
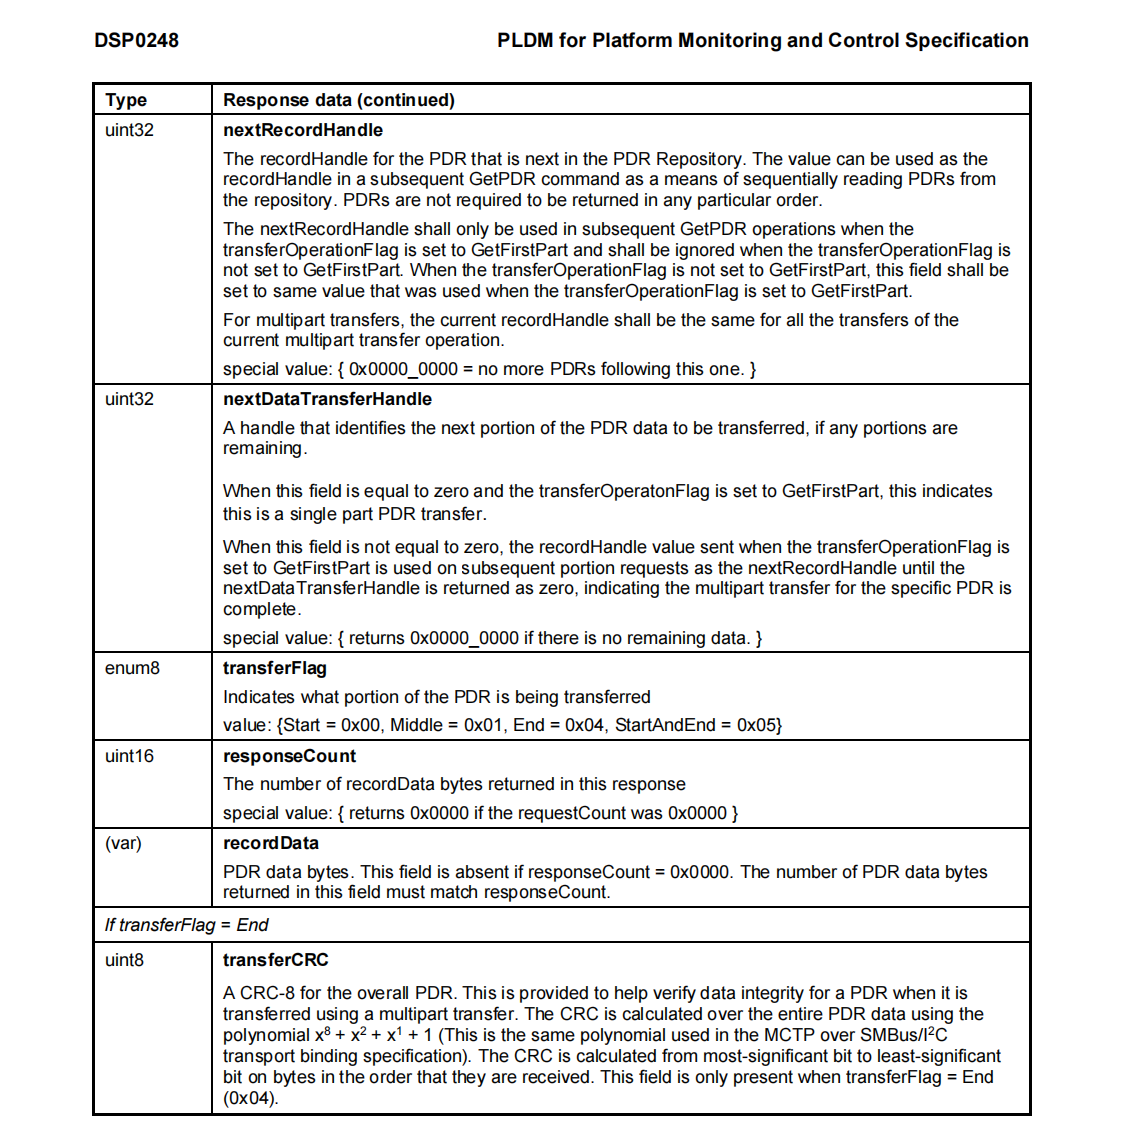
其值如果是使用的transferOperationFlag=GetFirstPart,就需要设置为0,如果transferOperationFlag=GetNextPart,值需要设置为first part of the PDR (see 28.1).也就是说,数据包形式有:Start = 0x00, Middle = 0x01, End = 0x04, StartAndEnd = 0x05,发送了第一条数据包后,将第一个数据包中的var(record Data):
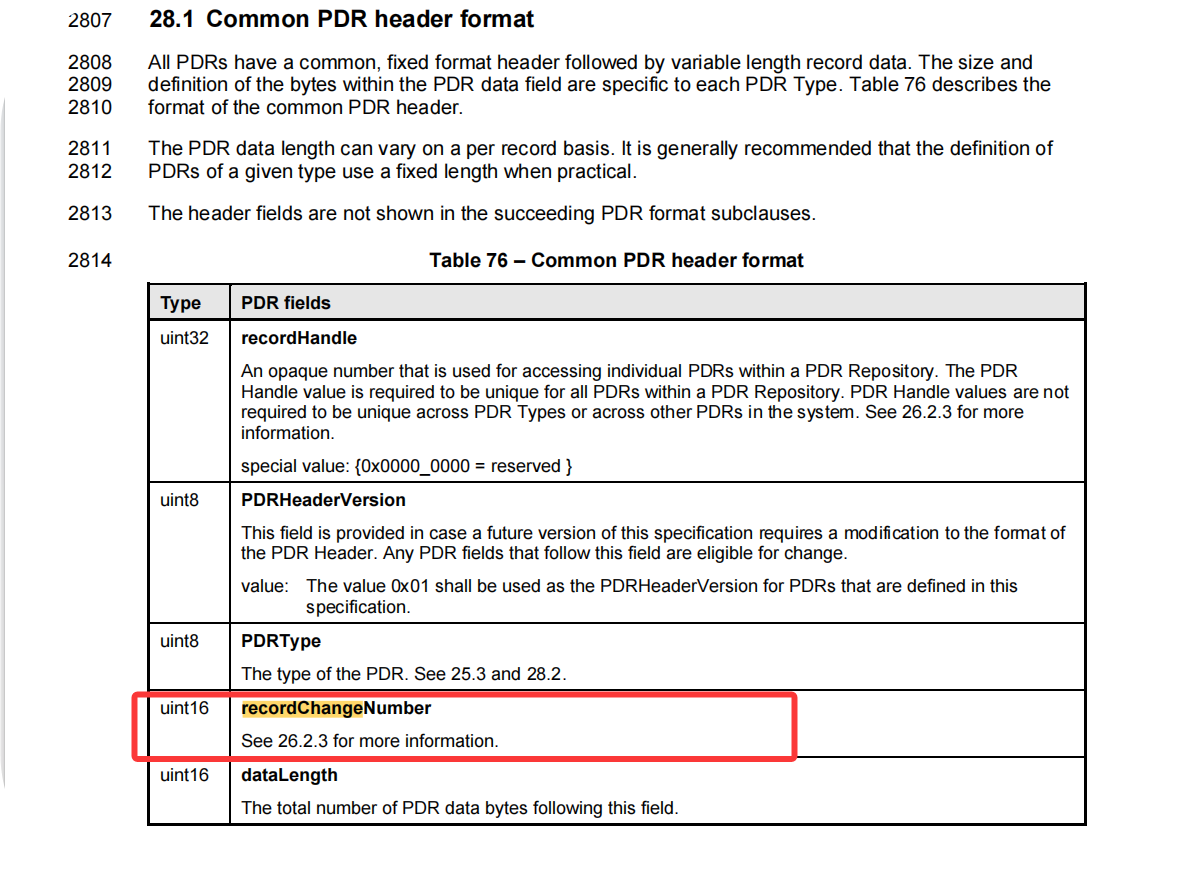
中的recordChangeNumber作为后续包的值。
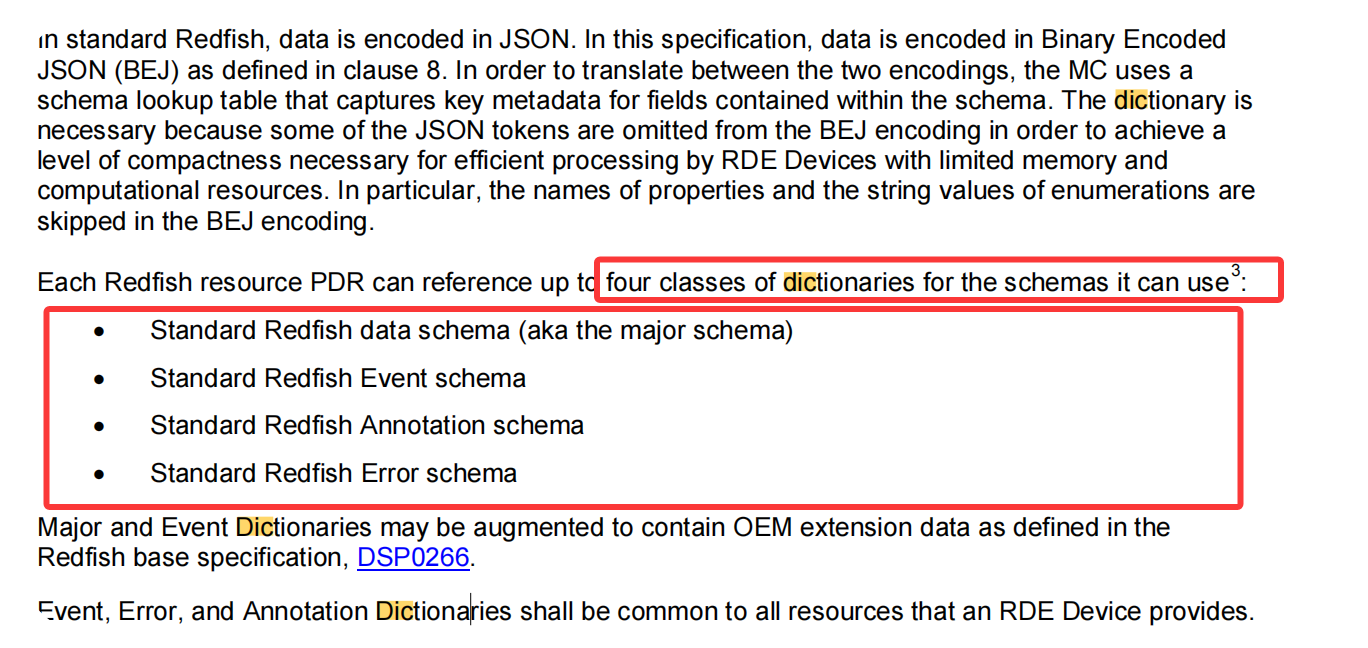
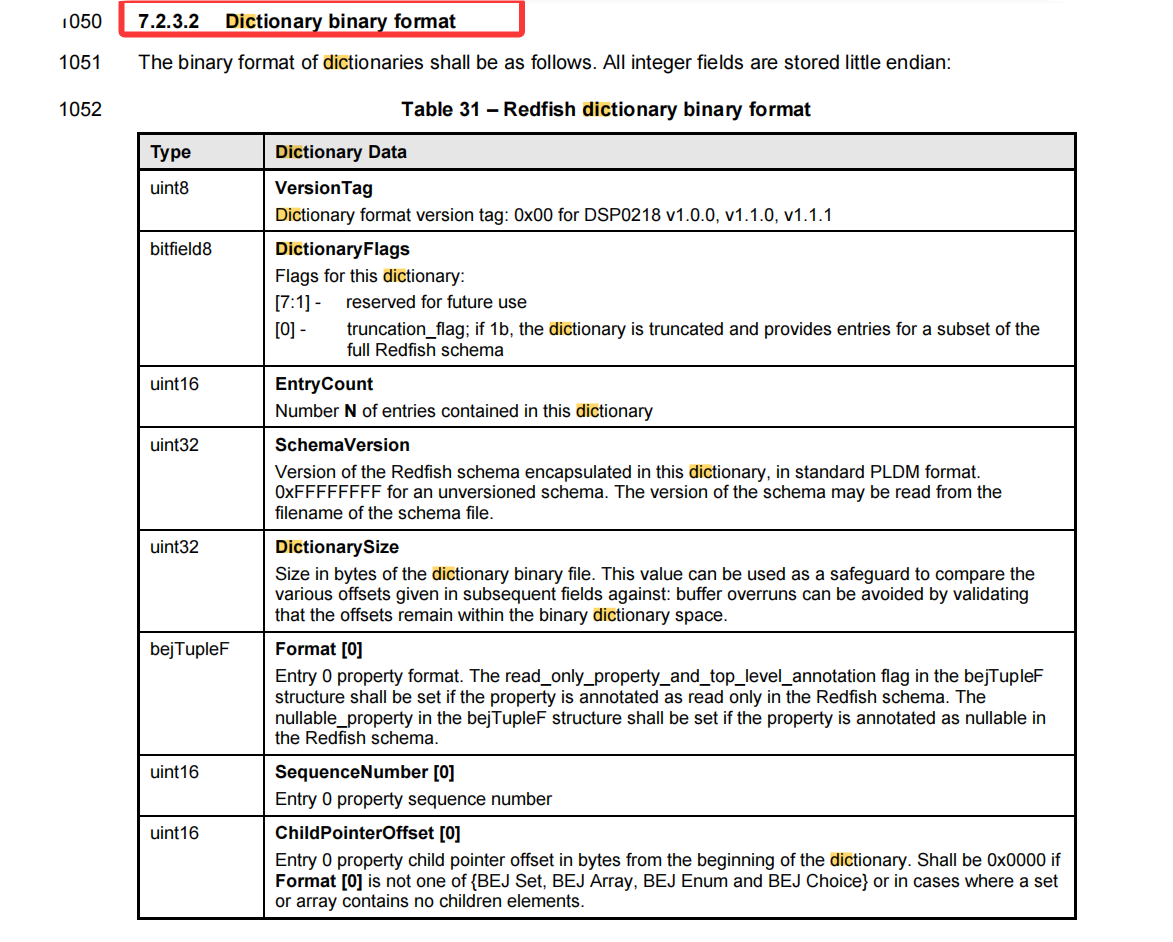
3.3 字典
RDE简单说就是使用redfish(json)格式与设备端进行交互。但是使用json(字符串格式)与设备端交互就会显得数据浪费,因此,需要将数据格式进行转换:json字符串 <----> binary。
以spec中的内容举例分析:
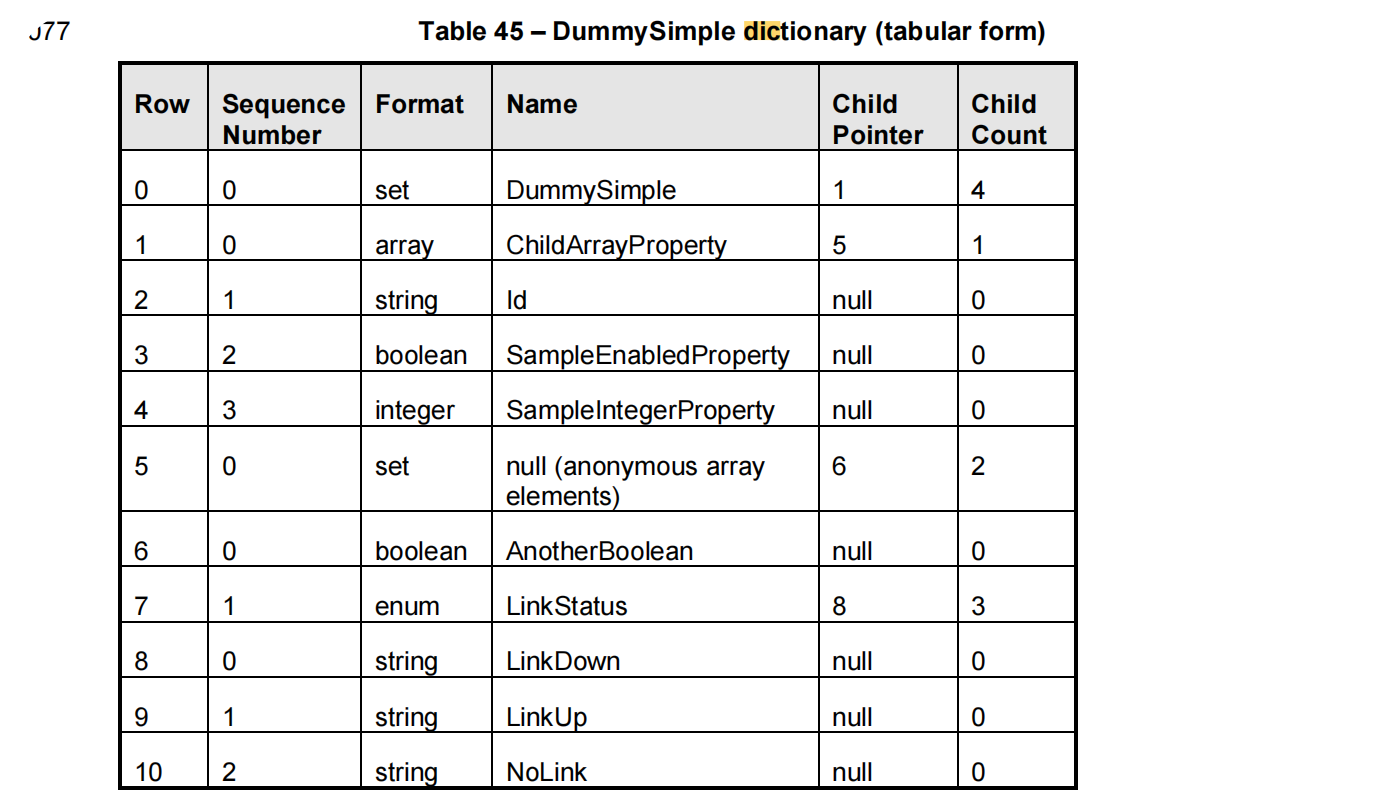
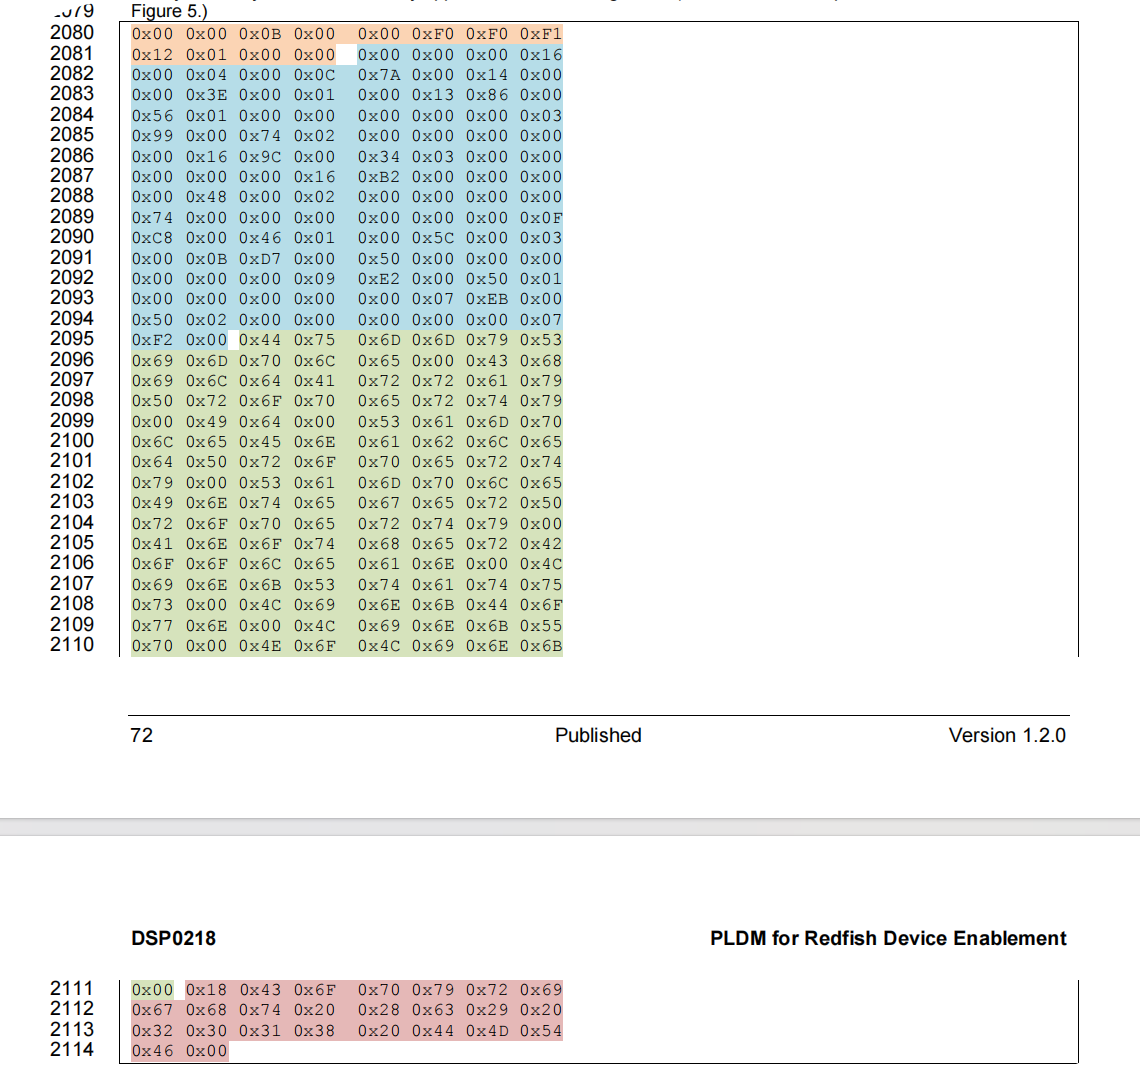
以上数据内容,需要使用下表执行内容解释:
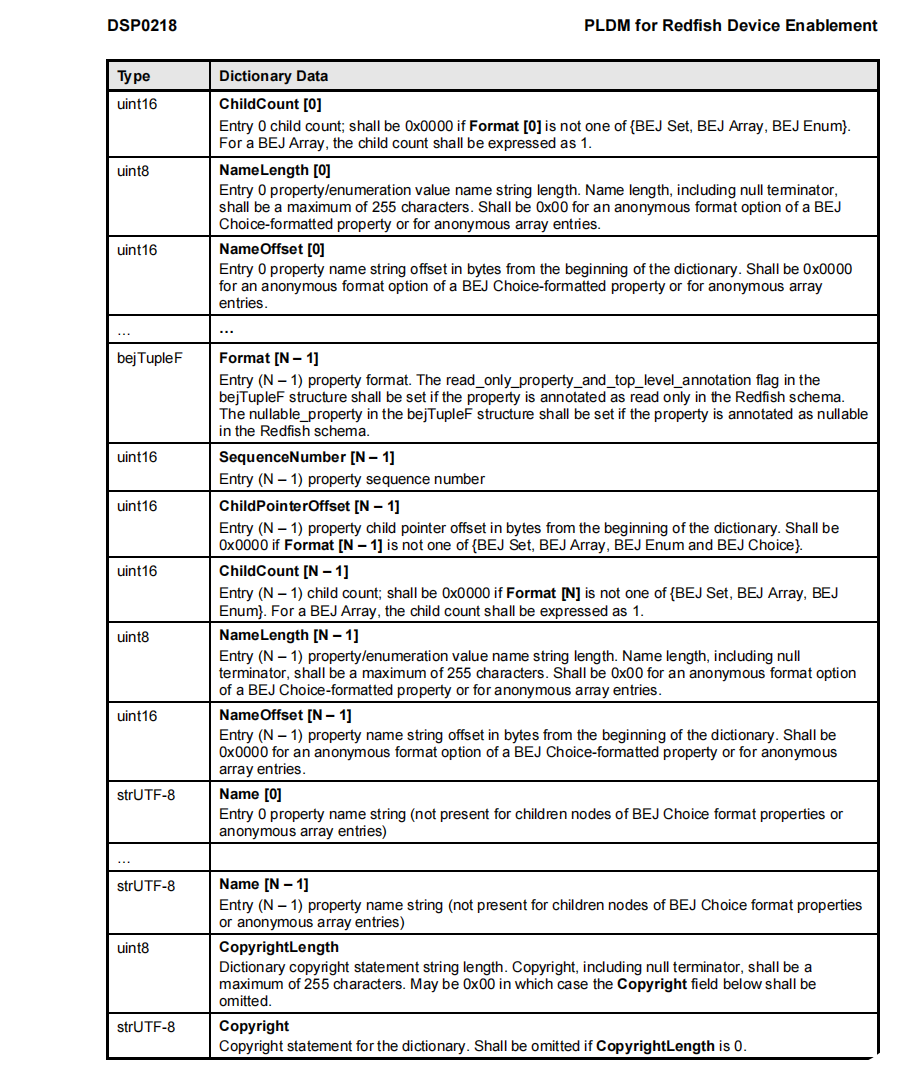
上面数据内容中,有一个bejTupleF格式,
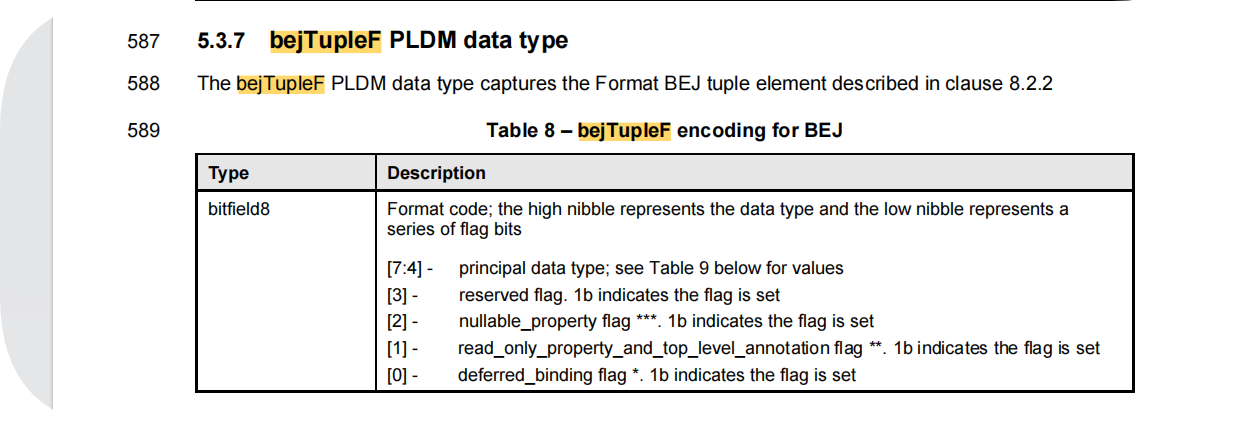
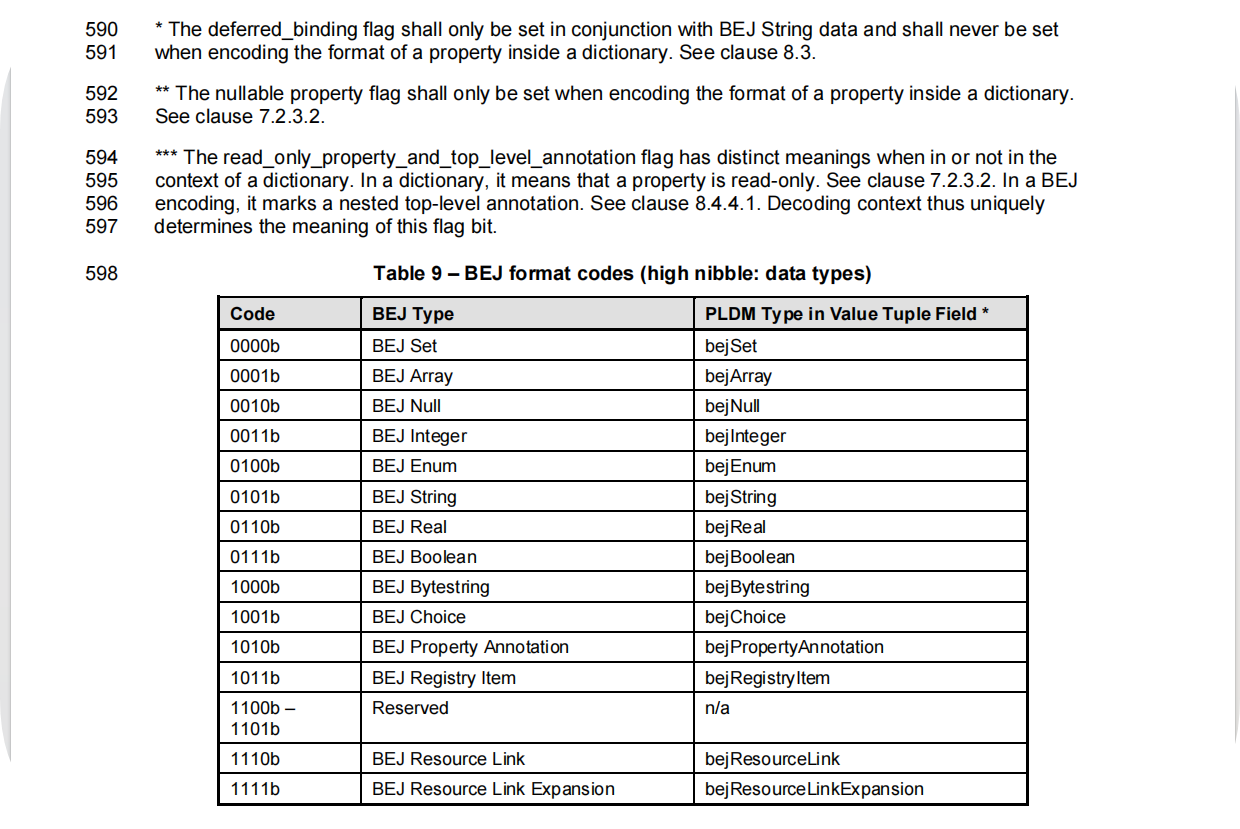
编解码方法… To be continued…